Data Quality Components for SSIS/ADF FAQs#
Compatibility and Support#
SQL Server 2016 is supported until February 2, 2027, after which it will be deprecated.
While components for deprecated SQL Server versions may still be included in the SSIS installation, these platforms do not receive new features, updates, or full technical support.
Officially Supported by Melissa#
SQL Server Version |
Visual Studios Version Links |
|
|---|---|---|
Microsoft SQL Server 2022 |
Microsoft Visual Studio 2022 |
|
Microsoft SQL Server 2019 |
Microsoft Visual Studio 2019 |
|
Microsoft SQL Server 2017 |
Microsoft Visual Studio 2017 |
|
Microsoft SQL Server 2016 |
Microsoft Visual Studio 2015 |
|
Microsoft SQL Server 2014 |
Microsoft Visual Studio 2013 |
Deprecated 08/10/2026 |
Microsoft SQL Server 2012 |
Microsoft Visual Studio 2010/2012 |
Deprecated |
Common Issues#
Invalid Permissions#
Insufficient privileges can prevent a project from successfully performing file operations at runtime. This issue is often related to the application’s permission level, so it is necessary to ensure that the program has the required permissions to write to any specified directories for successful task completion.
These errors can be accompanied by a 0x80004005 code.
Solution: Right-click on the program’s shortcut and select “Run as administrator.”
Data File Errors#
Outdated or missing data files can cause various error messages when using the On-Premise processing mode in the Contact Verify component. The underlying binaries expect all data files to be present in the designated directory, and the component will not function properly if there are any discrepancies.
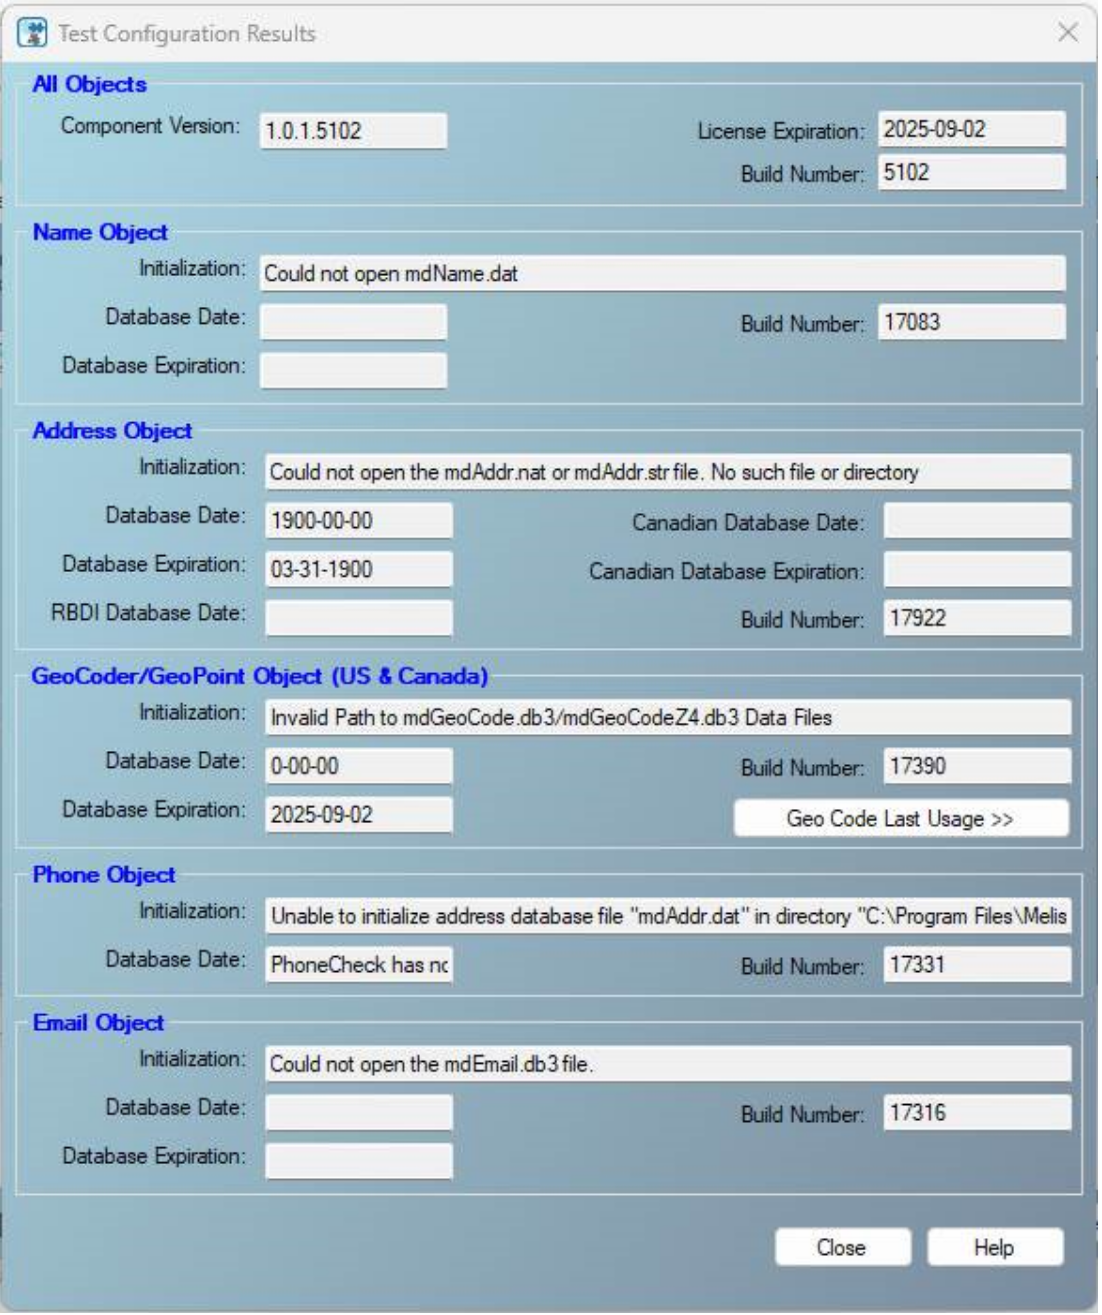
(Note: The error you encounter might differ from the examples shown here.)
Cause: Various issues can occur with data files for the Contact Verify Component, such as an incorrect path to the data files path or outdated/missing data files.
Solution: Follow these steps to ensure the configuration is correct:
Step 1: Check for Required Data Files: Ensure you have all the necessary data files for each on-premise object. The required files can be found here:
Step 2: Verify Data File Path Configuration: Confirm the Data File Path points to the correct location. By default, this path is C:\Program Files\Melissa DATA\DQT\Data.
Step 3: Update Outdated Data Files: If the data files exist and the Data File Path is configured correctly but errors persist, your data files might be outdated. Consider the following actions:
Option 1: Run the Full On-Premise SSIS Installer
SSIS builds are released quarterly. You should receive emails from the sales rep with download links for the latest installer. Running this will update the data files.
If you aren’t receiving these emails, please contact your Sales Rep or our Tech Support.
Option 2: Download Data Files Manually
Use Melissa’s Releases page to download the latest data files using your License String. Links for each object:
Name Object -
https://releases.melissadata.net/browse?MFT=dq_name_data&RELEASE=latest&ID={YourLicense}Address Object -
https://releases.melissadata.net/browse?MFT=dq_addr_data&RELEASE=latest&ID={YourLicense}GeoCoder/GeoPoint Object -
https://releases.melissadata.net/browse?MFT=geocoder_data&RELEASE=latest&ID={YourLicense}Phone Object -
https://releases.melissadata.net/browse?MFT=dq_phone_data&RELEASE=latest&ID={YourLicense}Email Object -
https://releases.melissadata.net/browse?MFT=dq_email_data&RELEASE=latest&ID={YourLicense}
Option 3: Download Data Files Automatically
Use the Melissa Updater, which checks for missing/outdated files and automatically downloads and replaces them.
Memory Allocation Errors#
The size of the buffers allocated for the data flow will significantly impact the performance of an SSIS project. Larger buffers allow more data to be loaded into memory at once, while smaller buffers help manage memory consumption. Both configurations can enhance speed and functionality, so finding the optimal buffer size for a specific system is crucial.
Messages relating to memory errors may resemble:
“A buffer failed while allocating…”
“The Data Flow task failed to create a buffer to call PrimeOutput…”
Solution: There are three properties that can be used to modify the data flow’s buffers and mediate memory allocation issues.
DefaultBufferMaxRows- This represents the maximum number of rows a buffer can hold before being processed and moved to the next component in the data flow.DefaultBufferSize- This value sets the maximum number of bytes in a buffer.AutoAdjustBufferSize- When set to True, this will dynamically adjust buffer size at runtime based on the system’s available memory and the amount of data being processed.
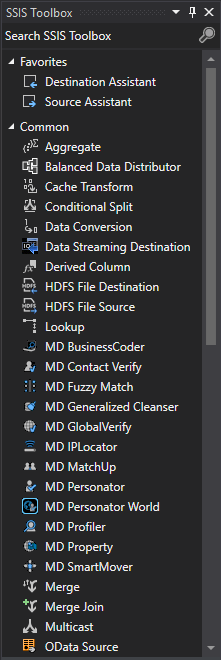
Missing Components#
If Melissa’s components do not appear in the SSIS Toolbox after a successful installation, there may be a mismatch between the Target Server Version configured in SSIS and the version of SQL Server used in the target environment on the system.
SSIS Setting Target Server Version Option#
In Visual Studio, verify that the Target Server Version option is set to the corresponding SQL Server instance on the machine.
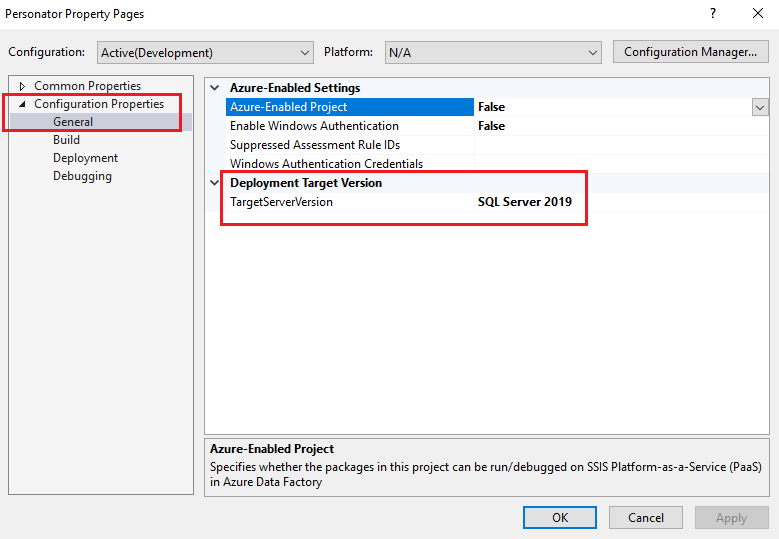
To set the Target Server Version, in Visual Studio’s Solution Explorer, right click on the SSIS project Node and click Properties
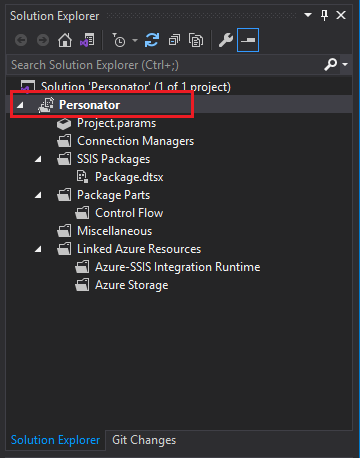
Select Configuration Properties. You will see the Target Server Version; select the desired version of SQL Server.
Once set, the project will reload. Double click the .dtsx package in the Solution Explorer menu and our SSIS components should appear in the SSIS Toolbox.
Public Key Token Errors#
A mismatch between an SSIS project’s Public Key Token and the target SQL Server version can cause errors related to the Public Key Token, which may prevent the successful execution of the project.
Messages related to Public Key Token errors may resemble:
“Public Key Token could not be loaded.”
“Could not load file or assembly…”
SSIS How to Update Public Key Token#
In order to update your existing projects to a newer version of SQL Server, you will need to edit the PublicKeyToken in the code designer page.
Before starting this process we recommend obtaining a list of all the components that utilize PublicKeyToken in the OLD projects.
Updating the PublicKeyToken in Existing Projects
Warning
Please back up the original project file before starting.
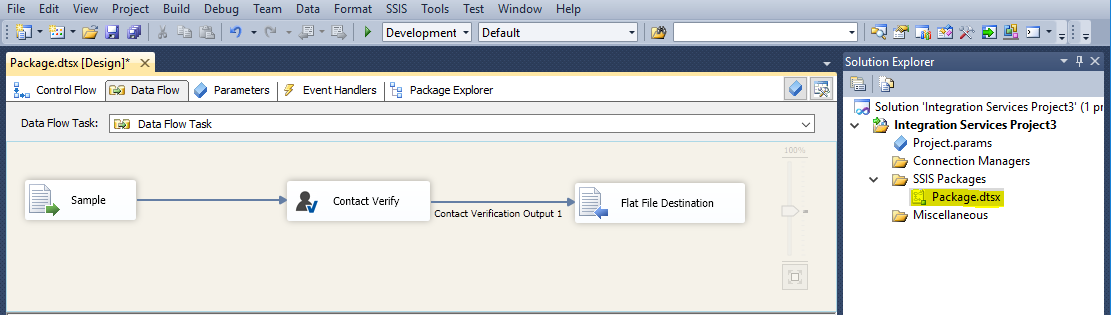
Locate the
Package.dtsxby going to View > Solution Explorer.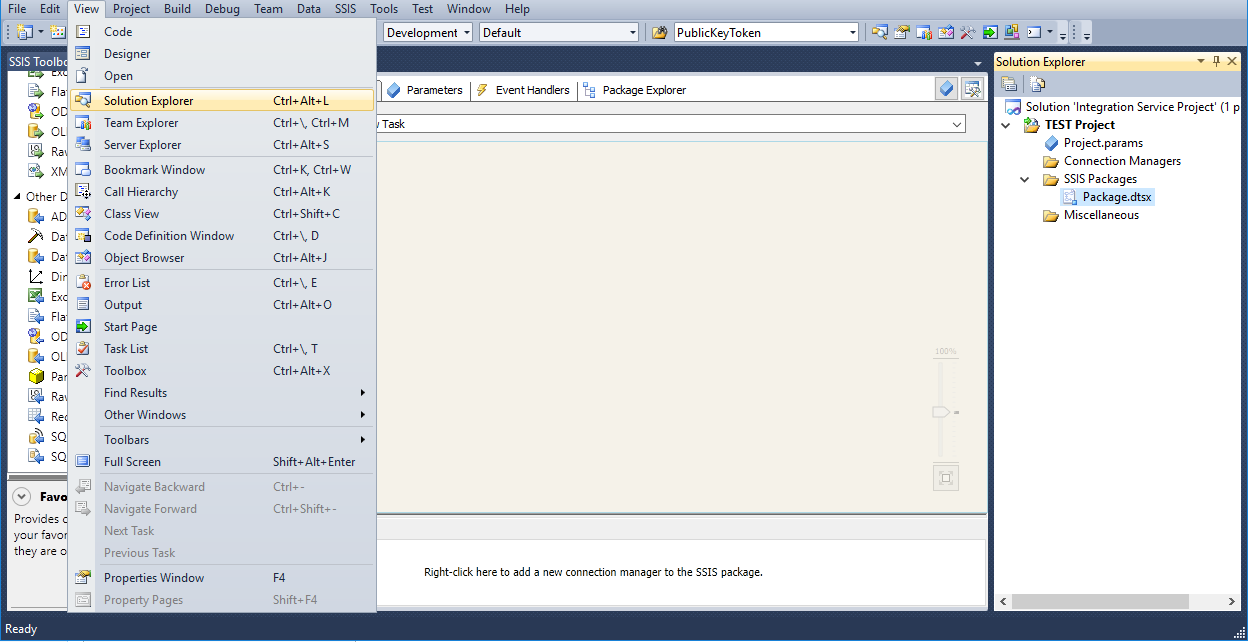
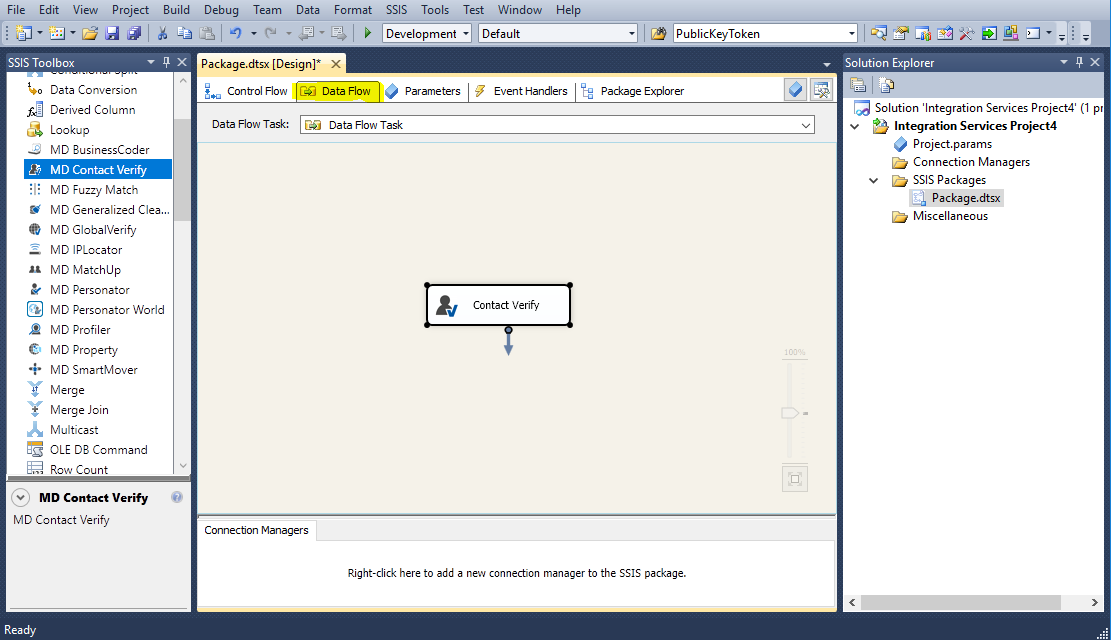
Go to the Data Flow tab and drag a NEW component from the SSIS Toolbox in order to get the NEW PublicKeyToken.
Right click the
Package.dtsxon the right side in the Solution Explorer and click View Code (or alternatively hit F7). The following window should come up: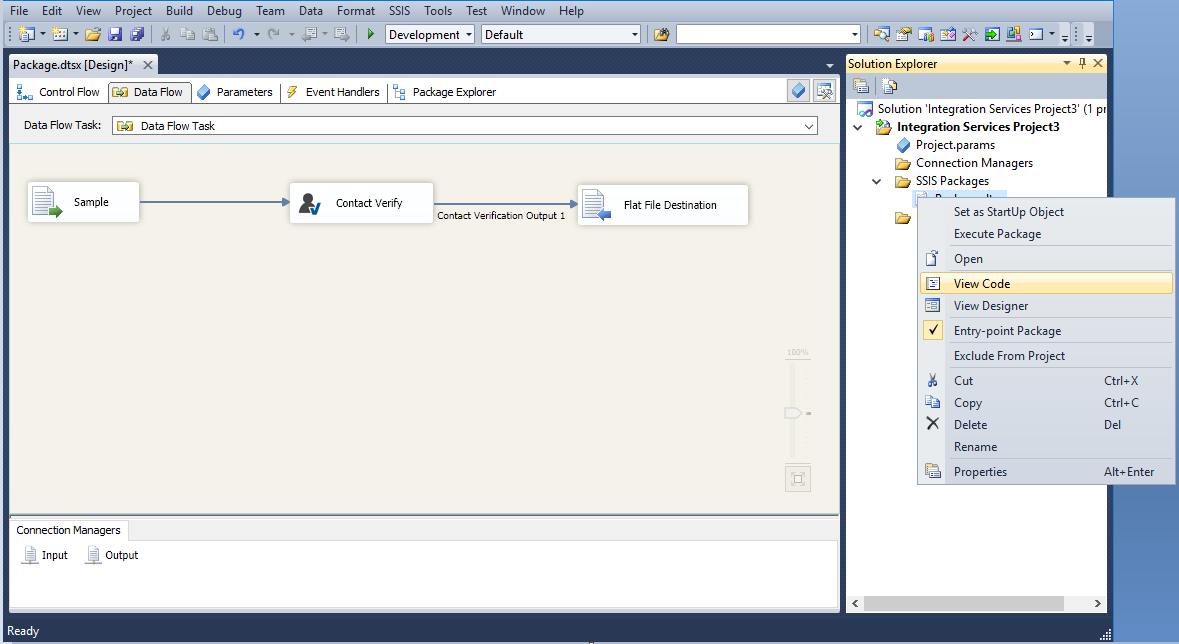
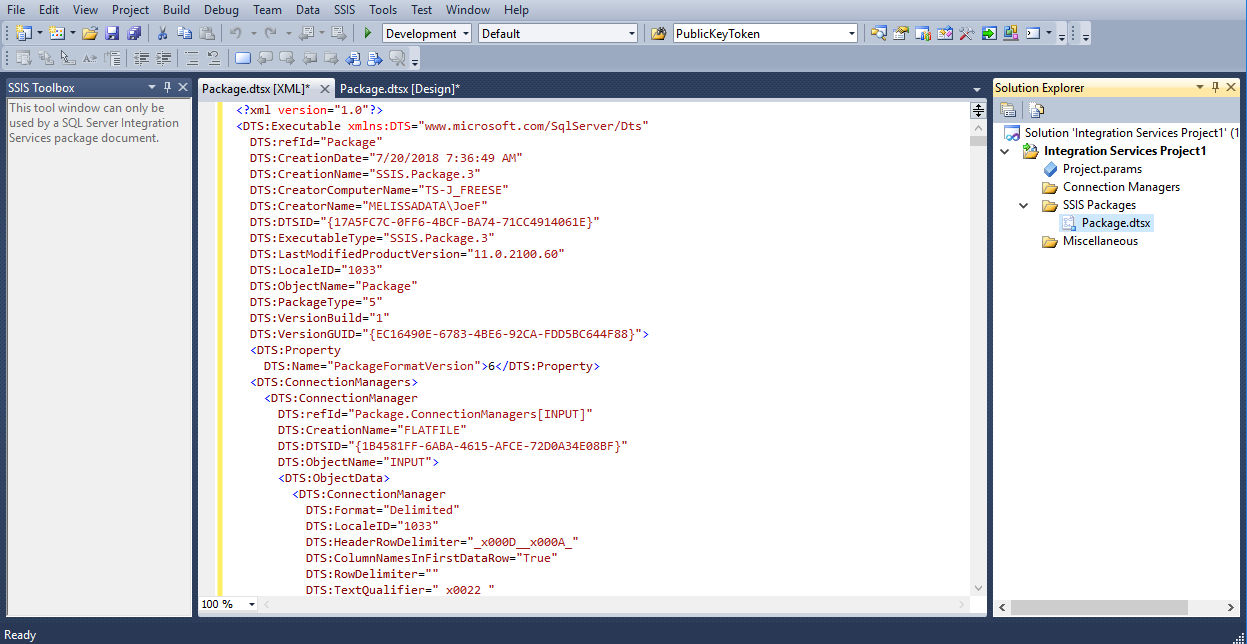
Press
CTRL+Fto open the Find and Replace window. TypePublicKeyTokenin the Find what: field and click Find Next to locate and copy the NEW token value to wordpad. Save this token, it will be used to update the older projects experiencing the issue. (Ex. PublicKeyToken=aa80e80ec340a80c)
Open the old project to be updated in Visual Studio.
Right click
Package.dtsxon the right side under the Solution Explorer and click View Code.
Use
Ctrl+Fto search for PublicKeyToken in the project to be updated.
Once it is found, paste the NEW PublicKeyToken that was collected in step 4, in place of the existing one. Save the project. Now the PublicKeyToken has been updated. (Save, close, and then reopen.)
Data Quality Components for SSIS#
What is affected during an install or upgrade?#
By default the data is stored at this path: C:\Program Files\Melissa DATA\DQT\Data
Sample Projects is located
C:Program FilesMelissa DATADQTDQSSamples
Copy of Component DLLS:
C:Program FilesMelissa DATADQTDQSSSIS_2014
C:Program FilesMelissa DATADQTDQSSSIS_2016
C:Program FilesMelissa DATADQTDQSSSIS_2017
C:Program FilesMelissa DATADQTDQSSSIS_2019
C:Program FilesMelissa DATADQTDQSSSIS_2022
Note: Older versions (SSIS 2012 and earlier) are deprecated.
Object DLLS:
C:Program FilesMelissa DATADQTDQS32_bit
C:Program FilesMelissa DATADQTDQS64_bit
Copy of Config Files:
C:Program FilesMelissa DATADQTDQSConfig
Affected During Update or Install:
Component Pipeline DLLs:
C:Program FilesMicrosoft SQL ServerXXXDTSBinn
C:Program Files (x86)Microsoft SQL ServerXXXDTSBinn
Note: “XXX” refers to the SQL Server version number (e.g., 120 = 2014, 130 = 2016, 140 = 2017, 150 = 2019, 160 = 2022). Please use the path corresponding to your installed version.
Active Config Used by SSIS:
C:ProgramDataMelissa DATA
MatchUp Data Files and Configurations:
C:ProgramDataMelissa DATAMatchUP
mdMatchup.mcstores your matchcode and will not be overwritten if one existsYou can copy this file to a new install to transfer matchcodes
How come I can’t process less than 100 records for SmartMover NCOA?#
USPS regulations state we cannot process NCOA for files less than 100 records. In adherence to the new regulations, SmartMover now checks the first batch to see if it contains less than 100 records. If the batch is less than 100 records we will reject the batch and return an error message. SmartMover will interrupt the processing after processing begins. Please contact your sales representative if you have any questions or concerns regarding this change.
Can we save current settings for DQC for future?#
Yes, Melissa SSIS includes the feature that you can save currents settings for future use. Under File Tab you can save current setting in a .cfg file in local your drive. Under same File tab click “Open” and upload the .cfg file.
How can I update an individual Melissa object instead of updating the entire Contact Verify component?#
The Contact Verify component installs all Melissa object DLLs in the DTSPipelineComponents folder of your SQL Server installation. If you only need to update a specific object (for example, Address, Email, or GeoCoder), you can replace the corresponding DLL file without reinstalling the entire component.
To do this:
Locate your SQL Server SSIS installation path:
C:\Program Files\Microsoft SQL Server\<version>\DTS\PipelineComponentsReplace the specific DLL with the updated version:
Address Object →
mdAddr.dllEmail Object →
mdEmail.dllGeoCoder Object →
mdGeo.dll(and similarly for other objects)
Note:
<version>corresponds to your SQL Server version (e.g., 100 = 2008, 110 = 2012, 130 = 2016, 150 = 2019, 160 = 2022).
This allows you to update individual Melissa objects without performing a full Contact Verify reinstall.
Data Type Conversions#
Conversion chart of SSIS data types to SQL Server data types
SSIS Data Type |
SSIS Expression |
SQL Server |
|---|---|---|
single-byte signed integer |
(DT_I1) |
|
two-byte signed integer |
(DT_I2) |
smallint |
four-byte signed integer |
(DT_I4) |
int |
four-byte signed integer |
(DT_I4) |
int |
eight-byte signed integer |
(DT_I8) |
bigint |
eight-byte signed integer |
(DT_I8) |
bigint |
float |
(DT_R4) |
real |
double-precision float |
(DT_R8) |
float |
string |
(DT_STR, «length», «code_page») |
char, varchar |
Unicode text stream |
(DT_WSTR, «length») |
nchar, nvarchar, sql_variant, xml |
date |
(DT_DATE) |
date |
Boolean |
(DT_BOOL) |
bit |
numeric |
(DT_NUMERIC, «precision», «scale») |
decimal, numeric |
decimal |
(DT_DECIMAL, «scale») |
decimal |
currency |
(DT_CY) |
smallmoney, money |
unique identifier |
(DT_GUID) |
uniqueidentifier |
byte stream |
(DT_BYTES, «length») |
binary, varbinary, timestamp |
database date |
(DT_DBDATE) |
date |
database time |
(DT_DBTIME) |
|
database time with precision |
(DT_DBTIME2, «scale») |
time(p) |
database timestamp |
(DT_DBTIMESTAMP) |
datetime, smalldatetime |
database timestamp with precision |
(DT_DBTIMESTAMP2, «scale») |
datetime2 |
database timestamp with timezone |
(DT_DBTIMESTAMPOFFSET, «scale») |
datetimeoffset(p) |
file timestamp |
(DT_FILETIME) |
|
image |
(DT_IMAGE) |
image |
text stream |
(DT_TEXT, «code_page») |
text |
Unicode string |
(DT_NTEXT) |
ntext |
Component Specific FAQ & Optimizations#
SSIS Component |
FAQ |
|---|---|
Matchup |
Basics: Advanced: |
Contact Verify |
|
Personator |
|
Profiler |
|
Global Verify |
|
SmartMover |
|
IP Locator |
|
Property |
|
Business Coder |
SSIS Install Other Than C: Drive#
If you want to install your SQL Server to a path other than the default C: drive, follow this guide.
Open Command Prompt as Administrator.
Navigate (cd) to where the installer is located on your machine.
Type the installer name along with the command
/NoDetectSSISExample:
.\setup-web.exe /NoDetectSSIS
Once the installer appears, accept the agreement and click Next.
Select which version of SQL Server Integration Services is installed.
Select the SSIS root directory. Here you can modify where to install SSIS.
Enter your license string, and then select the components you want installed.
SSIS Service Speed#
Melissa’s SSIS enterprise components can process hundreds of thousands of records per hour. Performance depends on whether you are using Cloud or On-Premise processing, as well as several key factors:
Major Factors#
Threads / Parallelism
Cloud components support multiple concurrent requests (recommended: up to 10 threads).
For on-premise, use multiple component instances with a Balanced Data Distributor to increase throughput.
Input Method
Using Melissa Address Key (MAK) is fastest
Structured fields (Address, City, State) perform better than free-form input
Data Quality
Poor-quality data requiring correction or standardization will slow processing
Output Columns & Options
Requesting more fields, options, or actions reduces speed due to additional processing
Premium Mode (Phone/Email)
Slower due to real-time validation for higher accuracy
SSIS Input Source
OLE DB and Flat File sources typically provide better performance
Data Flow Buffer Settings
(
DefaultBufferMaxRows, DefaultBufferSize) should be tuned based on environment and input speed
Execution Method
Running via SQL Server Agent or Command Prompt is faster than Visual Studio due to reduced overhead
On Premise Components#
Speeds will vary due to hardware differences; higher speeds may be achieved with multiple instances of on-premise components.
SSIS Component |
Throughput (records / hour) |
|---|---|
Contact Verify – Name, Address, Phone, Geo, Email (Express) |
500,000 – 600,000 |
Generalized Cleanser |
9,000,000 – 12,000,000 |
MatchUp (Basic Match Code) |
3,000,000 – 5,000,000 |
Profiler |
800,000 – 1,250,000 |
Cloud Processing Components#
SSIS Component |
Throughput (records / hour) |
|---|---|
Contact Verify – Name, Address, Phone, Geo, Email (Express) |
90,000 – 160,000 |
Contact Verify – Name, Address, Phone, Geo, Email (Premium) |
50,000 – 70,000 |
Personator |
|
SmartMover |
|
Business Coder |
|
Property |
|
Global Verify – Name, Address, Phone (Express), Email (Express) |
110,000 – 150,000 |
Global Verify – Name, Address, Phone (Premium), Email (Premium) |
60,000 – 85,000 |
IPLocator |
|
Personator World – Check – Name, Address, Phone (Express), Email (Express) |
Azure Data Factory (ADF)#
How do I deploy SSIS packages from Visual Studio for execution by SSIS-IR in ADF?#
This guide covers how to deploy an SSIS package that uses Azure SQL Server for both input and output. If you plan to use a different input/output method, the configuration steps will vary.
In this approach, the package is deployed to the SSISDB database on Azure SQL Server. You can then trigger its execution in Azure Data Factory by starting a pipeline that invokes the SSIS Integration Runtime (SSIS-IR).
Important
The SSIS package must be built for SQL Server 2017, as SSIS-IR in Azure Data Factory currently only supports SQL 2017 packages.
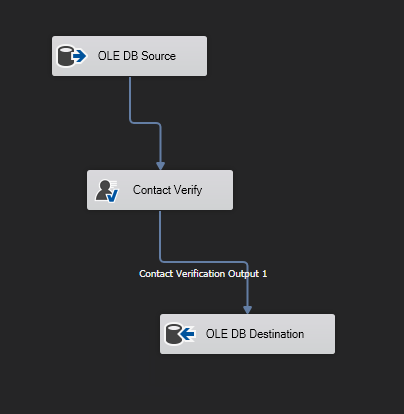
Step 1: Create a 2017 SSIS Package In Visual Studio With Input and Output being Azure SQL Server#
Step 2: Deploy the SSIS Package to Azure SQL Server#
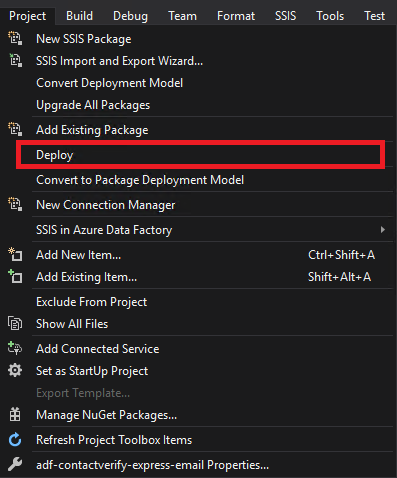
Navigate to Project (top-left menu) → Click Deploy.
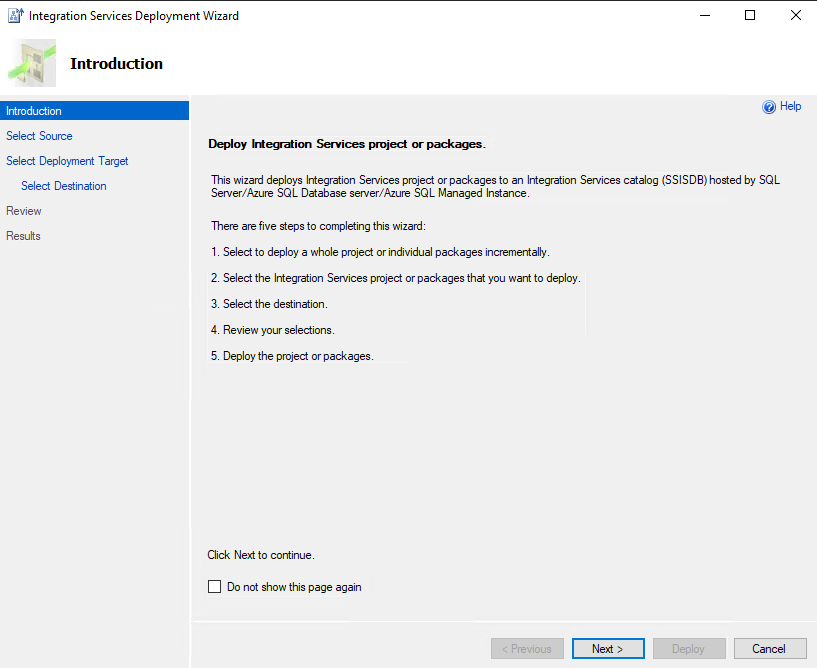
In the Integration Services Deployment Wizard, click Next.
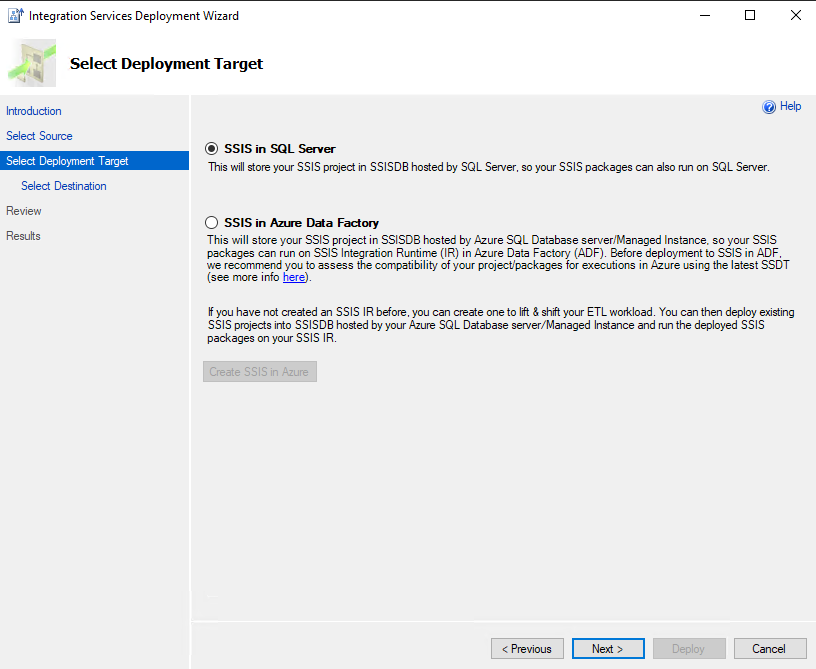
Under the Deployment Target tab:
Choose SSIS in SQL Server or SSIS in Azure Data Factory (both will deploy your package to the SSISDB of your Azure SQL Server).
Click Next.
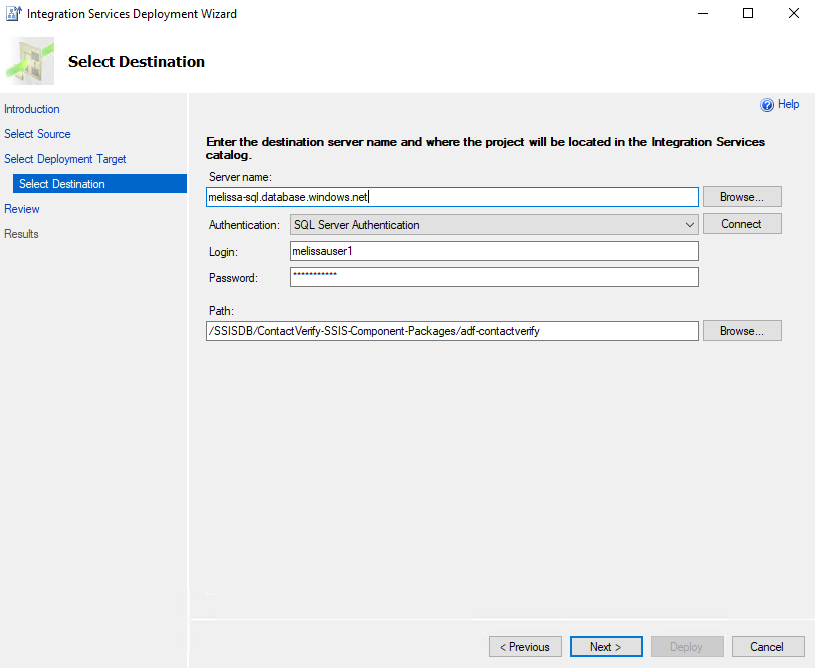
Under the Select Destination tab, enter the following details:
Server Name: Enter your Azure SQL Server name.
Authentication: Select SQL Server Authentication.
Login & Password: Use the credentials created when setting up the Azure SQL Server.
- Click Connect to verify the connection.
- If the connection is successful, the Path text box will become active:
Click Browse…
Under SSISDB, click New Folder… to create a subfolder for SSIS packages (unless you already have one that you would like to use).
Click OK, then Next.
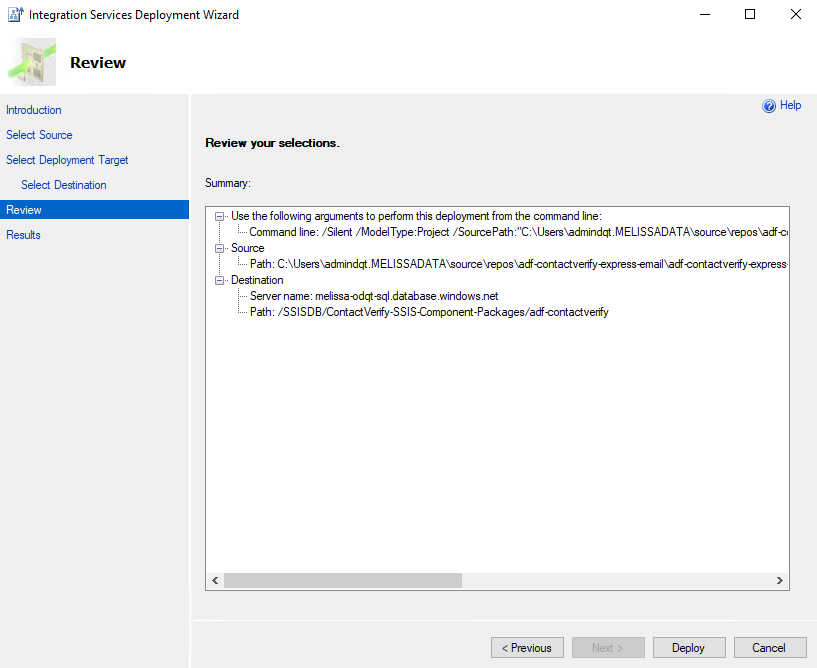
Under the Review tab:
Review the deployment details.
Click Next.
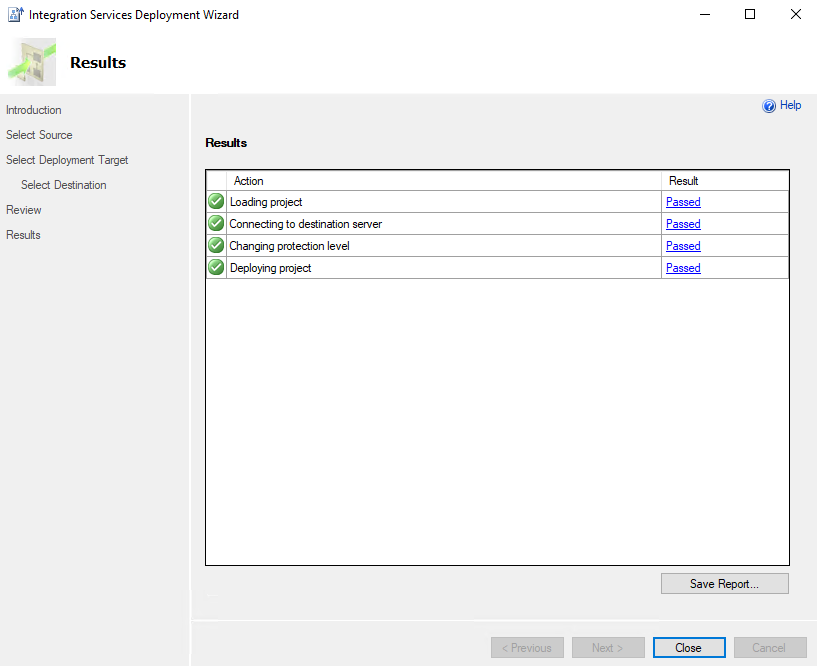
Under the Results tab:
If everything is configured correctly, a success message will confirm that your package has been deployed successfully.
Note
The SSIS Integration Runtime (SSIS-IR) instance linked to this Azure SQL Server must be running at the time of package deployment.
Step 3: Execute Package in Azure Data Factory (ADF) Environment#
Navigate to your Data Factory (V2) instance on the Azure Portal.
Click Launch Studio.
On the left-hand side, click Author.

Click Add New Resource → Pipeline → Pipeline.
In the search box, type
Execute SSIS Package, then drag and drop it into the pipeline.Rename the Pipeline and Execute SSIS Package as desired.
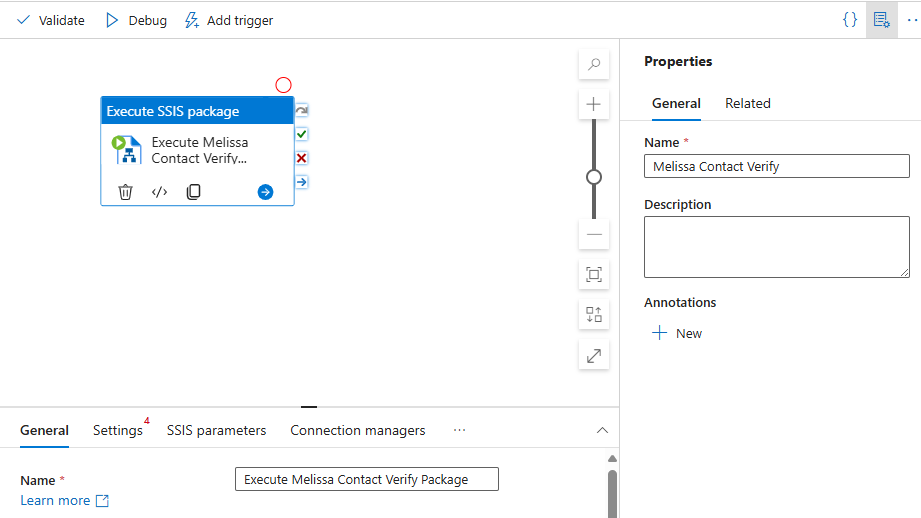
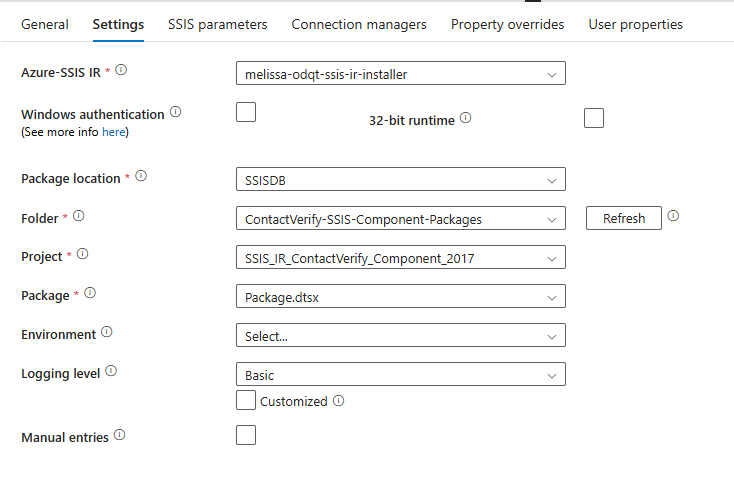
Configure the SSIS Package Execution. Go to the Settings tab:
Azure-SSIS IR: Select your SSIS-IR instance from the dropdown (Ensure it is active and running).
Package Location: Choose
SSISDBfrom the dropdown, then click Refresh to display all newly deployed packages.Folder - Project - Package: Select the path of your package. If you haven’t renamed the package file, it should default to
package.dtsx.
Click Debug.

You will be directed to the Output tab where you can track the execution status of your package. The status will indicate whether the package succeeds or fails.

Estimated Monthly Costs#
How much does it cost to run SSIS on Azure Data Factory? These are estimated monthly Azure costs for Melissa SSIS on an ADF deployment.
Note
Azure offers many different usage options and configurations for its services. The cost may vary significantly depending on the settings and region you select. For the most accurate and customized estimate, you can use the official Azure Pricing Calculator.
Azure SQL Database (General Purpose, 2 vCores)#
Used to store:
SSIS packages (in SSISDB)
Input/output data tables
Breakdown:
- Compute:
2 vCores × $0.508/hr × 730 hrs = $370.84 / month
- Storage:
32 GB data × $0.115/GB = $3.68
9.6 GB log × $0.115/GB = $1.10
→ Total storage = $4.78 / month
Total Estimated Monthly Cost: $373
Azure Data Factory – SSIS Integration Runtime (SSIS-IR)#
Configuration:
Integration Runtime Type: SQL Server Integration Services (SSIS-IR)
Tier: Standard
Instance: A8 v2 (8 vCores, 16 GB RAM, 80 GB disk)
Rate: $0.9448 per hour
Runtime: 160 hours/month (e.g., 8 hrs/day × 5 days/week)
Azure Hybrid Benefit: Enabled (uses your own SQL Server licenses)
Support Plan: Basic (Included)
Licensing Program: Microsoft Customer Agreement (MCA)
Total Estimated Monthly Cost: $151.16
Note
Keeping SSIS-IR running 24/7 would increase this cost significantly.
Azure Blob Storage (East US)#
Used to store setup scripts, installer files, and (optionally) data files.
Configuration:
Account Type: Block Blob Storage
Performance: Standard
Access Tier: Hot
Redundancy: Locally Redundant Storage (LRS)
Capacity: 1,000 GB
File Structure: Flat Namespace
Costs:
Storage: 1,000 GB × $0.0208/GB = $20.80
- Operations:
Write Operations: 100,000 ops × $0.0005 = $0.50
List/Create Container: 100,000 ops × $0.0005 = $0.50
Read Operations: 100,000 ops × $0.0004 = $0.04
Other Operations: 10,000 ops × $0.0004 = $0.01
Data Retrieval: No cost for Hot tier
Data Write: No cost for Hot tier
Total Estimated Monthly Cost: $21.84
Costs Summary#
This is a summary of the approximate monthly totals.
Component |
Estimated Monthly Cost |
|---|---|
Azure SQL Database |
$373.00 |
SSIS Integration Runtime |
$151.16 |
Azure Blob Storage |
$21.84 |
Azure File Share (Standard) |
$2.03 (if applicable) |
Azure File Share (Premium) |
$24.00 (if applicable) |
Microsoft Fabric Integration#
You can also use Microsoft Fabric for data orchestration and automated workflows. Melissa provides sample notebook code for integrating Melissa Cloud APIs into Microsoft Fabric using Lakehouse tables, Python notebooks, and optional pipelines. These examples can help you quickly evaluate and implement Melissa services in your Fabric environment.
Type |
Repository |
|---|---|
Microsoft Fabric Notebook |
Microsoft Fabric Cost Estimate#
Details |
Low Usage |
Medium Usage |
High Usage |
|---|---|---|---|
Ideal For |
Proof of Concept Small Teams |
Standard Production Business Workloads |
Enterprise Scale High Volume Operations |
Typical Processing Volume |
1k–100k records/run |
100k–5M records/day |
Tens or hundreds of millions of records |
Recommended Fabric Capacity |
F2 |
F8–F16 |
F32–F64 |
Fabric Capacity Cost |
~$263/month |
~$1,051–$2,102/month |
~$4,205–$8,410/month |
Storage Costs(OneLake + SQL) |
~$5–$25/month |
~$35–$300/month |
~$300–$3,000/month |
Estimated Total |
~$270–$300/month |
~$1,100–$2,500/month |
~$4,500–$12,000+/month |