Listware For Excel Reference Guide#
US#
A contact checking, verification, and appending Cloud API.
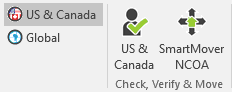
US Check & Verify can be accessed by clicking the ‘US & Canada’ button.
US Check & Verify allows you to do Contact Verification. Each step can be navigated to by clicking the ‘Next’ or ‘Previous’ buttons. The steps are as follows:
Processing range#

Select the range of cells in your worksheet that you would like to process, then click the ‘Select Data to Process’ button.
Once you have selected your processing range, the following fields will be populated:
Workbook#
Displays the workbook (file name) of the data you have selected.
Worksheet#
Displays the worksheet (e.g. Sheet 1) of the data you have selected.
Range#
Displays the range of data you have selected (e.g. A1:E10).
Note: Listware can only process 50,000 or fewer rows per run.

Cleasing Operations#
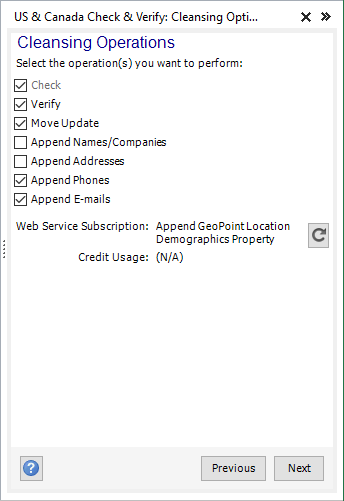
Check the operation(s) you want to perform.
The following operations are available:
Check#
Check is always performed as a default. The Check action determines whether the data within a submitted record is valid, e.g. whether or not a given postal code contains the given city. It can also make limited corrections and appends to the data. Check looks at each data point separately, the inputs you put in for email don’t affect what Check does with an address. Check returns results codes that describe which inputs were invalid, valid, or corrected. It also returns the input data after it has been corrected and added.
Verify#
The Verify action allows you to determine whether the input data points are associated with each other. By default Listware will use the input Address as the centric, or pivot piece of data. If no address is used as input, Listware will use phone and email in that order as the centric piece of data.
For example, Listware will tell you whether the name, phone, and email on that record coincide with that address in our database.
Verify only returns the results column with results codes describing what it found.
Move Update#
Appends address data of contacts who have moved based off of multisource data.
Append Names#
Appends missing name or company information if available.
Append Addresses#
Appends missing address information if available.
Append Phones#
Appends missing phone information if available.
Append E-mails#
Appends missing e-mail information if available.
Credit Balance#
Displays your credit balance.
Credit Usage#
Displays the estimated credit usage of your data cleansing process.
Input Columns#
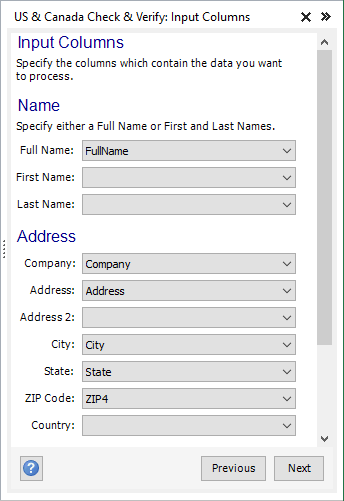
Specify the input columns you want to process by selecting them in the drop-down menus.
The following input columns are available:
Name#
If the names are split into first and last names, specify those columns in ‘First Name’ and ‘Last Name’ instead. Alternatively, if the names are not split specify that column in ‘Full Name’.
Full Name#
Specify the column that contains full names.
First Name#
Specify the column that contains first names.
Last Name#
Specify the column that contains last names.
Address#
Company#
Specify the column that contains company and/or organization names.
Address#
Specify the column that contains street or PO Box addresses.
Address 2#
Specify the column that contains a second address line. If available, this is generally extra addressing information such as an apartment or suite numbers.
If the information is in the “Address” column, it will be found and parsed to this column when you specify that column here.
City#
Specify the column that contains cities.
State#
Specify the column that contains the US state and/or Canadian province.
Zip Code#
Specify the column that contains the US ZIP code and/or Canadian Postal Code.
Country#
Specify the column that contains the country name (US or Canada).
Although US Check & Verify can often identify an address’s country of origin by looking at the address, sometimes address verification can improve if the country is provided.
Phone#
Specify the column that contains phone numbers.
E-mail#
Specify the column that contains e-mail addresses.
Output Columns#
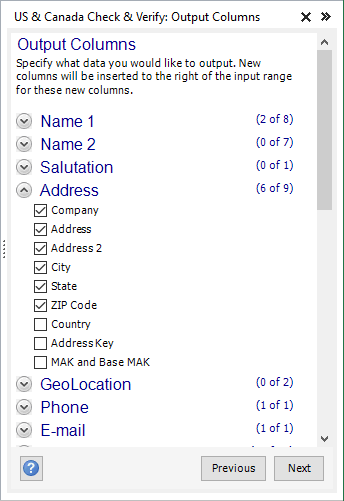
Specify what data you want to output by checking the box next to the desired columns.
You can right-click each section to ‘Check All’ or ‘Check None’.
The following output columns are available:
Name 1#
This section contains name components.
Full Name#
Output the full name. E.g. “Dr. Bill S. Preston, Esquire.”
Prefix#
Output the parsed name prefix. E.g. “Dr.”
First Name#
Output the parsed first name. E.g. “Bill.”
Middle Name#
Output the parsed middle name. E.g. “S.”
Last Name#
Output the parsed last name. E.g. “Preston.”
Suffix#
Output the parsed name suffix. E.g. “Esquire.”
This will output the name’s gender. “M” for male, “F” for female, and “N” for neutral.
Use Demographic Data When Available
Check this item if you want to use the more accurate demographic-derived gender. This option is available for Output Name1 Gender only.
Name 2#
This section contains a second set of name components for when your input contains two names. The columns here have the same definitions as the columns contained under Name 1.
Salutation#
Salutation#
Output a salutation. E.g. “Dear Mr. Preston.”
Address#
Company#
Output the company or organization.
Address#
Output the address.
Address 2#
Output the second address. If you specify a second address line, secondary information (apartment, suite, etc.) will be put here. If you choose to not output to Address 2, secondary information will be appended to the first Address.
City#
Output the city.
State#
Output the US State or Canadian Province.
ZIP Code#
Output the US ZIP Code or Canadian Postal Code.
Country#
Output the Country.
AddressKey#
Output the AddressKey. The AddressKey is a unique identifier for a given address and is required as input for some other Melissa products.
MAK and Base MAK#
A unique key assigned to the submitted address (MAK) and base address of a complex with apartments or suites (Base MAK). For more information, see Melissa Address Key.
GeoLocation#
Latitude and Longitude#
Output the latitude and longitude.
Link to Map Location#
US Check and Verify use the returned Address and Latitude Longitude pair to create a hyperlink to the specified Map Server. Unverified records with no returned Lat Long pair, may therefore display a map to the user’s local area determined by the selected Map Server.
Phone#
Phone#
Output the phone number. The number will be formatted in the selected format below.
Format: * (800) 800-6245 * (800) 800 6245 * 800-800-6245 * 800 800 6245 * 800.800.6245 * 8008006245
E-mail#
E-mail#
Output the e-mail address.
Address Information#
Address Type#
Output the Address Type.
Code |
Description |
|
|---|---|---|
S |
Standard Address |
|
G |
General Delivery Address |
|
M |
Military Address |
|
P |
PO Box Address |
|
R |
Rural Route Address |
|
U |
Unique/LVR Address |
Delivery Indicator#
Output the Delivery Indicator.
Code |
Description |
|
|---|---|---|
B |
Business Address |
|
R |
Residential Address |
|
U |
Unknown Address |
Extra Address Information#
Output extra information that does not fit in any of the output address columns.
Suite#
Output the suite.
If requested, the suite will be populated in this column instead of the output address columns.
Private Mailbox#
Output the Private Mailbox. These mailboxes are used in commercial receiving agencies, such as the UPS store.
If requested, the Private Mailbox will be populated in this column instead of the output address columns.
Urbanization (PR Only)#
Output the urbanization name. These are used only in Puerto Rican addresses.
City Abbreviation#
Output the city abbreviation if any is available.
State Name#
Output the full state name.
ISO Country Code#
Output the ISO country code.
Carrier Route#
Output the Carrier Route (CRRT.) This is a 4-character code defining the carrier route for the address.
Delivery Point#
Output the Delivery Point (DP) and its check digit. This is a 2-digit code defining the address’s delivery location. The single-digit check digit follows the delivery point and serves as an error check for the ZIP Code, Plus4 and Delivery Point.
Universal Time Code#
Output the Universal Time Code (UTC.) This indicates the amount of hours:minutes offset from Greenwich Mean Time (GMT.)
Census Information#
CBSA Code#
Output the Census Bureau Core-Based Statistical Area (CBSA) code. This is a 5-digit code for the address.
CBSA Title#
Output the Title describing the CBSA code.
CBSA Level#
Output the Level of the CBSA code. If present, the CBSA Level will be Metropolitan or Micropolitan.
Divisional CBSA Code#
Output the CBSA representing the division associated with the address.
Divisional CBSA Title#
Output the Title describing the Divisional CBSA code.
Divisional CBSA Level#
Output the Level of the Divisional CBSA code. If present, the Divisional CBSA Level will be Metropolitan or Micropolitan.
County Name#
Output the County name.
County FIPS Code#
Output the County FIPS code. This is a 5-digit code. The first two digits indicate the state while the last three digits indicate the county within the state.
Census Block#
Output the Census Block. This is a 4-digit string indicating the Census Block number associated with the address. Census Blocks are the smallest geographic area for which the Bureau of the Census collects information.
Census Tract#
Output the Census Tract. This is a 4 to 6-digit string containing the Census Tract number associated with the address. Census Tracts are small subdivisions of the county.
Place Name#
Output the Place Name. When ZIP Codes overlap, the returned city will indicate the city that covers the majority of the ZIP area; for addresses located outside the city but within the ZIP Code, the Place Name will refer to that area.
Place Code#
Output the Place Code. When ZIP Codes overlap, the returned city will indicate the city that covers the majority of the ZIP area; for addresses located outside the city but within the ZIP Code, the Place Code will refer to that area.
Congressional District#
Output the Congressional District. This is a 2-digit code indicating the address’s congressional district.
CensusKey#
Check this item if you want the Census Key.
CountySubdivisionCode#
Check this item if you want the output County Subdivision Code.
CountySubdivisionName#
Check this item if you want the output Upper State District Code.
StateDistrictUpper#
Check this item if you want the output Upper State District Code.
StateDistrictLower#
Check this item if you want the output Lower State District Code.
ElementarySchoolDistrictCode#
Check this item if you want the output Elementary School District Code.
ElementarySchoolDistrictName#
Check this item if you want the output Elementary School District Name.
SecondarySchoolDistrictCode#
Check this item if you want the output Secondary School District Code.
SecondarySchoolDistrictName#
Check this item if you want the output Secondary School District Name.
UnifiedSchoolDistrictCode#
Check this item if you want the output Unified School District Code.
UnifiedSchoolDistrictName#
Check this item if you want the output Unified School District Name.
Demographics#
Date of Birth#
Output the Date of Birth demographic. The date of birth will be formatted: yyyy-mm (no day will be specified.)
Date of Death#
Output the Date of Death demographic. The date of death will be formatted: yyyy-mm-dd.
Household Income#
Output the household income demographic.
Residence Type#
Output the residence type demographic.
Code |
Description |
|
|---|---|---|
DR |
Definite Renter |
|
PR |
Inferred Renter |
|
PO |
Inferred Owner |
|
DO |
Definite Owner |
Length of Residence#
Output the length of residence demographic (i.e., the number of years at the current residence.)
Occupation#
Output the occupation demographic.
Marital Status#
Output the marital status demographic.
Code |
Description |
|
|---|---|---|
“ “ |
Unknown |
|
DS |
Definitely single |
|
PS |
Inferred single |
|
PM |
Inferred Married |
|
DM |
Defintely Married |
Presence of Children#
Output the children demographic.
Code |
Description |
|
|---|---|---|
Y |
Yes |
|
N |
No |
Education#
Returns the highest level of education completed by an individual.
Household Size#
Returns the number of occupants in the household.
Political Party#
Returns an individual’s political affiliation.
Presence of Senior#
Returns the presence of senior/s in the household.
Credit Card User#
Returns whether the user has a credit card or not.
Ethnic Code (Deprecated)#
Returns an individual’s specific ethnicity.
Ethnic Group (Deprecated)#
Returns the grouped category for a person’s ethnicity. This is a more generalized grouping compared to Ethnic Codes.
Child Age Range#
Returns the age range of children in the household.
Property#
Assessors Parcel Number (APN)#
Output the formatted Assessor’s Parcel Number (APN.) This is present for 99% of properties.
Owner Name#
Output the property owner’s name. This is present for 45% of properties.
Owner Address#
Output the property owner’s address. This is present for 98% of properties.
Improvement Value#
Output the Calculated Improvement Value. This is closed to the current market value, and is used for assessment by tax agencies. This is present for 59% of properties.
Estimated Home Value#
Output the estimated home value.
Assessed Property Value#
Output the Total Assessed value. This is parcel plus improvement values. This is present for 92% of properties.
Tax Amount#
Output the property’s total tax amount. This is present for 89% of properties.
Last Sale Date#
Output the property’s sale date, formatted yyyy-mm-dd. This is present for 47% of properties.
Last Sale Price#
Output the property’s sale price. This is present for 46% of properties.
Acreage#
Output the total land area in acres. This is present for 86% of properties.
Property Square Footage#
Output the property’s square footage. This is present for 8% of properties.
Building Square Footage#
Output the total building area in square feet. This is present for 35% of properties.
Year Built#
Output the original building’s year of construction. This is present for 55% of properties.
Total Rooms#
Output the property’s number of rooms in the primary building. This is present for 27% of properties.
Bedrooms#
Output the total number of bedrooms in the primary building. This is present for 39% of properties.
Bathrooms#
Output the property’s total bathrooms. This is present for 48% of properties.
Mortgage Term#
Output the property’s mortgage term. This is present for 19% of properties.
Mortgage Due Date#
Output the property’s mortgage due date. This is present for 19% of properties.
Mortgage Amount#
Output the property’s mortgage amount. This is present for 27% of properties.
Parsed Address#
House Number#
Output the parsed House Number for the output address.
Street Pre-Directional#
Output the parsed Street Pre-Directional for the output address.
Street Name#
Output the parsed Street Name for the output address.
Street Suffix/Type#
Output the parsed Street Suffix (a.k.a. Street Type) for the output address.
Street Post-Directional#
Output the parsed Post-Direction for the output address.
Suite Name#
Output the parsed Suite Name for the output address
Suite Number#
Output the parsed Suite Number for the output address.
Private Mailbox Name#
Output the parsed Private Mailbox Name for the output address.
Private Mailbox Number#
Output the parsed Private Mailbox Number for the output address.
Route Service Number (CAN Only)#
Output the parsed Route Service Number for the output address.
Canada Only.
Delivery Installation (CAN Only)#
Output the parsed Delivery Installation for the output address.
Canada Only.
Lock Box Number (CAN Only)#
Output the parsed Lock Box Number for the output address.
Canada Only.
Reporting#
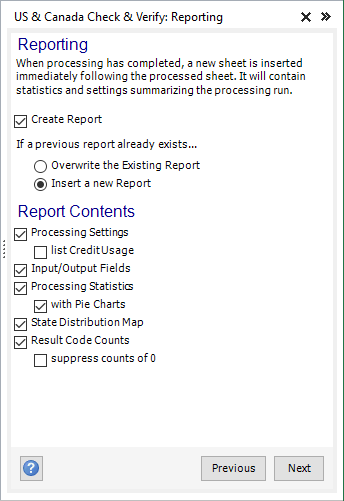
Listware now gives you the option of creating an additional sheet of processing statistics for a completed process.
This allows you to easily print your results, or save for further analysis
Create Report
Check this option if you want to have a report created when processing is complete.
The report will be created on a new Excel sheet immediately following the one you’ve processed.
Overwrite Existing Report
Select this option if you want to overwrite a report from a previous processing run.
Insert New Report
Select this option if you want to insert a new report sheet rather than overwrite a report from a previous processing run.
Reporting Contents#
Processing Settings#
Check this option if you want the Processing Settings (i.e., Processing Range and Cleansing Operations) to appear in the report.
Input/Output Fields#
Check this option if you want the Input and Output Fields listed in the report.
Processing Statistics#
Check this option if you want Processing Statistics (i.e., ‘Good’ Names count, ‘Fixed’ Addresses count, etc.) listed in the report.
Pie Charts#
Check this option if you want the Processing Statistics corresponding Pie Charts to appear in the report.
State Distribution Map#
Check this option if you want the report to contain a map of US States, colored to indicate each state’s record distribution.
Result Code Counts#
Check this option if you want a list of all Result Codes and their counts to appear in the report.
Suppress counts of 0#
Check this if you want the report limited to only those Result Codes in which at least one instance was detected.
Review Settings#
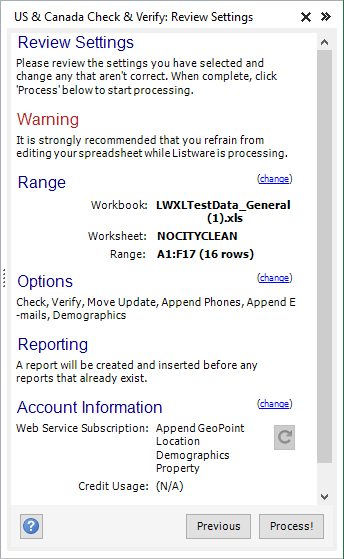
Review the settings you have selected and fix any errors. You may click ‘change’ to go back to the respective steps and modify your settings.
When you are ready, click ‘Process!’ to process your file.
Range#
Displays the range you selected in the Processing Range step. .. ADD LINK TO RANGE
Options#
Displays the options you selected in the Cleansing Operations step. .. ADD LINK TO CLEANSING OEPRATIONS
Reporting#
Displays the reporting you selected in the Reporting step. .. ADD LINK TO REPORTING
Account Information#
Displays your account information (e.g. Credit Usage, etc.). Clicking ‘change’ will open your user account web page on Melissa’s web site.
Credit Balance#
Displays your credit balance.
Credit Usage#
Displays the estimated credit usage of your data cleansing process.
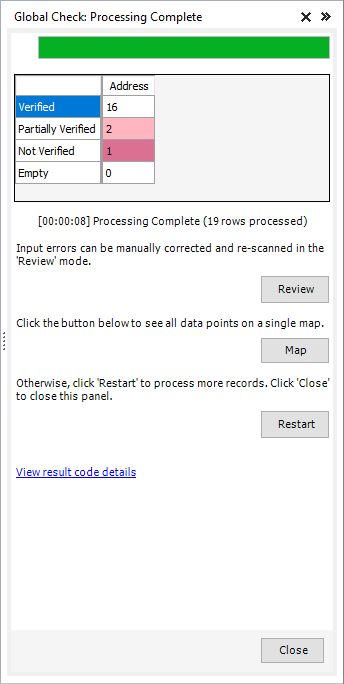
Processing#
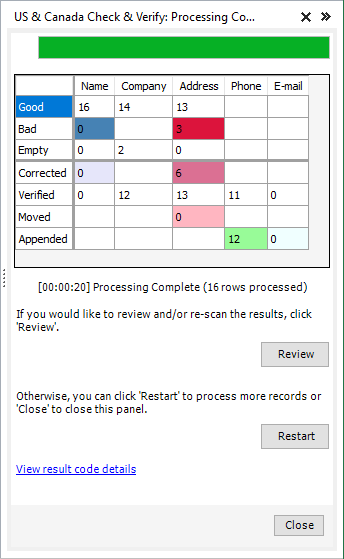
Processing will display the progress of your data cleansing.
Review
If you want to review or modify the results of the data cleansing, click ‘Review’.
Restart
If you want to restart the data cleansing process (possibly to change some settings, process more records, etc.) click ‘Restart’.
Close
Click ‘Close’ to close the Listware Add-in. Make sure to save your file before you exit Excel, or you may lose your cleansed data.
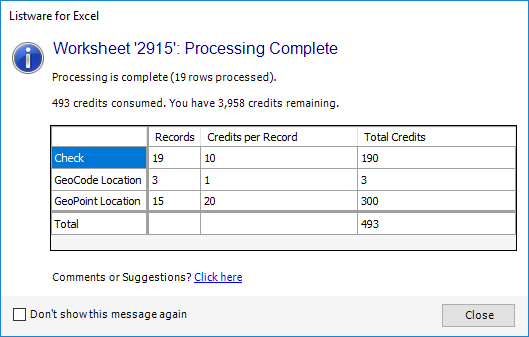
Credits Used#
Once processing is complete a window will pop-up, displaying the amount of credits your data cleansing process used.
Review Results#
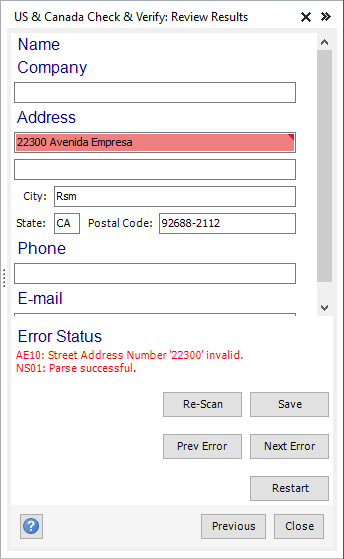
Once processing is completed, this step will display. You may take this opportunity to review, restart, or close the process.
The following operations are available:
Name, Address
The cleansed data will appear in these fields. If there is an associated result code, you will see a small triangle in the top-right corner of the field. Mouse-over the field to see a tool-tip of the result code.
Status#
The result codes for this address will display below the ‘Status’ header.
Re-Scan#
Click this button to re-scan the contact information specified in the above ‘Name’ and ‘Address’ fields.
Save#
Click this button to transfer any information you changed in the ‘Name’ or ‘Address’ fields to your spreadsheet.
Prev Error, Next Error#
Click ‘Prev Error’ or ‘Next Error’ to navigate through the contacts with associated error codes and review them.
Restart#
Click this button to restart the data cleansing process. You will be able to select a new range of data and change any options as needed.
Global#
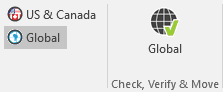
Global Check & Verify can be accessed by clicking the ‘Global’ button.
Global Check & Verify allows you to do Contact Verification. Each step can be navigated to by clicking the ‘Next’ or ‘Previous’ buttons. The steps are as follows:
Processing Range#
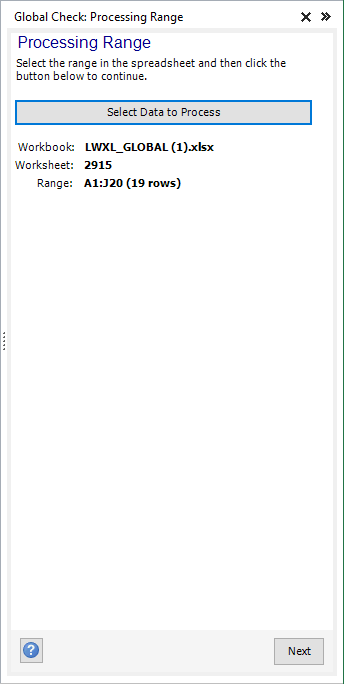
Select the range of cells in your worksheet that you would like to process, then click the ‘Select Data to Process’ button.
Once you have selected your processing range, the following fields will be populated:
Workbook#
Displays the workbook (file name) of the data you have selected.
Worksheet#
Displays the worksheet (e.g. Sheet 1) of the data you have selected.
Range#
Displays the range of data you have selected (e.g. A1:E10).
Note: Listware can only process 50,000 or fewer rows per run.
Cleansing Operations#
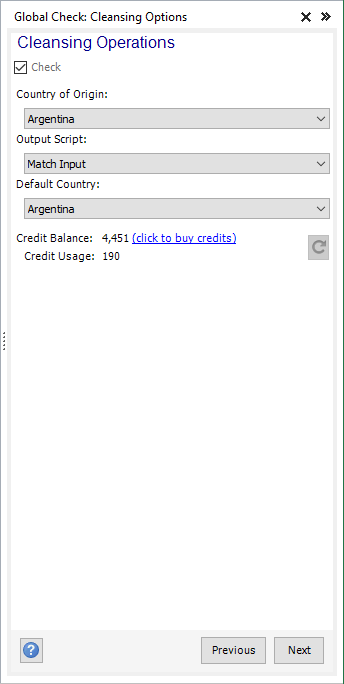
Check the operation(s) you want to perform and specify your origin country, output script, and default country.
The following operations are available:
Check#
The Check action determines whether the data within a submitted record is valid, e.g. whether or not a given postal code contains the given city. It can also make limited corrections and appends to the data. Check looks at each data point separately, the inputs you put in for email don’t affect what Check does with an address. Check returns results codes that describe which inputs were invalid, valid, or corrected. It also returns the input data after it has been corrected and added.
Country of Origin#
The origin country. This is used for mailing information in the Formatted Address output column.
Output Script#
The character set used to format the output data. You can choose:
Match Input
The output character set will match the input character set.
Latin
The output character set will be latin.
Native
The output character set will match the address’s country.
Default Country#
When no country column is specified or the record’s country column is blank, this will set the default country for that record.
Credit Balance#
Displays your credit balance.
Credit Usage#
Displays the estimated credit usage of your data cleansing process.
Input Columns#
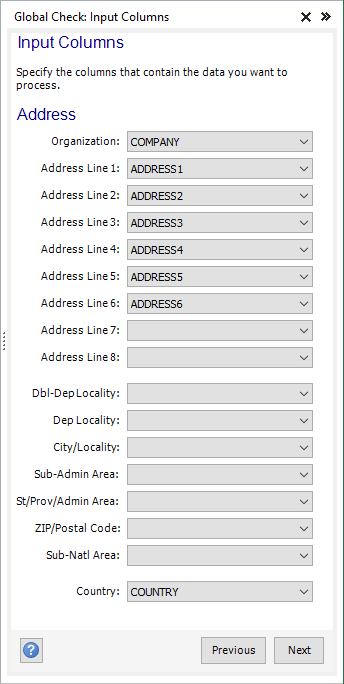
Specify the input columns you want to process by selecting them in the drop-down menus.
The following input columns are available:
Address#
Organization#
Specify the column that contains company and/or organization names.
Address Line 1 - Address Line 8#
Specify the column(s) that contain address information.
Dbl-Dep Locality#
Double-Dependent Locality. An area or village (e.g. UK) within a Dependent Locality required to identify an address.
Dep Locality#
Dependent Locality. A district, area, or neighborhood (e.g. Turkey) within a Locality required to identify an address.
Locality#
A city (e.g. US), town, or municipality (e.g. Canada) that is the most common population center element within an Administrative Area.
Sub-Admin Area#
A county (e.g. US) or region larger than the Locality but smaller than the Administrative Area.
Admin Area#
A state (e.g. US), province (e.g. Canada) or canton (e.g. Switzerland) contained within a Country.
Postal Code#
The postal code or ZIP code (e.g. US) for the input address.
Sub-Natl Area#
Sub-National Area. Not commonly used. An arbitrary region smaller than a Country but larger than an Administrative Area.
Country#
Country name or code of the input address.
Output Column#
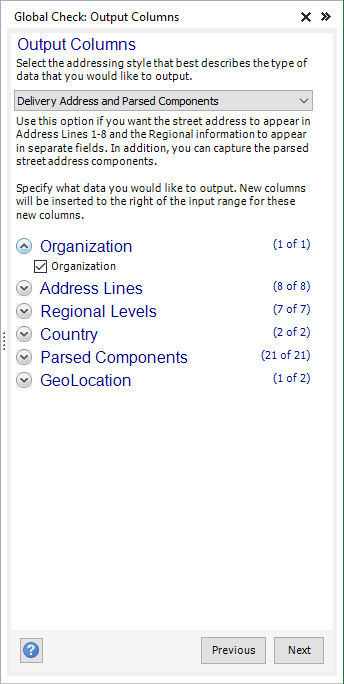
Specify what data you want to output by checking the box next to the desired columns.
You can right-click each section to ‘Check All’ or ‘Check None’.
The following output columns are available:
Output Address Format Options#
Select the addressing style that best describes the type of data that you would like to output
Multi-Line Address#
Use this option if you want the entire mailing address to appear in output Address Lines 1-8.
Delivery Address#
Use this option if you want the street address to appear in output Address Lines 1-8 and Regional information to appear in separate fields.
Delivery Address and Parsed Components#
Use this option if you want the street address to appear in output Address Lines 1-8 and Regional information to appear in separate fields. In addition, you can capture the parsed street address components.
Organization#
Organization#
Output the company or organization.
Address Lines#
Address Line 1 - Address Line 8#
Output the selected line of the complete output address.
Regional Levels#
Double-Dependent Locality#
Double-Dependent Locality. An area or village (e.g. UK) within a Dependent Locality required to identify an address.
Dependent Locality#
Dependent Locality. A district, area, or neighborhood (e.g. Turkey) within a Locality required to identify an address.
City/Locality#
A city (e.g. US), town, or municipality (e.g. Canada) that is the most common population center element within an Administrative Area.
Sub-Administrative Area#
A county (e.g. US) or region larger than the Locality but smaller than the Administrative Area.
State/Province/Admin Area#
A state (e.g. US), province (e.g. Canada) or canton (e.g. Switzerland) contained within a Country.
ZIP/Postal Code#
The postal code or ZIP code (e.g. US) for the input address.
Sub-National Area#
Sub-National Area. Not commonly used. An arbitrary region smaller than a Country but larger than an Administrative Area.
Country#
ISO 3166-1 Country Code#
Output the ISO 3166-1 Country Code.
Format#
Select the format of the output country code. The possible formats are:
Alpha-2
The two letter abbreviation for countries. E.G., for United States; Canada; and the Philippines: US; CA; PH.
Alpha-3
The three letter abbreviation for countries. E.G., for United States; Canada; and the Philippines: USA; CAN; PHL.
Numeric
The number code for countries. E.G., for United States; Canada; and the Philippines: 840; 124; 608.
Parsed Components#
Address Type#
A one-character code for the type of address coded. Only for US and Canadian addresses.
AddressKey#
A unique key for the address. Only for US and Canadian addresses.
Thoroughfare#
The thoroughfare (eg, the name of the street or block).
Thoroughfare Pre-Direction#
The prefix directional contained within the Thoroughfare.
Thoroughfare Leading Type#
The leading thoroughfare type indicator within the Thoroughfare.
Thoroughfare Name#
The name indicator within the Thoroughfare.
Thoroughfare Trailing Type#
The trailing thoroughfare type indicator within the Thoroughfare.
Thoroughfare Post-Direction#
The postfix directional contained within the Thoroughfare.
Dependent Thoroughfare#
The dependent thoroughfare (eg, the name of the dependent street or block).
Dependent Thoroughfare Pre-Direction#
The prefix directional contained within the Dependent Thoroughfare.
Dependent Thoroughfare Leading Type#
The leading thoroughfare type indicator within the Dependent Thoroughfare.
Dependent Thoroughfare Post-Direction#
The postfix directional contained within the Dependent Thoroughfare.
Sub-Premises#
The alphanumeric code that identifies an individual location.
Building#
The descriptive name identifying an individual location.
Premises Type#
The leading premises type indicator within Premises.
Premises Number#
The alphanumeric indicator within Premises.
Sub-Premises Type#
The sub-premises type indicator within Sub-Premises.
Sub-Premises Number#
The alphanumeric indicator within Sub-Premises.
Post Box#
The post box information for a particular delivery point.
GeoLocation#
Latitude and Longitude#
Output the latitude and longitude.
Link to Map Location#
Global Verify will use the returned Address and Latitude Longitude pair to create a hyperlink to the specified Map Server. Unverified records with no returned Lat Long pair, may therefore display a map to the user’s local area determined by the selected Map Server.
Reporting#
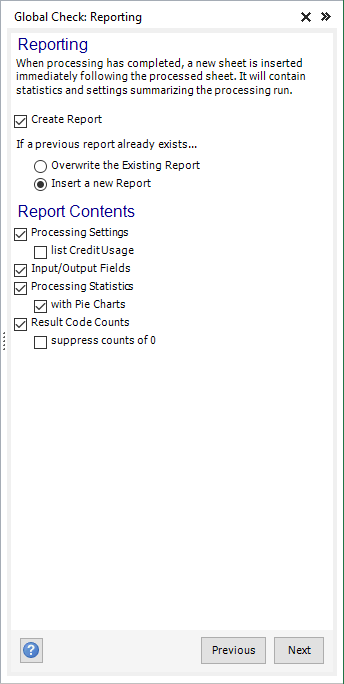
Listware now gives you the option of creating an additional sheet of processing statistics for a completed process.
This allows you to easily print your results, or save for further analysis.
Create Report
Check this option if you want to have a report created when processing is complete.
The report will be created on a new Excel sheet immediately following the one you’ve processed.
Overwrite Existing Report
Select this option if you want to overwrite a report from a previous processing run.
Insert New Report
Select this option if you want to insert a new report sheet rather than overwrite a report from a previous processing run.
Report Contents#
Processing Settings#
Check this option if you want the Processing Settings (i.e., Processing Range and Cleansing Operations) to appear in the report.
Input/Output Fields#
Check this option if you want the Input and Output Fields listed in the report.
Processing Statistics#
Check this option if you want Processing Statistics (i.e., ‘Good’ Names count, ‘Fixed’ Addresses count, etc.) listed in the report.
Pie Charts#
Check this option if you want the Processing Statistics corresponding Pie Charts to appear in the report.
Result Code Counts#
Check this option if you want a list of all Result Codes and their counts to appear in the report.
Suppress counts of 0#
Check this if you want the report limited to only those Result Codes in which at least one instance was detected.
Review Settings#
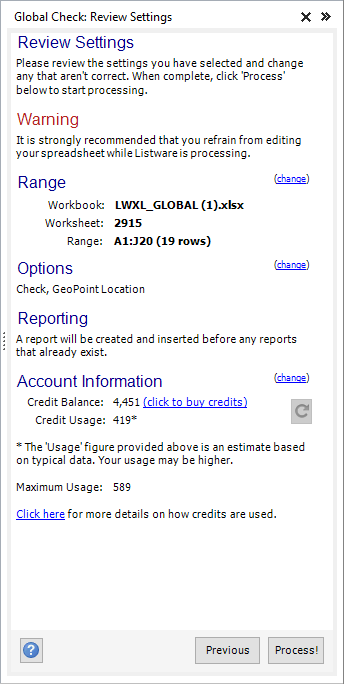
Review the settings you have selected and fix any errors. You may click ‘change’ to go back to the respective steps and modify your settings.
When you are ready, click ‘Process!’ to process your file.
Range#
Displays the range you selected in the Processing Range step. .. ADD LINK TO RANGE
Options#
Displays the options you selected in the Cleansing Operations step. .. ADD LINK TO CLEANSING OEPRATIONS
Reporting#
Displays the reporting you selected in the Reporting step. .. ADD LINK TO REPORTING
Account Information#
Displays your account information (e.g. Credit Usage, etc.). Clicking ‘change’ will open your user account web page on Melissa’s web site.
Credit Balance#
Displays your credit balance.
Credit Usage#
Displays the estimated credit usage of your data cleansing process.
Processing#
Processing will display the progress of your data cleansing.
Review
If you want to review or modify the results of the data cleansing, click ‘Review’.
Restart
If you want to restart the data cleansing process (possibly to change some settings, process more records, etc.) click ‘Restart’.
Close
Click ‘Close’ to close the Listware Add-in. Make sure to save your file before you exit Excel, or you may lose your cleansed data.
Credits Used#
Once processing is complete a window will pop-up, displaying the amount of credits your data cleansing process used.
Review Results#
Once processing is completed, this step will display. You may take this opportunity to review, restart, or close the process.
The following operations are available:
Organization, Address
The cleansed data will appear in these fields. If there is an associated result code, you will see a small triangle in the top-right corner of the field. Mouse-over the field to see a tool-tip of the result code.
Status#
The result codes for this address will display below the ‘Status’ header.
Re-Scan#
Click this button to re-scan the contact information specified in the above ‘Name’ and ‘Address’ fields.
Save#
Click this button to transfer any information you changed in the ‘Name’ or ‘Address’ fields to your spreadsheet.
Prev Error, Next Error#
Click ‘Prev Error’ or ‘Next Error’ to navigate through the contacts with associated error codes and review them.
Restart#
Click this button to restart the data cleansing process. You will be able to select a new range of data and change any options as needed.
Smart Mover#
SmartMover can be accessed by clicking the ‘SmartMover NCOA’ button in the ‘Check, Verify & Move’ section.
SmartMover uses National Change of Address (NCOA) data to update addresses with associated move information in the US and Canada. Each step can be navigated to by clicking the ‘Next’ or ‘Previous’ buttons. The steps are as follows:
Processing Range#
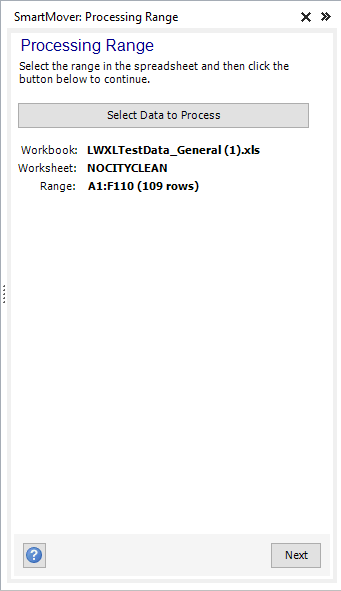
Select the range of cells in your worksheet that you would like to process, then click the ‘Select Data to Process’ button.
Once you have selected your processing range, the following fields will be populated:
Workbook#
Displays the workbook (file name) of the data you have selected.
Worksheet#
Displays the worksheet (e.g. Sheet 1) of the data you have selected.
Range#
Displays the range of data you have selected (e.g. A1:E10).
Note: Listware can only process 50,000 or fewer rows per run.
NCOA Options#
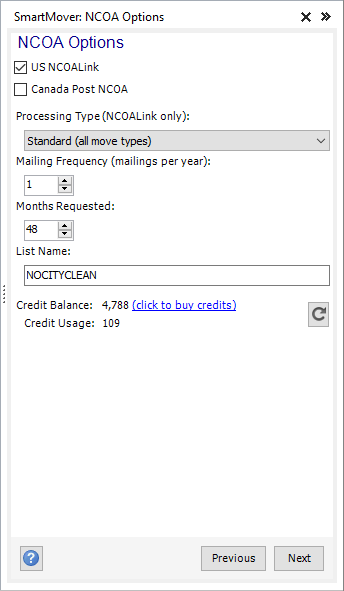
Select the Change of Address service you would like to perform.
The following change of address services are available:
US NCOALink
Selecting this service will identify moves in the US.
Each record checked will cost 1 credit.
Each record successfully moved with a new address will consume 10 credits.
Canada Post NCOA
Selecting this service will identify moves in Canada.
Each record checked will cost 1 credit.
Each record successfully moved with a new address will consume 10 credits.
Listware allows you to select both services in one process.
Processing Type#
For US processing you can select the types of moves you want to detect.
Standard#
The service will detect and return all types of moves.
Individual Only#
All Individual parsed name parts will determine moves. Neither Business nor Surname only matches will be returned.
Individual & Business#
Matches on Individual or Business but not Family moves.
Business Only#
Matches on Company name.
Residential#
Family (surname) & Individual (parsed name parts) match, but no Business moves.
Mailing Frequency#
The number of times per year this list will be mailed to. This will appear on the NCOA Summary report.
The acceptable range is 1-52 (weeks).
Months Requested#
Request the number of months you wish the service search back for moves.
The acceptable range is 6-48 (months).
List Name#
How you want the name of the List to appear on the NCOA form
Credit Balance#
Displays your credit balance.
Credit Usage#
Displays the estimated credit usage of your data cleansing process.
Input Columns#

Specify the input columns you want to process by selecting them in the drop-down menus.
The following input columns are available:
Name#
If the names are split into first and last names, specify those columns in ‘First Name’ and ‘Last Name’ instead. Alternatively, if the names are not split specify that column in ‘Full Name’.
Full Name#
Specify the column that contains full names.
Prefix#
Specify the column that contains name prefixes. E.g. Mr., Ms., Mrs.
First Name#
Specify the column that contains first names.
Middle Name#
Specify the column that contains middle names.
Last Name#
Specify the column that contains last names.
Suffix#
Specify the column that contains name suffixes. E.g. Jr., Sr., IV.
Address#
Company#
Specify the column that contains company and/or organization names.
Address#
Specify the column that contains street or PO Box addresses.
Address 2#
Specify the column that contains a second address line. If available, this is generally extra addressing information such as an apartment or suite numbers.
If the information is in the “Address” column, it will be found and parsed to this column when you specify that column here.
City#
Specify the column that contains cities.
State#
Specify the column that contains the US state and/or Canadian province.
ZIP Code#
Specify the column that contains the US ZIP code and/or Canadian Postal Code.
Country#
Specify the column that contains the country name (US or Canada).
Although specifying a country column to ensure that records are searched in the proper service, SmartMover NCOA has advanced logic to accurately make that determination in the event your list does not have a country column.
Output Columns#
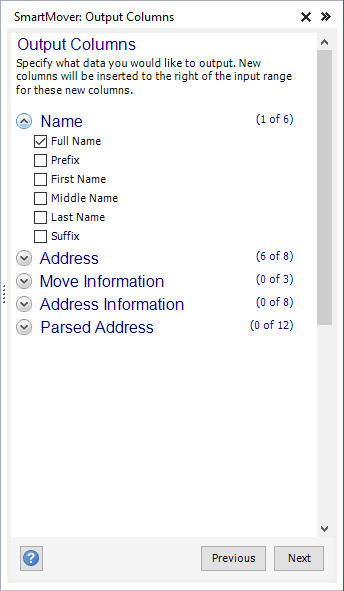
Specify what data you want to output by checking the box next to the desired columns.
You can right-click each section to ‘Check All’ or ‘Check None’.
The following output columns are available:
Name 1#
This section contains name components.
Full Name#
Full name. E.g. “Dr. Bill S. Preston, Esquire.”
Prefix#
Parsed name prefix. E.g. “Dr.”
First Name#
Parsed first name. E.g. “Bill.”
Middle Name#
Parsed middle name. E.g. “S.”
Last Name#
Parsed last name. E.g. “Preston.”
Suffix#
Parsed name suffix. E.g. “Esquire.”
Address#
Company#
Company or organization.
Address#
Full address.
Address 2#
Second address. If you specify a second address line, secondary information (apartment, suite, etc.) will be put here. If you choose to not output to Address 2, secondary information will be appended to the first Address.
City#
City.
State#
US State or Canadian Province.
ZIP Code#
US ZIP Code or Canadian Postal Code.
Country#
Country name.
AddressKey#
AddressKey. The AddressKey is a unique identifier for a given address and is required as input for some other Melissa products.
Move Information#
Move Date#
Move effective date.
Move Status#
Move status description.
Move Type#
Move type description.
Address Information#
Extra Address Information#
Extra information that does not fit in any of the output address columns.
Suite#
Suite.
If requested, the suite will be populated in this column instead of the output address columns.
Private Mailbox#
Private Mailbox. These mailboxes are used in commercial receiving agencies, such as the UPS store.
If requested, the Private Mailbox will be populated in this column instead of the output address columns.
Urbanization (PR Only)#
Urbanization name. These are used only in Puerto Rican addresses.
City Abbreviation#
City abbreviation is any is available.
State Name#
Full state name.
ISO Country Code#
ISO country code.
Carrier Route#
Carrier Route (CRRT.) This is a 4-character code defining the carrier route for the address.
Delivery Point#
Delivery Point (DP) and its check digit. This is a 2-digit code defining the address’s delivery location. The single-digit check digit follows the delivery point and serves as an error check for the ZIP Code, Plus4 and Delivery Point.
Parsed Address#
House Number#
Parsed House Number for the output address.
Street Pre-Directional#
Parsed Street Pre-Directional for the output address.
Street Name#
Parsed Street Name for the output address.
Street Suffix/Type#
Parsed Street Suffix (a.k.a. Street Type) for the output address.
Street Post-Directional#
Parsed Post-Direction for the output address.
Suite Name#
Parsed Suite Name for the output address.
Suite Number#
Parsed Suite Number for the output address.
Private Mailbox Name#
Parsed Private Mailbox Name for the output address.
Private Mailbox Number#
Parsed Private Mailbox Number for the output address.
Route Service Number (CAN Only)#
Parsed Route Service Number for the output address.
Canada Only.
Delivery Installation (CAN Only)#
Parsed Delivery Installation for the output address.
Canada Only.
Lock Box Number (CAN Only)#
Parsed Lock Box Number for the output address.
Canada Only.
Reporting#

Listware now gives you the option of creating an additional sheet of processing statistics for a completed process.
This allows you to easily print your results, or save for further analysis.
Create Report
Check this option if you want to have a report created when processing is complete.
The report will be created on a new Excel sheet immediately following the one you’ve processed.
Overwrite Existing Report
Select this option if you want to overwrite a report from a previous processing run.
Insert New Report
Select this option if you want to insert a new report sheet rather than overwrite a report from a previous processing run.
Report Contents#
Processing Settings#
Check this option if you want the Processing Settings (i.e., Processing Range and Cleansing Operations) to appear in the report.
Input/Output Fields#
Check this option if you want the Input and Output Fields listed in the report.
Processing Statistics#
Check this option if you want Processing Statistics (i.e., ‘Good’ Names count, ‘Fixed’ Addresses count, etc.) listed in the report.
Pie Charts#
Check this option if you want the Processing Statistics corresponding Pie Charts to appear in the report.
State Distribution Map#
Check this option if you want the report to contain a map of US States, colored to indicate each state’s record distribution.
Result Code Counts#
Check this option if you want a list of all Result Codes and their counts to appear in the report.
Suppress counts of 0#
Check this if you want the report limited to only those Result Codes in which at least one instance was detected.
Review Settings#
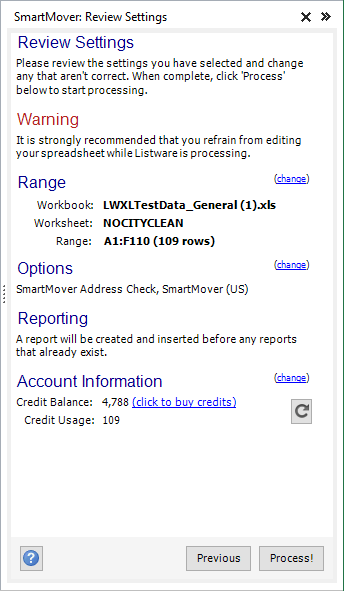
Review the settings you have selected and fix any errors. You may click ‘change’ to go back to the respective steps and modify your settings.
When you are ready, click ‘Process!’ to process your file.
Range#
Displays the range you selected in the Processing Range step.
Options#
Displays the options you selected in the NCOA Options step.
Reporting#
Displays the reporting you selected in the Reporting step.
Account Information#
Displays your account information (e.g. Credit Usage, etc.). Clicking ‘change’ will open your user account web page on Melissa’s web site.
Credit Balance#
Displays your credit balance.
Credit Usage#
Displays the estimated credit usage of your data cleansing process.
Processing#
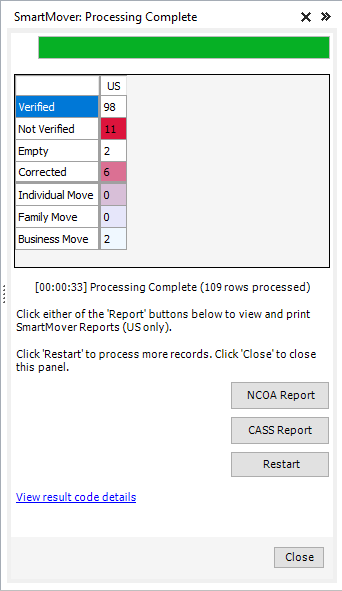
Processing#
Processing will display the progress of your data cleansing.
Verified#
The number of records whose address was verified.
Unverified#
The number of records whose address could not be verified.
Empty#
The number of records where the minimum input for Change of Address was not met.
The minimum input requirements are:
[FullName] OR [Company] OR [FirstName and LastName]
[Address1 OR Address2] AND [City/State] OR [Address1 OR Address2] AND [Zip]
Corrected#
The number of records whose address has been corrected.
Actions#
NCOA Report#
Click this button to view (and then optionally print) the NCOA Summary Report.
This report will contain your PAF information, the name of the list processed, and Change of Addres statistics.
CASS Report#
Click this button to view (and then optionally print) the 3553 CASS Form.
This report will contain address correction statistics.
Restart#
If you want to restart the data cleansing process (possibly to change some settings, process more records, etc.) click ‘Restart’.
Close#
Click ‘Close’ to close the Listware Add-in. Make sure to save your file before you exit Excel, or you may lose your cleansed data.
Credits Used#
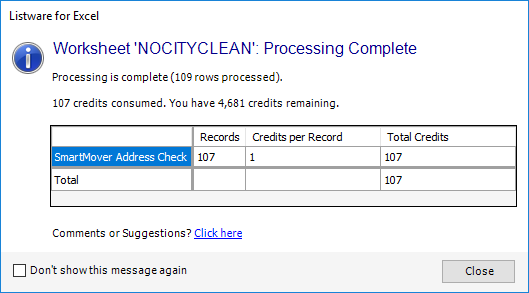
Once processing is complete a window will pop-up, displaying the amount of credits your data cleansing process used.
Business Coder#

Business Coder can be accessed by clicking the ‘Business Coder’ button in the ‘Enrichment’ section.
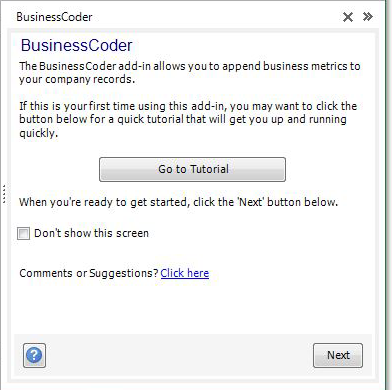
The Business Coder add-in allows you to append business metrics to your company records.
Express Entry#

Express Entry can be accessed by clicking the ‘Express Entry’ button in the ‘Data Entry’ section.
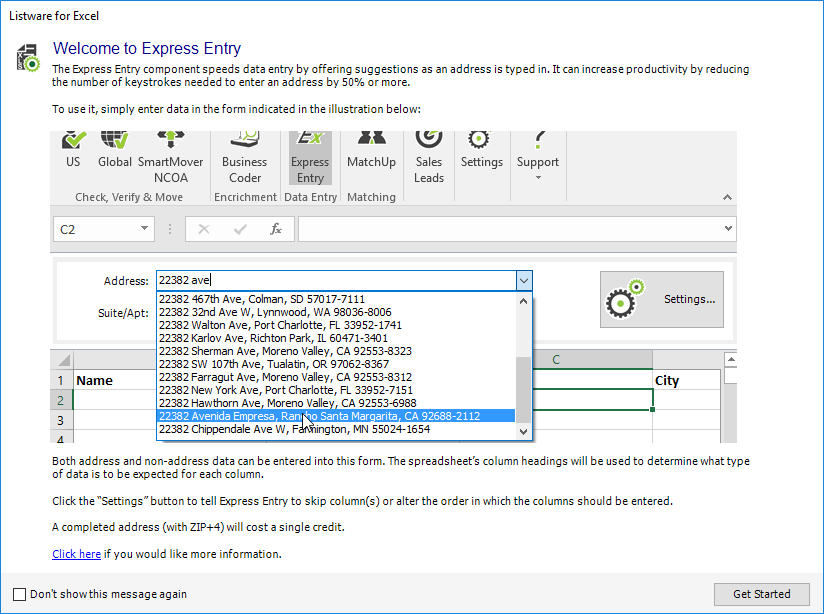
Express Entry can be used to enter any type of data, while enabling more accurate and convenient entry of addresses by validating the data as it is typed.
Express Entry only auto completes and verifies addresses.
When you are done with Express Entry, de-select the Express Entry button to close it.
Settings#

Listware settings can be accessed by clicking the ‘Settings’ button.
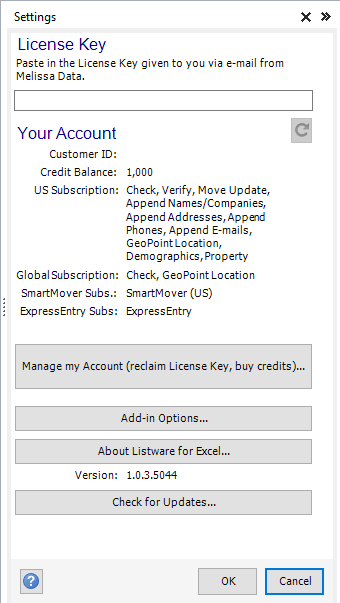
The settings panel allows you to set and view your License Key, view your Account status, and check your version of Listware.
Your Account#
License Key#
Displays your Melissa License Key. This is generated from your License Key.
Credit Balance#
Displays how many credits you have available for data cleansing processes.
Manage my Account#
Click this button to access your Melissa account through the web portal.
Add-in Options#
Click this button to view and modify your add-in options.
For more information, see Add-in Options below.
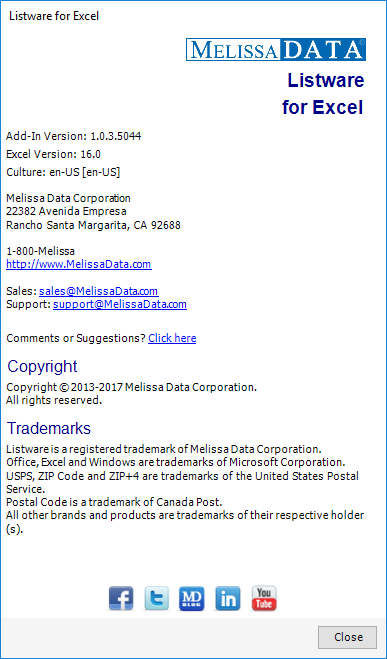
About Listware for Excel#
Click this button for version, contact, copyright, and trademark information.
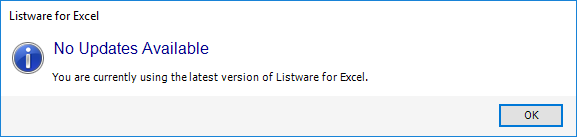
Check for Updates#
Click this button to check for updates to Listware for Excel.
Add-in Options#
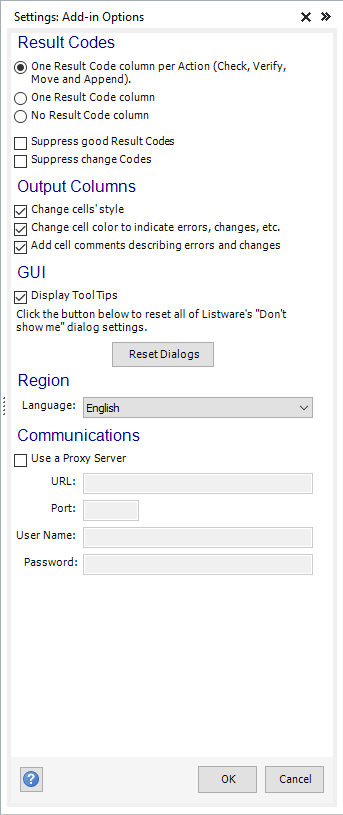
Result Codes#
One Result Code Column per Action#
There will be four Result Code columns, one each for Check, Verify, Move, and Append.
One Result Code Column#
There will be a single Result Code column, all types of codes (Check, Verify, Move, and Append) will be included in this single column.
No Result Code Column#
There will be no Result Code column (coloring and cell comments will still be added if selected below).
Suppress Good Result Codes#
‘Good’ Result Codes (ones that don’t indicate any problem) will not be listed in the Result Code column(s).
For US Check and Verify these are codes that start with ‘AS’. For Global Check, if an address returns a result code AV21-AV25, it and any other AS codes will be suppressed. Otherwise, if it is AV11-AV14, then the AS codes will not be suppressed.
Suppress Change Codes#
‘Change’ Result Codes (ones that indicate a correction) will not be listed in the Result Code column(s). However, coloring and cell comments will still reflect changes if those options are activated.
Output Columns#
Change cell’s style#
New columns will be added with a yellow-tinted background to help you differentiate them from you original data.
Change cell color to indicate errors, changes, etc.#
Cell coloring will be used to indicate errors, corrections, moves, and added data.
Add cell comments describing errors and changes#
Comments will be attached to cells to indicate errors, corrections, moves, and added data.
Note: Your choices for cell color and comments will affect your ability to fully analyze the processing results. See below.
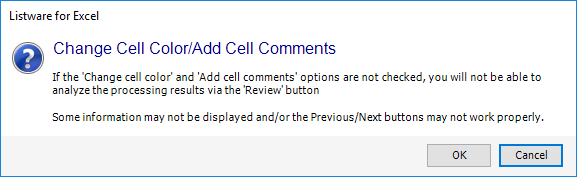
If the ‘Change cell color’ and ‘Add cell comments’ options are not checked, you will not be able to analyze the processing results via the ‘Review’ button.
Some information may not be displayed and/or the Previous/Next buttons may not work properly.
GUI#
Display Tool Tips#
Choose whether or not to display tool tips on mouse-over.
Region#
Selecting the language from the dropdown will enable you to override the default language (English) of the entire interface. After you change the language, you will be prompted to close and re-start Excel to see the interface written in the newly selected language.
Current languages available are
English (default)
French
German
Italian
Portuguese
Romanian
Spanish
Communications#
Use a Proxy Server#
Check this options if you use a Proxy Server.
Note: You need to restart Excel for this setting to take effect.
URL#
If you are using a proxy server, enter the url for the server here.
Port#
If you are using a proxy server, enter the port for the server here.
Name#
Enter the user name for the proxy server.
Password#
Enter the password for the proxy server.
Support#

Listware support can be accessed by clicking the ‘Support’ button.
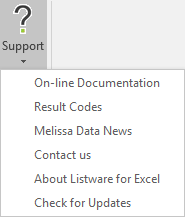
The Support tab provides you with quick links to Listware for Excel support, including updates, documentation, and the product version
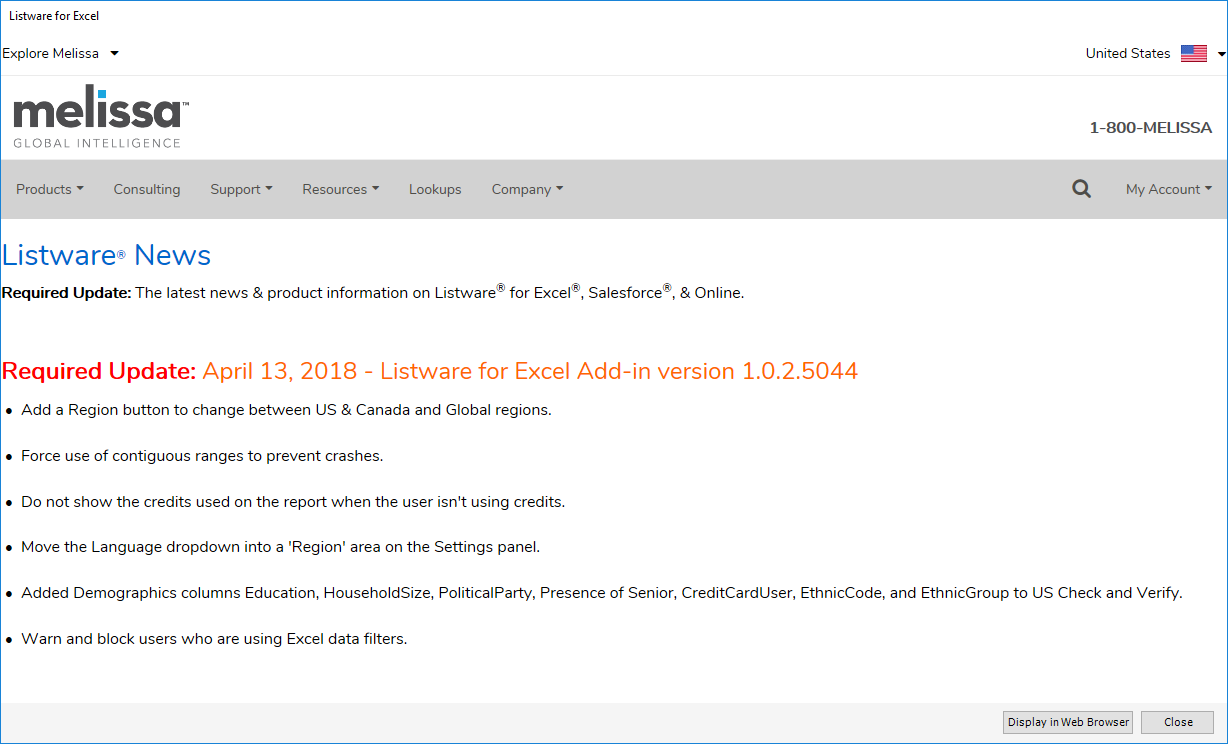
Melissa News#
This opens a Melissa News page with the newest information. You have the option to view this in your preferred web browser.
Contact Us
This links you to the feedback page for Listware for Excel.
About Listware for Excel#
Check for Updates#
Clicking this will check to see if there are any updates for your Listware for Excel add-in.