

Clean Suite for CRM: Salesforce Components#
Lightning Quick Actions#
Purpose#
Clean Suite provides six Lightning Components for quick actions on record pages. Each action starts one service request for the current record.
The action gets the record ID from Salesforce. It then finds Custom Mapping records for the object type of that record.
Only mappings with the required service value take part. The service writes only to fields that the mapping specifies.
Quick-Action Execution Flow#
The flow shows how a quick action uses a record and its matching mapping.
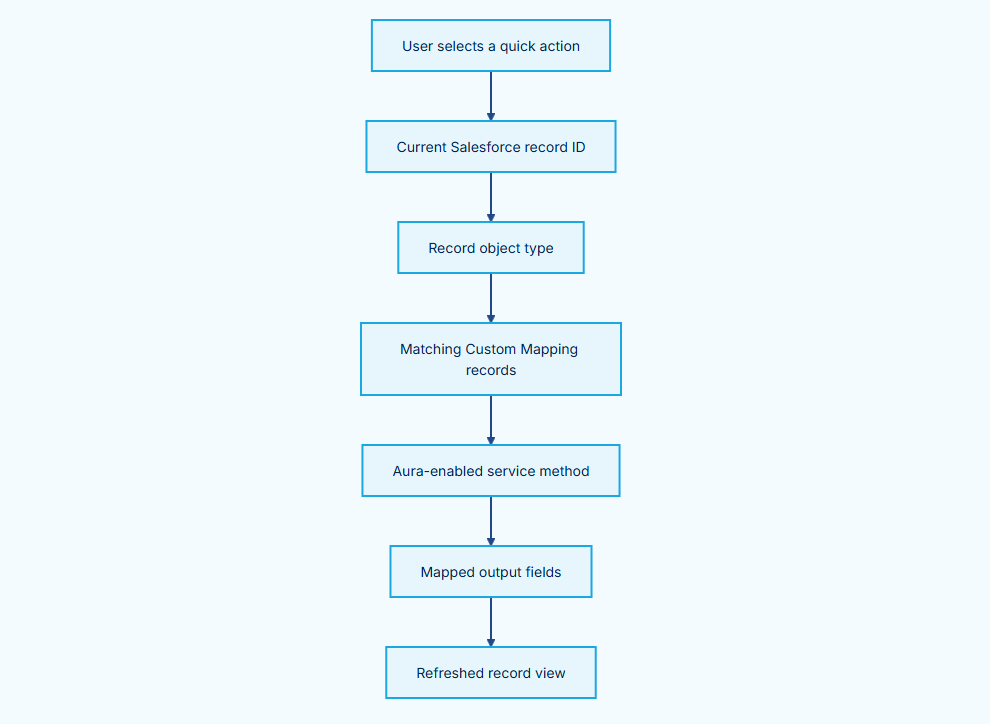
Diagram flow
User selects a quick action → Current Salesforce record ID
Current Salesforce record ID → Record object type
Record object type → Matching Custom Mapping records
Matching Custom Mapping records → Aura-enabled service method
Aura-enabled service method → Mapped output fields
Mapped output fields → Refreshed record view
Supported Quick Actions#
Create one Lightning Component action for each service that users need.
Lightning Component |
Suggested action label |
Apex service method |
Required mapping service |
|---|---|---|---|
|
Verify Business |
|
|
|
Verify Global Address |
|
|
|
Verify Email |
|
|
|
Verify Phone |
|
|
|
Verify Domestic Addr/Email/Phone/Name |
|
|
|
Verify Property |
|
|
The methods in this table are callable from quick actions. They accept one Salesforce record ID and return a string.
The package does not limit these actions to a fixed set of objects. Each method gets the object type from the record ID. It then selects Custom Mapping records for that object type.
Do not add an action to an object until you configure at least one mapping for its service. The methods read up to 100 mapping records for the object.
Add a Quick Action to a Record Layout#
Complete the service setup, license setup, and Custom Mapping setup before you add an action.
In Setup, open Object Manager and select the target object.
Open Buttons, Links, and Actions, then select New Action.

The action list header shows the New Action button.
Set the action type to Lightning Component. Select the required Clean Suite component from the table.
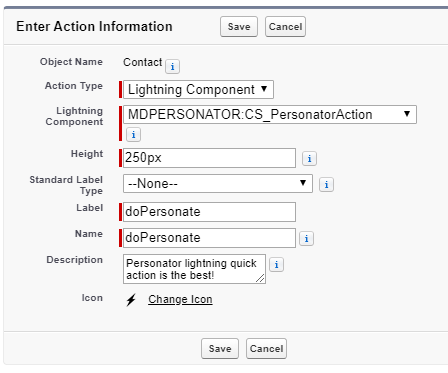
The example sets the Lightning Component to MDPERSONATOR:CS_PersonatorAction on the Contact object.
Enter an action label that identifies the service, then save the action.
Open Page Layouts. Select each layout that must show the action.
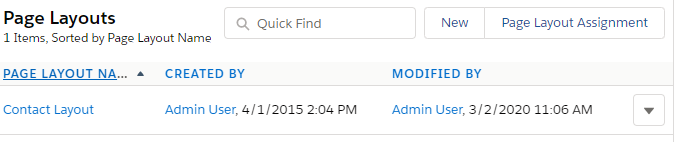
The page layout list shows each layout that is defined for the object.
In the layout, open Mobile & Lightning Actions. Drag the new action into Salesforce Mobile and Lightning Experience Actions.
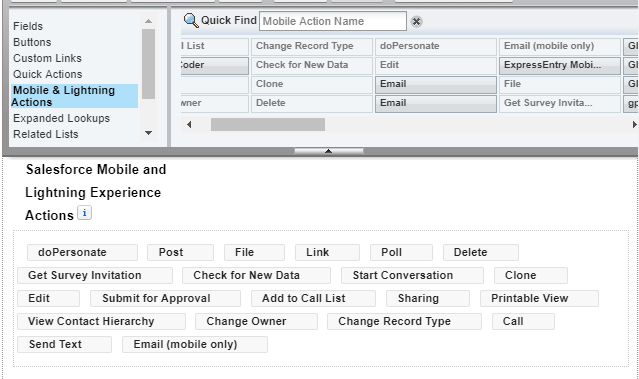
The layout editor shows the new action in the Salesforce Mobile and Lightning Experience Actions section.
Save the page layout.
Open a record of that object and confirm that the action is available.

The record page header shows the new quick action next to the standard buttons.
Test the action with a user who has the required permissions and a record that has mapped input data.
Repeat these steps for each record type and page layout that needs the service. An action can appear on a layout even when the object has no matching mapping. In that case, it does not process data.
User Experience#
When a user selects a quick action, the action starts immediately. It shows the package wait message and a spinner while the Apex call runs.
The action has no input form and no result table. It closes when the call completes and refreshes the record view.
After a successful Apex response, the action shows a success confirmation message for seven seconds. After an Apex error, it shows an error confirmation message for seven seconds. The error confirmation message includes the first Apex error message when Salesforce provides one.
A success confirmation message means that the call completed with a SUCCESS response state. The controllers do not inspect the string returned by the service method.
Do not use the confirmation message as proof that the service changed a record. Open the refreshed record and check the mapped output fields.
Example Result#
These images show a Personator action on a Contact record. The mapping writes the Other Address, Personator Result Codes, and Clean Suite Personator Result fields.
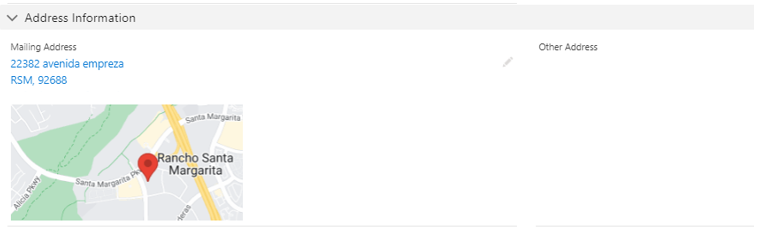
Before validation. The Mailing Address field holds the entered value. Other Address is empty.
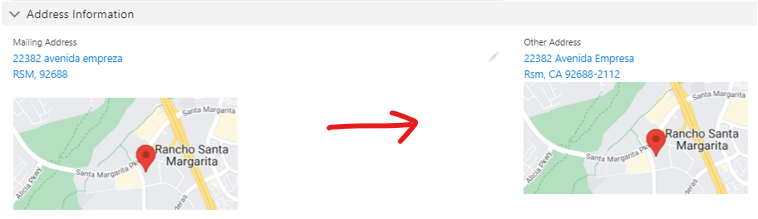
After validation. Personator standardized the street name and added the plus-4 code.

Before validation. The result fields are empty.

Permissions and Configuration#
Assign a Clean Suite permission set before users run an action. The package includes these permission set files:
Melissa_Global_Intelligence_Permission_SetMelissa_Global_Intelligence_Permission_Set_NonAdmin
Both permission sets grant Apex class access to the six action controllers. The controllers are MD_BusinessWSExt, MD_GlobalAddressWSExt, MD_GlobalEmailWSExt, MD_GlobalPhoneWSExt, MD_PersonatorWSExt, and MD_PropertyV4WSExt.
Also give each user access to the target object, the current record, and the mapped input and output fields. A quick action does not bypass Salesforce object, record, or field security.
Configure the Clean Suite license for every service that you expose. The package service settings and mappings control the request data and destination fields.
Important Limitations#
The service methods use the object type and Custom Mapping records at run time. They do not include a separate record-layout configuration screen.
If an object has no Custom Mapping records, all six methods return an empty string. They also skip mappings whose service value does not match the action.
Some access checks also return a string instead of an Apex error. For example, BusinessCoder returns FAIL when the target object is not updateable. Global Email returns an empty string when required upsert access is missing.
In these cases, the controller can show a success confirmation message because the Apex call itself completed. Verify output fields after each test.
The action methods are synchronous Aura calls. They are different from the package doOne... methods, which use future callouts for one record.
Other Package Surfaces#
Express Entry Aura and LWC Components#
LX_ExpressEntry is an Aura Lightning page component. It supports all FlexiPage types and Experience Cloud pages. It can receive the current record ID.
LX_ExpressEntry_Flow is an Aura Screen Flow component. globalEEFreeForm is an LWC with the lightning__FlowScreen target only.
The managed package gets the Express Entry service credential internally.
Do not add these Express Entry components as record-layout quick actions. Add LX_ExpressEntry to a Lightning page. Add LX_ExpressEntry_Flow or globalEEFreeForm to a Screen Flow.
Express Entry Visualforce Overrides#
Express Entry also provides legacy Visualforce New and Edit overrides. These are action overrides, not Lightning record-layout quick actions.
Object |
Standard action |
Visualforce page |
|---|---|---|
Account |
New, Edit |
|
Contact |
New, Edit |
|
Contact |
New, Edit for mobile |
|
Lead |
New, Edit |
|
Lead |
New, Edit legacy |
|
To configure an override, open the object in Object Manager. Open Buttons, Links, and Actions, then edit the standard New or Edit action. Select Visualforce Page, select the matching page, and save.
Use the mobile Contact page only for the mobile form factor. Use the modern Lightning page or Screen Flow surfaces for new Lightning implementations.
Express Entry consumes credits when it requests suggestions. It is autocomplete, not final deliverability verification. Use Personator or Global Address when the business process requires verification or standardization.
Lightning Lookups#
Clean Suite does not define a component named LightningLookup or LightningLookups.
The package uses two Aura lookup components for object, field, and saved-mapping selection. They are package controls. They are not Salesforce record lookups.
Lookup Selection Flow#
The flow shows how the package selects an object, fields, or a saved mapping.
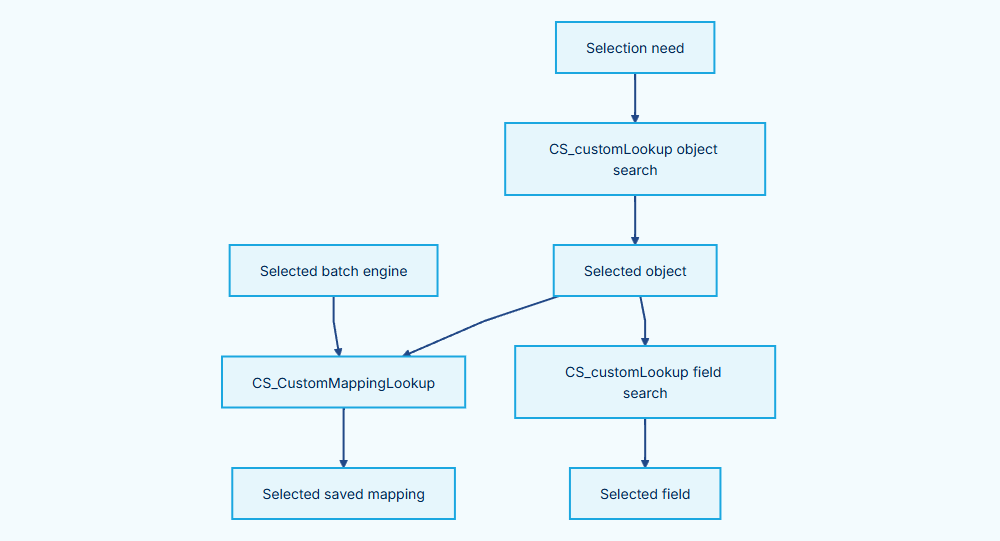
Diagram flow
Selection need → CS_customLookup object search
CS_customLookup object search → Selected object
Selected object → CS_CustomMappingLookup
Selected batch engine → CS_CustomMappingLookup
CS_CustomMappingLookup → Selected saved mapping
Selected object → CS_customLookup field search
CS_customLookup field search → Selected field
1. Object and Field Lookup#
CS_customLookup is a single-selection Aura component. Clean Suite uses it in Advanced Mappings and Batch Processing to select a target object.
When objectAPIName is blank, the component searches Salesforce object API names and labels. It only returns objects that the user can access and query. It does not return custom settings.
When objectAPIName contains an object API name, the component searches field API names and labels for that object. It does not return fields of type ADDRESS or ANYTYPE.
The filters attribute accepts a comma-separated list of Salesforce field display types. A nonblank value limits the returned fields to those types. A blank value does not apply a type limit.
The component uses a case-insensitive substring match. It shows no more than 20 returned items.
Select an item to store its name and label values as the selected record. Remove the selected pill to clear the selection and return to the search input.
Supported Field Types#
The component default permits these field display types:
STRINGTEXTAREAPICKLISTEMAILPHONE
A caller can set filters to another valid display-type list. The package source does not provide an administrator setting for this list.
2. Saved Mapping Lookup#
CS_CustomMappingLookup is a single-selection Aura component for saved Clean Suite mappings. Batch Processing uses it after the user selects an object and an engine.
The component reads mapping records for the selected object. It keeps mappings whose stored service matches the selected batch engine. It returns each matching mapping as its name and label.
The package maps these batch engine names to mapping services:
Batch engine |
Mapping service |
|---|---|
|
|
|
|
|
|
|
|
|
|
|
|
The server query reads no more than 100 mapping records for the selected object. The component shows no more than 20 returned items.
The component sends the typed search value to the server. The mapping query does not use that value to filter mapping names. Therefore, typing does not narrow the saved-mapping result set.
3. Result Lookup Relationship Fields#
Melissa documentation also uses the name Lightning Lookups for a standard Salesforce lookup relationship field. That field points a source record at its Clean Suite result record. It is a Salesforce field, not a package component.
Create the field before you map a Lookup Field output in Advanced Mappings.
Open Setup.
Open Object Manager.
Select the object.
Open Fields & Relationships.
Click New.
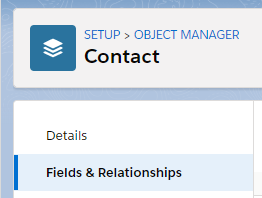
Start a new custom field on the source object.
Select Lookup Relationship.
Click Next.

A lookup relationship links the record to its result record.
Select the Clean Suite result object in the Related To list.
Click Next.
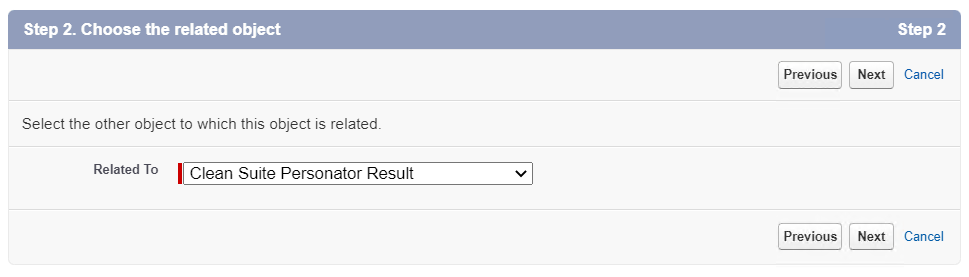
For Personator results, select Clean Suite Personator Result.
Enter a Field Label.
Enter a Field Name.
Set the description and relationship options.
Click Next.
Set the security settings that your org requires.
Click Next.
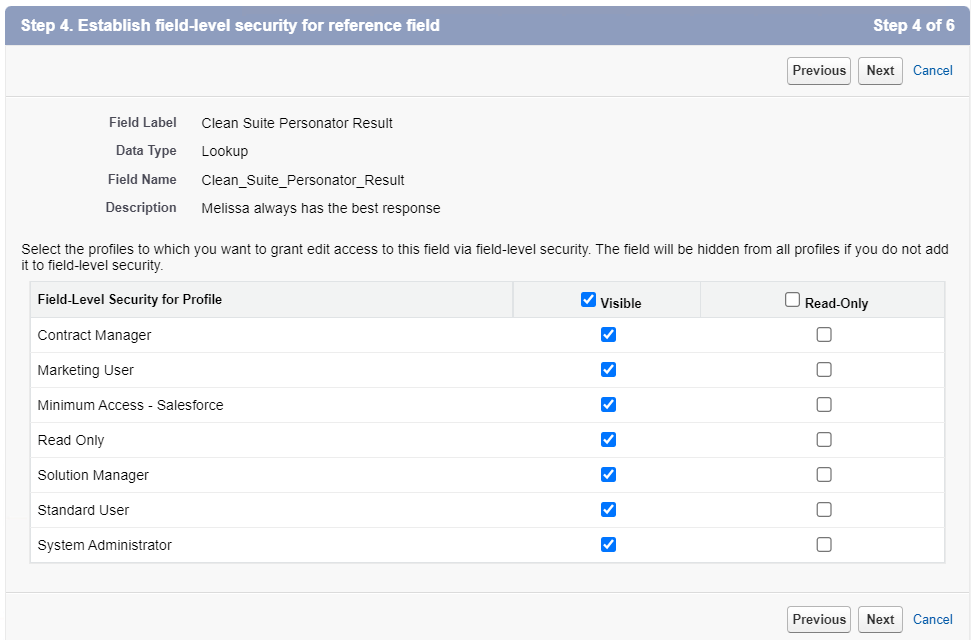
Grant access to the profiles that run Clean Suite.
Set the page layouts.
Click Next.
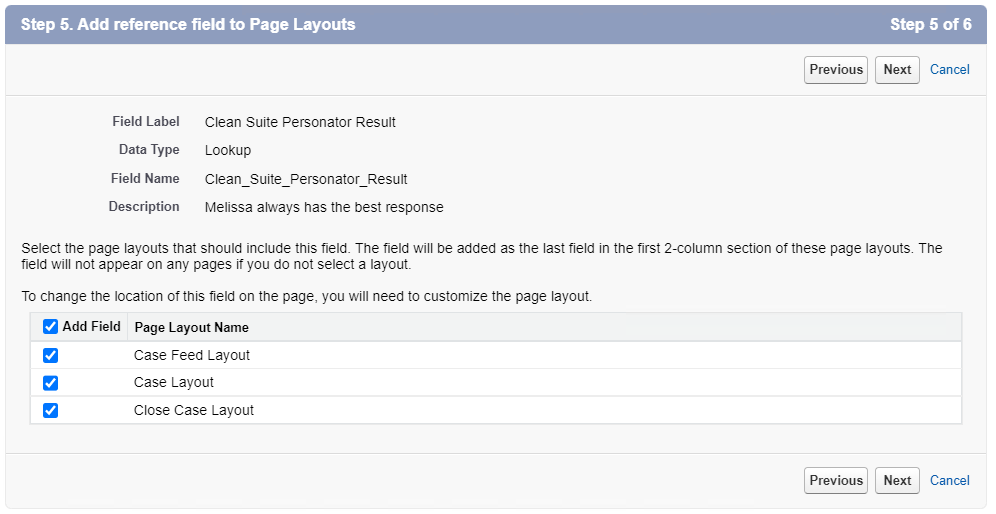
Select the layouts that must show the field.
Set the related lists.
Click Save.
In Advanced Mappings, open the Lookup Field output.
Select the new field.
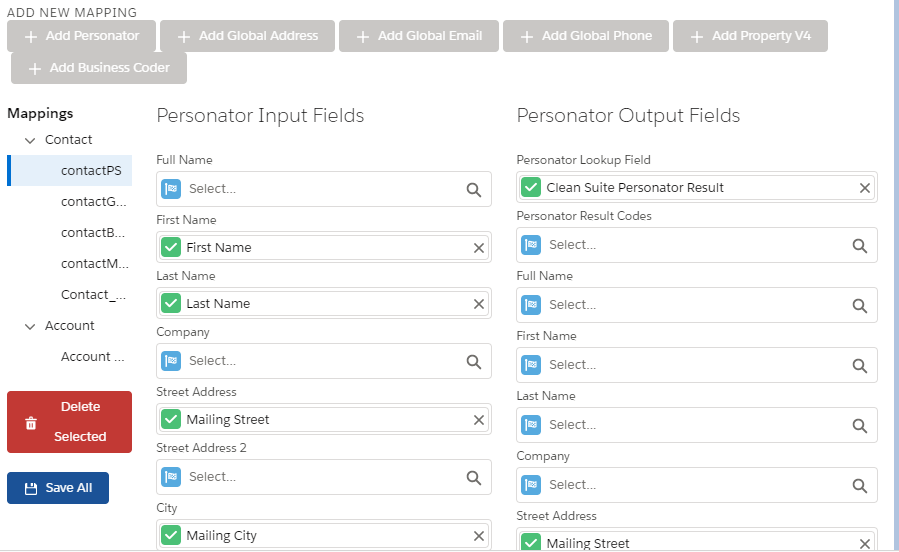
The service then writes the full response to the linked result record.
Lightning Global Express Entry#
Global Express Entry lets a user search for an address and select a suggestion. The selected values can populate address fields. It is an autocomplete service. Use another validation process when you need deliverability confirmation.
Clean Suite provides these Express Entry surfaces:
Surface |
Component or page |
Use |
|---|---|---|
Lightning page |
|
Add address autocomplete to a record, app, home, or Experience Cloud page. |
Screen Flow |
|
Use this LWC in a new Screen Flow. |
Screen Flow |
|
Keep this Aura component in existing Screen Flows. |
Legacy Visualforce |
|
Override a standard New or Edit action. |
Legacy Visualforce mobile |
|
Use the Contact mobile override page. |
Surface Selection Flow#
Select the surface that matches the page or Screen Flow where users enter addresses.
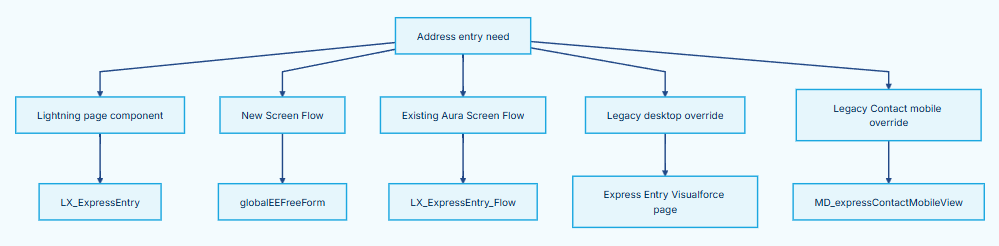
Diagram flow
Address entry need → Lightning page component
Address entry need → New Screen Flow
Address entry need → Existing Aura Screen Flow
Address entry need → Legacy desktop override
Address entry need → Legacy Contact mobile override
Lightning page component → LX_ExpressEntry
New Screen Flow → globalEEFreeForm
Existing Aura Screen Flow → LX_ExpressEntry_Flow
Legacy desktop override → Express Entry Visualforce page
Legacy Contact mobile override → MD_expressContactMobileView
Lightning page component#
Add CS ExpressEntry in Lightning App Builder. LX_ExpressEntry supports all Lightning page types and receives the current record ID.
Open the target Lightning page in App Builder. Click the gear icon, then select Edit Page.
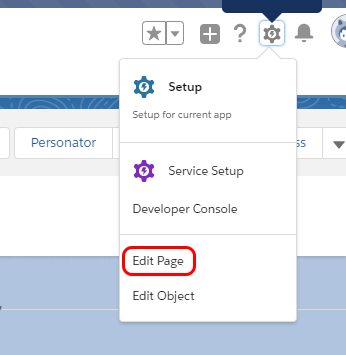
Open the record page in Lightning App Builder.
Find CS ExpressEntry in the component pane. Drag it onto the page.
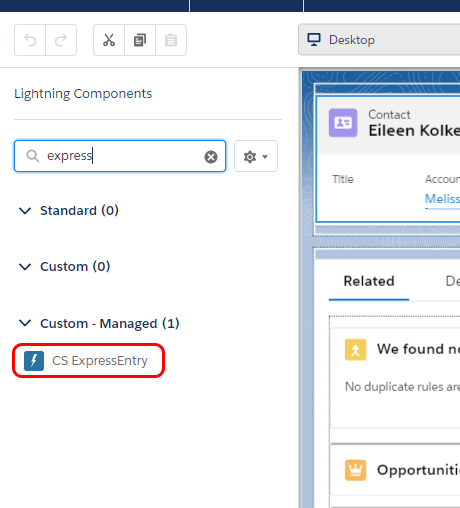
Place the component where users enter an address.
Select the component to open its properties.
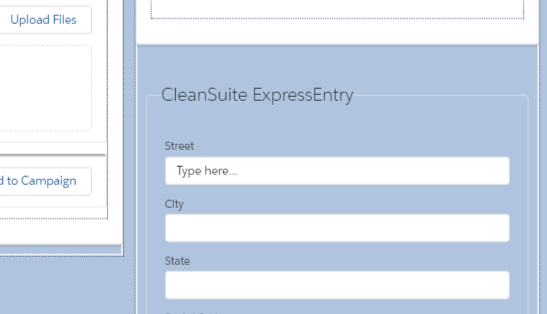
The properties pane opens on the right.
Set the field-binding properties for the fields that the component must update. Set the search and display properties that your page needs.
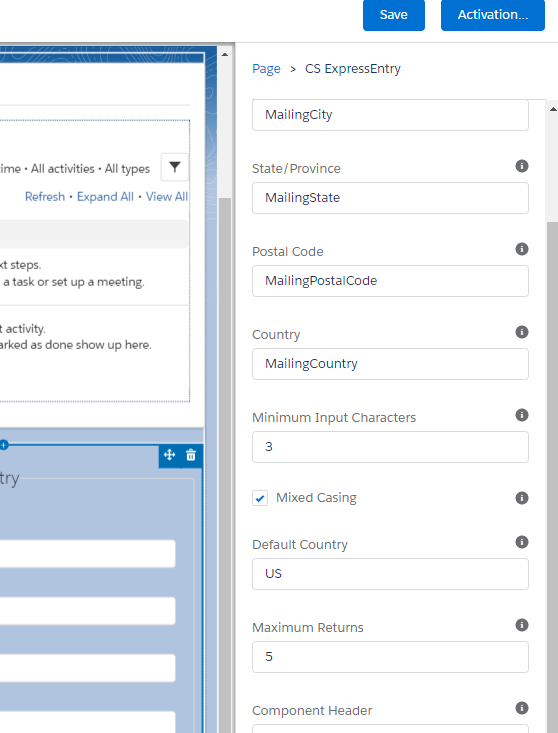
Enter the API name of each target field.
Save and activate the page. Return to the record and enter an address in the search field.
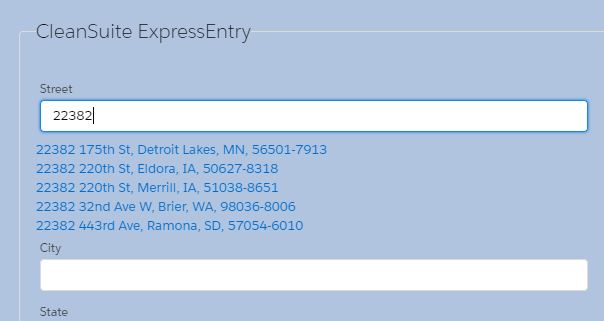
Confirm that the component returns address suggestions.
The component shows an address search field, selected address fields, Clear, and Save. Select a suggestion. Then select a suite when the service returns suite values. Select Save to update the current record.
Field bindings#
Set each property to a target field API name. Leave an optional property blank when you do not want an update.
App Builder property |
Component attribute |
Selected value |
|---|---|---|
Street |
|
Street |
Suite |
|
Suite |
Locality/City/Town |
|
City |
State/Province |
|
State or province |
Postal Code |
|
Postal code |
Country |
|
Country |
County/SubAdministrativeArea |
|
County |
Latitude |
|
Latitude |
Longitude |
|
Longitude |
MAK Field |
|
MAK |
BaseMAK Field |
|
BaseMAK |
Set Combine Street and Suite (USPS standard) to combine both values in the Street target field. Otherwise, use the separate Street and Suite bindings. Set Prevent User from changing Values to disable manual edits after a selection. User Changed Values reports whether the displayed values differ from the selected values.
Other page properties are Component Header, Default Country, Minimum Input Characters, Maximum Returns, and Mixed Casing. They also include Show Lat/Long, Show County, and Full Postal Code US. The Aura component defaults to 25 returns, a minimum of 3 characters, mixed case, and US. The Cloud API returns no more than 100 results. Do not set Maximum Returns above 100.
Screen Flow components#
globalEEFreeForm#
Use globalEEFreeForm in new Screen Flows. It is available only for a Flow screen.
Create or edit a Screen Flow.
Add a Screen element.
Add
globalEEFreeFormto the screen.Set Available Countries (CSV) when the default list does not apply.
Bind the required output properties to Flow variables.
Use the variables in later Flow elements.
Available Countries (CSV) defaults to US,GB,DE. The component requests suggestions after more than three input characters. It requests up to 10 suggestions.
Output-only |
Value after a selection |
|---|---|
|
Delivery address |
|
Locality |
|
Administrative area |
|
Postal code |
|
Two-letter ISO 3166 country code, when returned |
|
Selected suite, when returned |
|
Sub-administrative area |
|
Postal-code extension when the selected postal code contains one |
|
Latitude |
|
Longitude |
|
Formatted address string |
|
Melissa Address Key |
|
Base Melissa Address Key |
The component also exposes output-only addressLine1. The selection code does not assign or notify this property. Do not depend on it for selected street data. Use street.
LX_ExpressEntry_Flow#
Use MD Express Entry Flow for an existing Aura-based Screen Flow.
Add a Screen element.
Add MD Express Entry Flow.
Set the input options.
Bind the output values that later Flow elements require.
Save and activate the flow.
The configurable inputs include Prevent User from changing Values, Minimum Input Characters, Maximum Returns, and Mixed Casing. They also include Show County, Combine Street and Suite (USPS standard), and Full Postal Code US.
The outputs are Street, Suite, City, State, PostalCode, County, Country, Latitude, Longitude, MAK, and BaseMAK. The component also exposes userChangedValues.
Legacy Visualforce pages#
The desktop pages use MD_ExpressEntry as a controller extension:
Object |
Current page |
Legacy page |
|---|---|---|
Account |
|
— |
Contact |
|
— |
Lead |
|
|
For Contact mobile, use MD_expressContactMobileView. That page includes MD_expressMobileComponent twice. It passes the Contact Mailing and Contact Other map names. The component accepts record, mapping, num, and recordType attributes. Its current markup only renders the ExpressEntry Mobile heading.
To configure a legacy override:
Open the object in Object Manager.
Open Buttons, Links, and Actions.
Edit the required New or Edit action.
Select Visualforce Page.
Select the page that matches the object and action.
Save the action.
Test the configuration#
On a Lightning page, enter an address, select a suggestion, and select Save.
Confirm that each configured record field contains the selected value.
In a Screen Flow, select an address and inspect the bound output variables.
On a legacy override, select New or Edit and confirm that the selected Visualforce page opens.
Do not test Express Entry by calling internal package methods. Do not expose or log service credentials.
Clean Suite Advanced Mappings#
Advanced Mappings connect fields on one Salesforce object to a Clean Suite service. The mapping then identifies Salesforce fields that receive service results.
The Advanced Mappings component supports these service values:
Service shown in the component |
Stored service value |
|---|---|
Personator |
|
Global Address |
|
Global Email |
|
Global Phone |
|
Property V4 |
|
BusinessCoder |
|
SmartMover US |
|
SmartMover CA |
|
Create a Mapping#
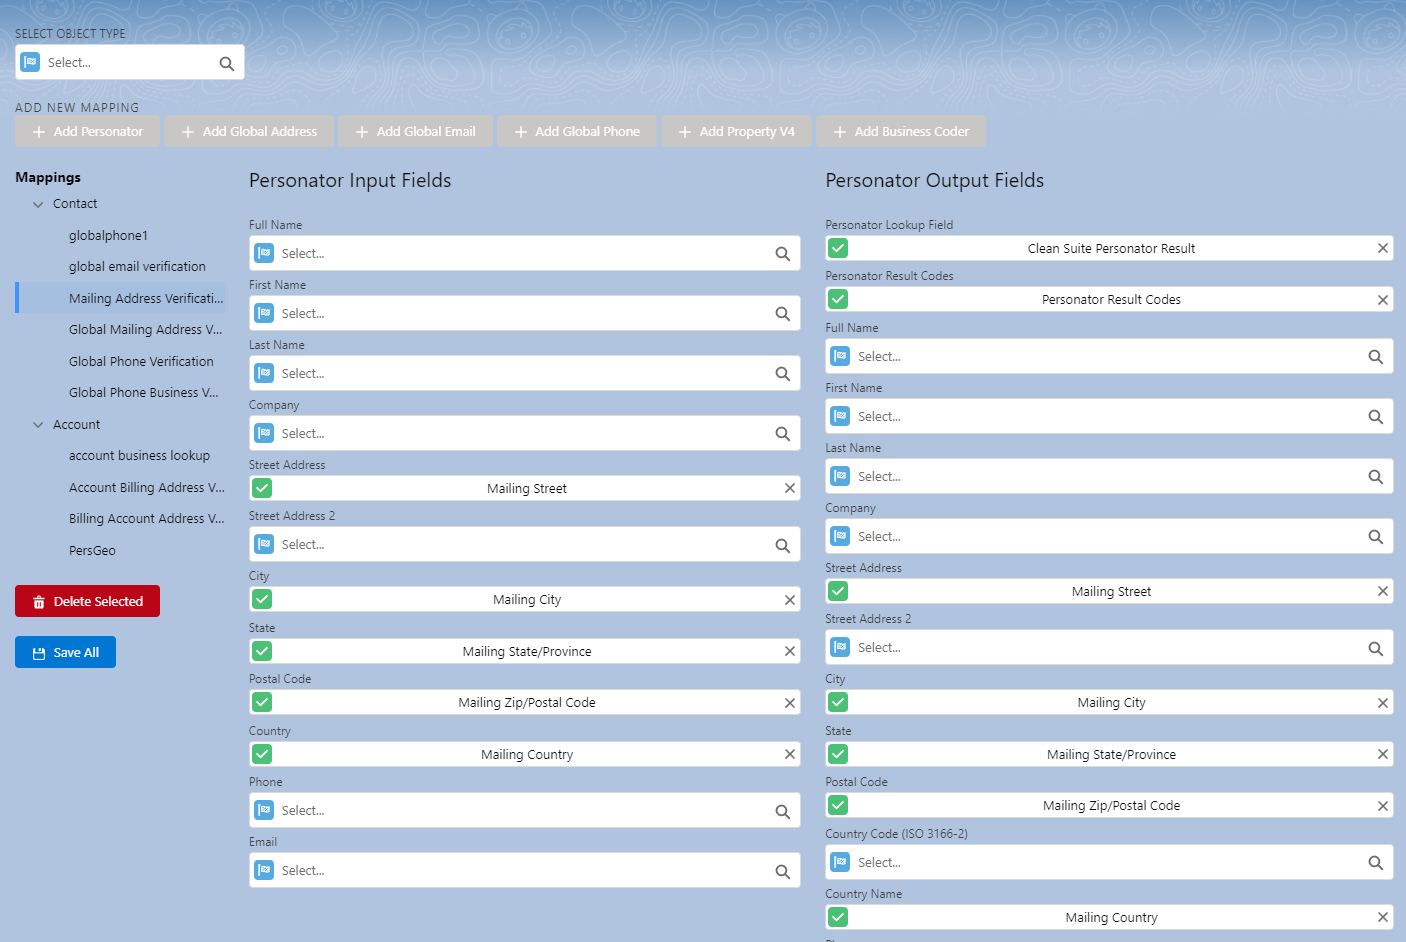
A Personator Contact mapping named Mailing Address Verification. The input column sends data. The output column receives the response.
Select the Salesforce object that contains the source and result fields.
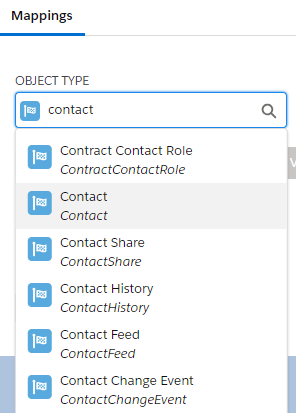
Enter the object name under SELECT OBJECT TYPE, then select it.
Select the Clean Suite service.
Enter a mapping name.
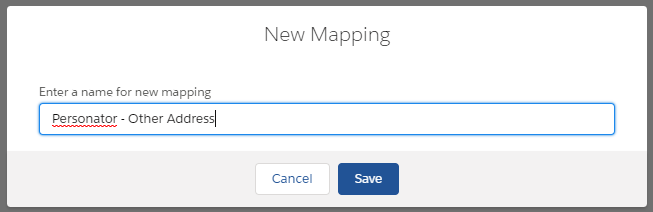
Use a name that you can recognize later, such as Mailing Address Verification.
Save the new mapping.
Select the mapping in the tree.
Select Salesforce fields for the service input fields.
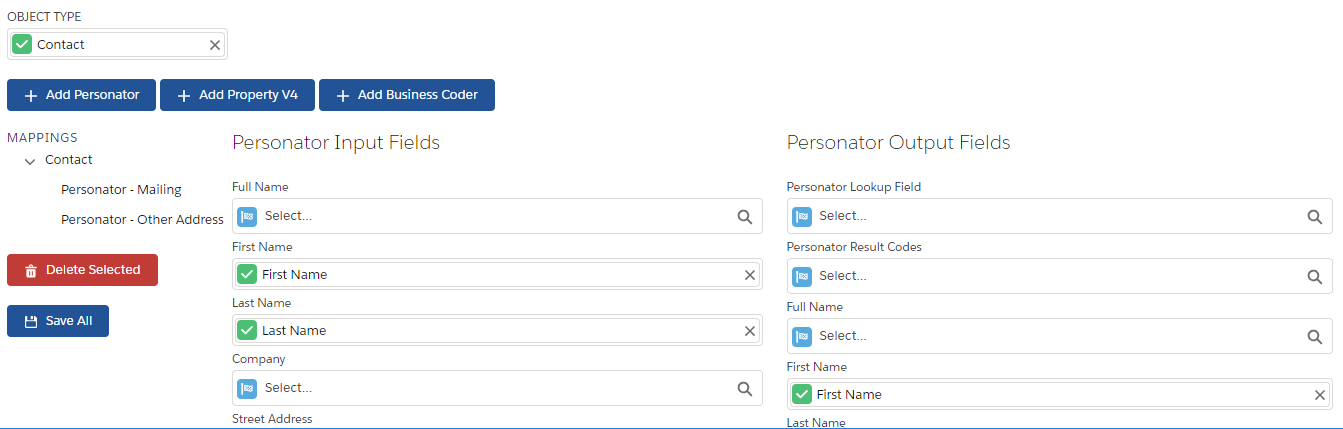
Enter a field name in the text box, then select it from the list.
Select Salesforce fields for the service output fields.
Save all mappings.
The component groups saved mappings by object type. It creates a mapping with an empty input map and output map. The component does not require an input or output selection before it creates the mapping.
Mapping Data Flow#
The flow shows how a mapping connects source fields, a service, and result fields.
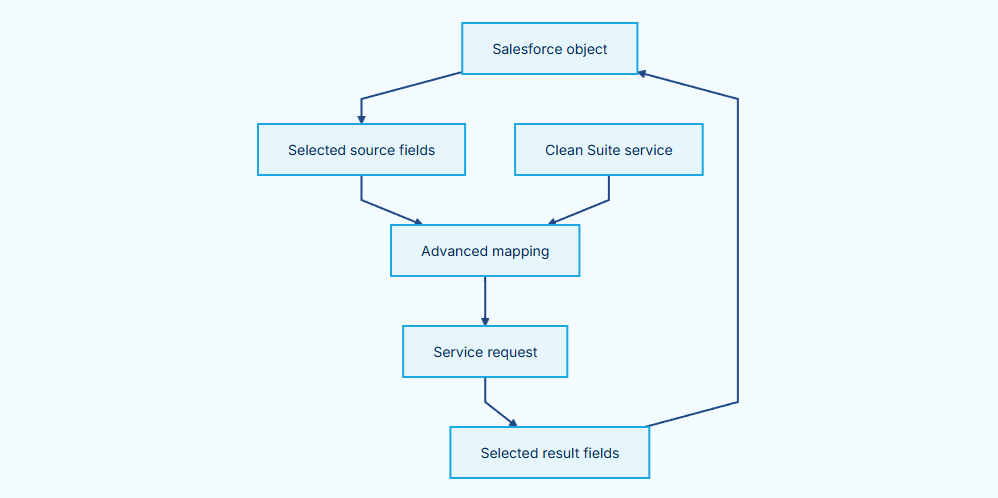
Diagram flow
Salesforce object → Selected source fields
Selected source fields → Advanced mapping
Clean Suite service → Advanced mapping
Advanced mapping → Service request
Service request → Selected result fields
Selected result fields → Salesforce object
Stored Mapping Schema#
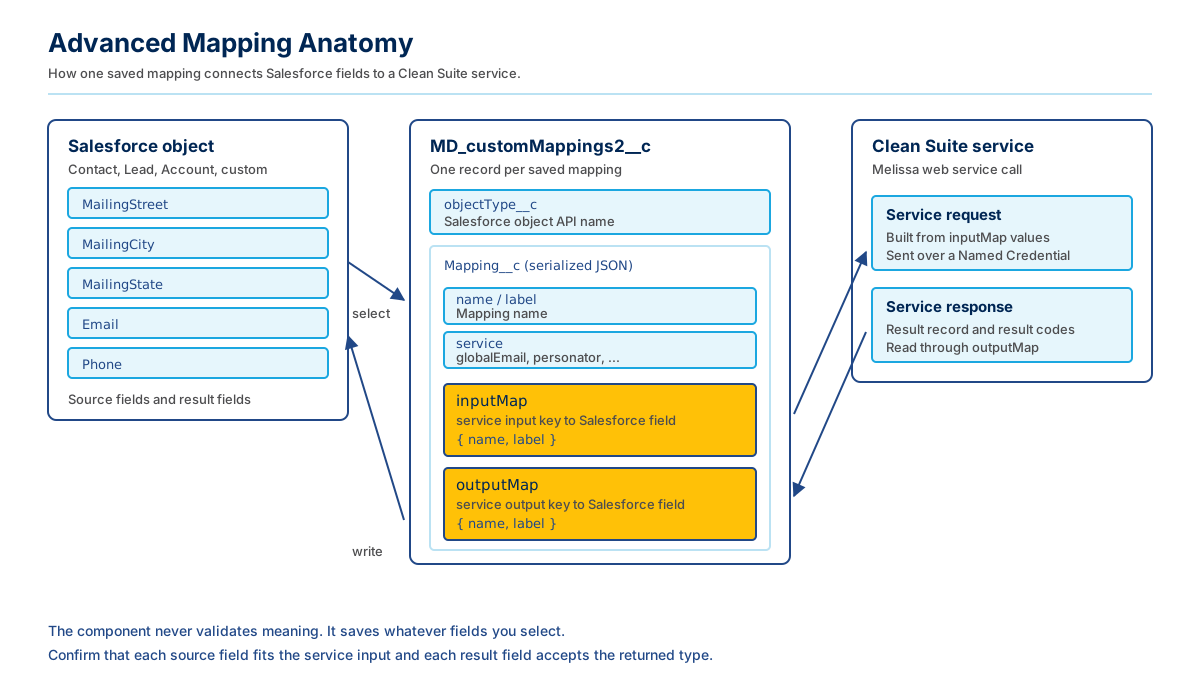
Structure of one saved mapping. The inputMap builds the request. The outputMap writes the response.
Clean Suite stores each advanced mapping in an MD_customMappings2__c record. The record has an objectType__c text field and a Mapping__c long-text field. Mapping__c contains the serialized mapping.
The serialized mapping has these top-level members:
MemberUse |
Description |
|---|---|
|
Mapping name. |
|
Mapping label. The component sets this to the mapping name when it creates the mapping. |
|
Clean Suite service value. |
|
Salesforce object API name. |
|
Mapping record ID. The component sets this value after it loads a saved mapping. |
|
Map of service input keys to selected Salesforce fields. |
|
Map of service output keys to selected Salesforce fields. |
Each selected field is a map with name and label values. The name value is the Salesforce field API name. The label value is the field label shown to the user.
Do not create a separate fields array for an advanced mapping. The Advanced Mappings Apex wrapper expects inputMap and outputMap as maps of field-selection maps.
Input Fields#
The component shows input fields for the selected service. Select a source field only when its value fits the service input.
ServiceInput purpose shown by the component |
Description |
|---|---|
Personator |
FreeForm, name, company, address, city, state, postal code, country, phone, and email. |
Property V4 |
Street address, city, state, postal code, and country. |
BusinessCoder |
Company, address, city, state, postal code, country, stock ticker symbol, and web URL. |
Global Address |
Organization, address lines 1 through 8, city or town, state or province, postal code, and country. |
Global Email |
Email. |
Global Phone |
Phone, country, and country of origin. |
SmartMover US and SmartMover CA |
Name, company, address, city, state, postal code, country, phone, and email. |
For example, Global Email reads the field selected by its email input entry. It queries the selected field from the mapping object before it sends the email value to the service.
Minimum inputs#
Each Melissa service accepts a defined set of minimum inputs. Map at least one complete set for the service that you select.
ServiceAccepted minimum input sets |
Description |
|---|---|
Personator |
Address plus postal code. Address plus city and state. Address plus last line. Email. Phone. Full name. IP address. FreeForm. Melissa Address Key. Melissa Identity Key. |
Global Address |
Address line 1, city, state or province, postal code, and country. |
Global Email |
Email. |
Global Phone |
Phone. |
BusinessCoder |
Address plus city, state, and postal code. FreeForm. Phone. Stock ticker symbol. Web URL. |
Property V4 |
FIPS code plus APN. Melissa Address Key. FreeForm. |
SmartMover US and SmartMover CA |
A name and an address together. For the name use full name, or first and last name, or company. For the address use address line 1, plus city and state or postal code. |
Personator accepts either FreeForm or the parsed fields. When you map the parsed fields, the minimum is address plus city and state, or address plus postal code.
For Personator, BusinessCoder, and Property, any one listed set is enough. SmartMover is different. It needs both a name and an address. Melissa records full name as required unless you map the parsed name inputs.
Each minimum input set comes from the Melissa Cloud API reference guide for that service on docs.melissa.com.
Output Fields#
The component shows a separate output list for each service. Select the Salesforce field that must receive each available service result. Leave an output unselected when the object does not need that result.
Clean Suite uses the name value from each output entry to select the target field. It writes a value only for output entries that have a nonblank field name.
For example, Global Email can use output entries for the saved result record, result codes, and email. It can also use an output entry for the deliverability confidence score. The service code writes these values from its saved response only when the related output entry exists.
The output keys are service-specific. Use the fields that the Advanced Mappings component displays for the selected service. Do not copy output keys from another Clean Suite service.
Map an output to a Salesforce picklist field only when the output value matches a picklist value.
Personator returns the state twice. State returns the two-letter abbreviation, such as CA. StateName returns the full name, such as California. Melissa added StateName for picklists that store full state names.
Global Address returns the United States state as a two-letter abbreviation in AdministrativeArea. CountrySubdivisionCode returns an ISO 3166-2 code, such as US-CA. Do not map CountrySubdivisionCode to a State picklist.
Validation and Save Behavior#
The component does not validate a complete mapping before it saves it. It lets you save a mapping with empty input and output maps. It also does not check that a selected field has the correct business meaning for a service input or output.
The server deserializes the mapping into its mapping wrapper and stores the serialized mapping. A save error can occur when Salesforce access or data operations fail. The component then shows an error message.
A successful save does not prove that the mapping can run. The service must later read the selected source fields and write the selected result fields.
Safe Practices#
Use a clear, unique mapping name. The mapping name identifies saved service results for at least Global Email.
Map fields on the selected object only. The component queries and updates the mapping object.
Use Salesforce field API names selected by the component. Do not hand-edit
Mapping__c.Confirm that input fields contain values that match the selected service input.
Confirm that output fields accept the returned value type.
Give users access to the mapping object and the selected Salesforce fields.
Test one record after you save a new or changed mapping.
Change one service mapping at a time. A mapping can affect later service requests and field updates.
Clean Suite Batch Processing#
The Clean Suite Batch Processing tab starts Salesforce Batch Apex jobs. The tab uses the CS_CleanSuiteBatch Lightning component and MD_CleanSuiteBatchController.
Before you start a job, check the settings in Administration and Advanced Mappings. The tab shows this warning.
Supported engines#
The tab shows these engine options when it starts:
Engine label |
Controller value |
Batch implementation |
|---|---|---|
Personator |
|
|
Global Address |
|
|
Global Phone |
|
|
Global Email |
|
|
SmartMover US |
|
|
SmartMover Canada |
|
|
Personator, Global Address, Global Phone, and Global Email do not need a SmartMover agreement check.
SmartMover options have separate availability rules. The controller reads the newest webServiceOptions settings record. It can evaluate those rules only when the current user can read both agreement fields. SmartMover US requires SmartMoverAgreement__c to be true. SmartMover Canada requires SmartMoverCAAgreement__c to be true.
If no engine is available, the tab disables Start Batch Job.
Batch Dispatch Flow#
This flow shows how the tab sends selected inputs to the batch controller. The controller then queues a job for the selected engine.
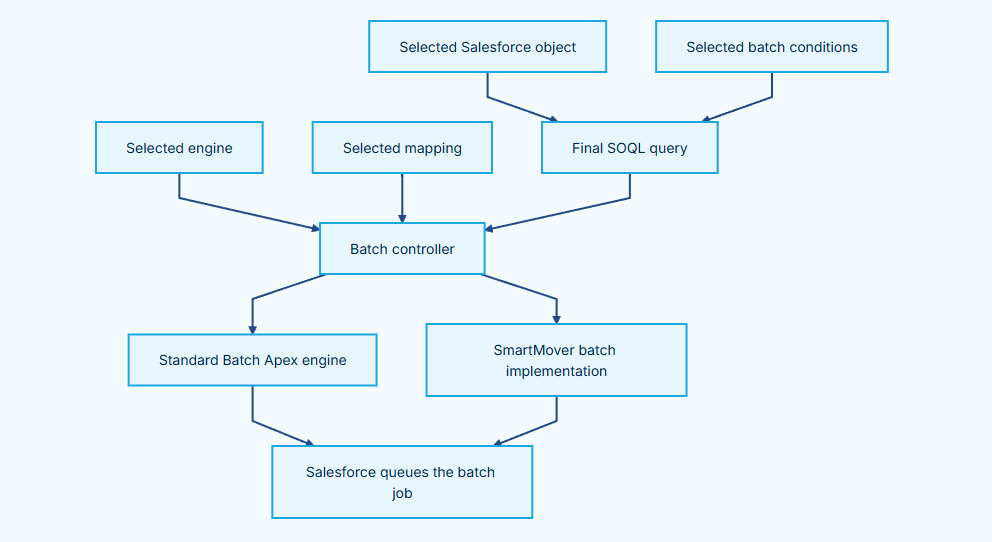
Diagram flow
Selected engine → Batch controller
Selected Salesforce object → Final SOQL query
Selected batch conditions → Final SOQL query
Selected mapping → Batch controller
Final SOQL query → Batch controller
Batch controller → Standard Batch Apex engine
Batch controller → SmartMover batch implementation
Standard Batch Apex engine → Salesforce queues the batch job
SmartMover batch implementation → Salesforce queues the batch job
Start a batch job#
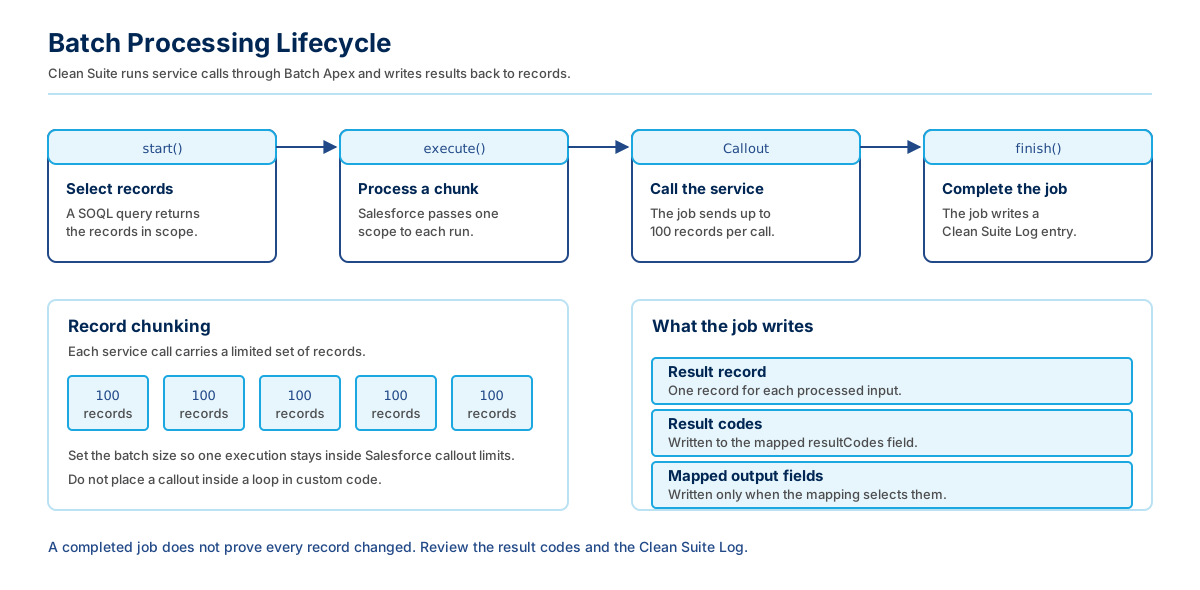
Batch Apex stages, record chunking, and what the job writes back.
Open Clean Suite Batch Processing.
In Step 1: Select an Engine, select an engine.
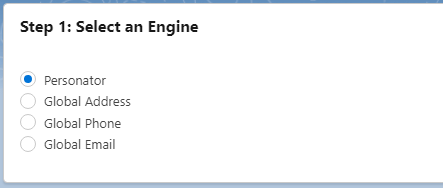
Select the engine that processes your records.
In Step 2: Select an Object, select the Salesforce object.
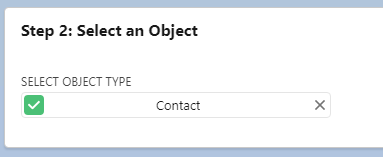
Standard objects and custom objects are supported.
In Step 3: Select a Mapping, select a mapping for that object and engine.
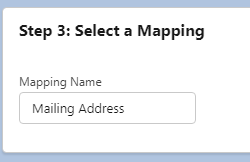
The mapping must exist for the selected object type.
In Step 4: Define Batch Conditions, select the record set.
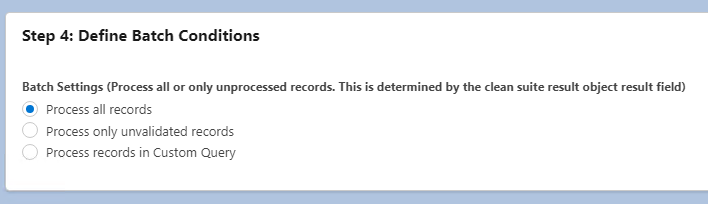
Select Process records in Custom Query to enter a SOQL query.
Click Start Batch Job.
Find the job status on the Apex Jobs setup page.
The component requires an object and a mapping. If either value is empty, it does not send the request. It shows an error instead.
The component shows a queue confirmation after Salesforce accepts the request. It then disables Start Batch Job for the current page view.
Define the record set#
The tab has three Batch Settings options.
OptionController behavior |
Description |
|---|---|
Process all records |
The controller sends |
Process only unvalidated records |
The controller sends |
Process records in Custom Query |
The tab shows Custom Query and sends its text as the batch SOQL query. |
For the first two options, the controller builds SELECT Id FROM <selected object>. For a custom query, the controller sends the entered query without changing it.
The Lightning tab always sends record update as enabled. It does not show a record-update choice.
Check that the custom query, selected object, and selected mapping refer to the same object. The component checks only that the object and mapping values are not empty.
All dispatched jobs use a Salesforce batch size of 100.
Record volume#
The tab sends a SOQL query string to every engine. Each engine returns a query locator from its start method. A query locator is not subject to the 50,000-record limit of a synchronous SOQL read. Jobs that you start from this tab therefore have no 50,000-record ceiling. This includes SmartMover.
The 50,000-record limit applies to custom Apex instead. A synchronous transaction can read no more than 50,000 records with SOQL. Some package entry points accept a collection that the caller gathers first. MD_PersonatorBatchList accepts a record list. MD_SmartMoverJobWSExt also accepts a set of record IDs. Those paths are subject to the limit.
Standard engine dispatch
Standard engine dispatch#
For Personator, Global Address, Global Email, and Global Phone, the controller sends the final SOQL query and selected mapping.
It sends record update enabled and the selected ProcessAll value. It also sends the Clean Suite batch flag as true.
These engines receive the selected batch condition. SmartMover does not use the record-update or ProcessAll values from this tab.
SmartMover batch jobs#
SmartMover uses a separate batch implementation. The tab shows SmartMover Options only after you select SmartMover US or SmartMover Canada.
Use the SmartMover options as follows:
Enter List Name when you need a list name.
Use the same list name across runs when you want the interface to group them in one report.
Enter Job ID only when you need a specific SmartMover job identifier.
Leave either field empty to use its default behavior.
If Job ID is empty, the controller creates an identifier that starts with SMJOB-. If List Name is empty, it sends an empty list name.
The controller sends SmartMover US to the NCOA action. It sends SmartMover Canada to the CCOA action. Both paths use MD_SmartMoverJobWSExt and the selected SOQL query. This class uses a Database.QueryLocator for the query.
SmartMover validates that the selected mapping exists for the query object. It creates or updates a SmartMover Job record when processing starts. The record stores the job ID, list name, mapping name, and status.
SmartMover writes SmartMover result records and applies configured output mappings to the source records. It marks the SmartMover Job record Completed after normal processing. It marks the record Failed after a SmartMover transmission error or a start error. When the response contains report-link data, the job record can store NCOA, CCOA, and CASS report links.
Monitor jobs#
The Lightning batch tab confirms only that Salesforce queued the job. It does not show batch progress or poll job status.
In Setup, open Apex Jobs. Use this page to monitor each queued batch. The controller also has a status method for a job ID. The method returns the Salesforce status, error count, processed items, and total items.
For SmartMover, also review SmartMover Jobs. This object tracks SmartMover-specific status, list name, mapping name, total processed records, and available report links. Review the related SmartMover result records when you need record-level output.
The older Listware Batch Jobs page refreshes its job list every five seconds. It lists Batch Apex jobs whose Apex class name starts with MD and ends with Batch. SmartMover does not appear there because its class is MD_SmartMoverJobWSExt.
Visualforce Pages#
Clean Suite includes 19 Visualforce pages in the package source. This page lists those pages and their source-defined roles.
Express Entry Overrides#
Use an Express Entry override when a user must open an Express-Entry-aware Visualforce form from a standard action. The supported standard objects are Account, Contact, and Lead.
Override Route#
Use this route to select the Visualforce page for an Express Entry action.
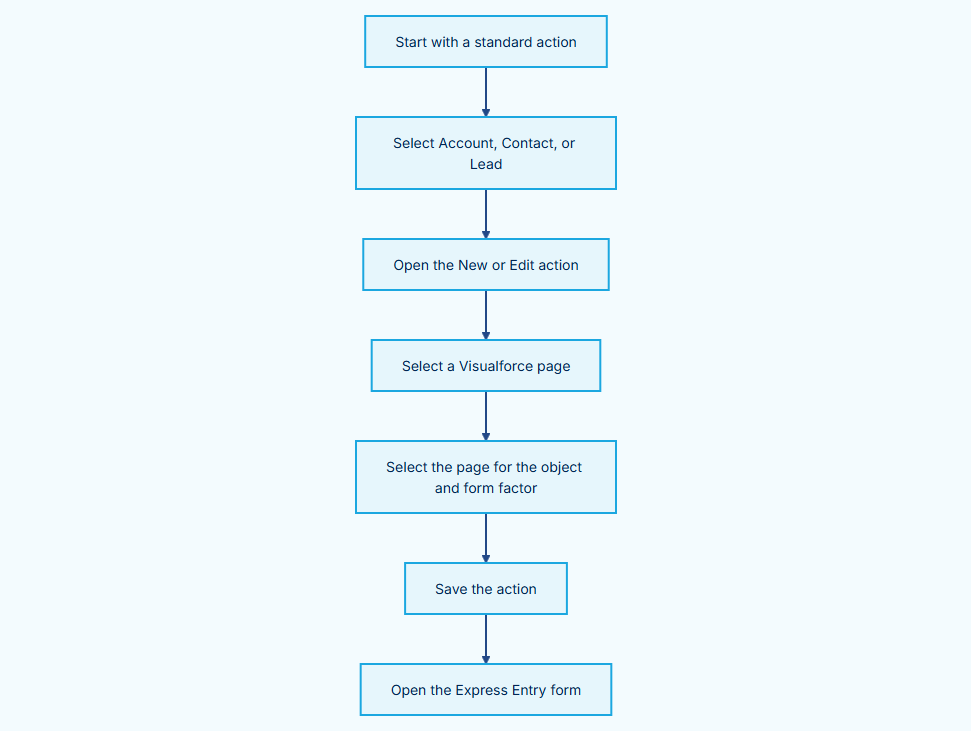
Diagram flow
Start with a standard action → Select Account, Contact, or Lead
Select Account, Contact, or Lead → Open the New or Edit action
Open the New or Edit action → Select a Visualforce page
Select a Visualforce page → Select the page for the object and form factor
Select the page for the object and form factor → Save the action
Save the action → Open the Express Entry form
Object |
Action |
Visualforce page |
Role |
|---|---|---|---|
Account |
New or Edit |
|
Desktop Account edit form. It uses the |
Contact |
New or Edit |
|
Desktop Contact edit form. It uses the |
Contact |
New or Edit on mobile |
|
Contact page that uses |
Lead |
New or Edit |
|
Current Lead override page. It uses the |
Lead |
New or Edit, legacy |
|
Legacy Lead edit form. It uses the |
Configure an Override#
Open Setup > Object Manager.
Select Account, Contact, or Lead.
Open Buttons, Links, and Actions.
Edit the New or Edit action.
Select Visualforce Page.
Select the page for the object and form factor from the table.
Save the action.
Configure the Contact mobile form factor separately. Select MD_expressContactMobileView for that form factor.
Before You Use an Express Entry Page#
The MD_ExpressEntry extension reads MD_expressEntryMap__c records. Each record matches an object prefix and defines street, postal, country, city, and state fields.
The extension checks that the record object is accessible and queryable. It also checks that each mapped field is accessible and updateable. The extension disables Express Entry when a required mapping is missing or a mapped field does not pass these checks.
Use the current Lead page, MD_expressEntryLead, for a new Lead override. Keep MD_expressLeadEdit only when an existing legacy override requires it.
Install a Single-Record Service Page#
The package includes Visualforce pages that show a Clean Suite service on a Contact record. These pages are designed for the View action, not for the New or Edit action.
Install one of these pages when a user must see service results on the record page.
Open Setup. Open Object Manager and select Contact. Open Buttons, Links, and Actions.

In Salesforce Classic, the same page is under Customize > Contacts.
Click Edit next to the View action.

The packaged single-record pages are designed for the View action.
Select Visualforce Page. Next to Override With, select the page for the component that you need.

The example selects MD_personatorContact for the View action.
Click Save.
Select the page that matches the Clean Suite component that you need.
Visualforce page |
Clean Suite component |
|---|---|
|
Personator |
|
Global Address Verification |
|
Property |
You do not have to use a packaged page. To show a service on another object, copy a packaged page and adapt it. The next section describes that procedure.
Custom Visualforce Pages#
The packaged pages are read-only. To use a packaged page on another object, copy its markup into a new page in your org.
Open Setup. In Quick Find, enter
Visualforce Pages.
In Salesforce Classic, the same page is under Develop > Pages.
Open the packaged page that you want to copy. Clean Suite pages use the
MDPERSONATORnamespace.
The example opens MD_personatorContact.
Select the markup from
<apex:page>to the closing</apex:page>tag. Copy it.
Copy the complete markup block.
Return to Visualforce Pages and click New.

A new page opens in the org namespace.
Paste the markup. Replace the source object name with the target object name. Enter a label and a name, then save.

For a Lead page, replace each Contact reference with Lead.
Test the new page before you assign it to a standard action. A copied page keeps the packaged controller extension. Confirm that the extension supports the target object.
Page Inventory#
Administration and Batch Pages#
Page |
Controller |
Role from source |
|---|---|---|
|
Standard controller: Extension: |
Administration page for Clean Suite settings. |
|
|
Batch Processing page. It selects an object type and shows batch options. |
|
|
Custom Mappings page. It accepts an object API name and shows input and output mappings. |
Express Entry Pages#
Page |
Controller |
Role from source |
|---|---|---|
|
Standard controller: Extension: |
Account edit page. |
|
Standard controller: Extension: |
Contact edit page. |
|
Standard controller: |
Contact mobile page. It includes |
|
Standard controller: Extension: |
Lead Express Entry page. |
|
Standard controller: Extension: |
Lead edit page. |
Single-Record Service Pages#
Page |
Controller |
Role from source |
|---|---|---|
|
Standard controller: Extension: |
Account page with the |
|
Standard controller: Extension: |
Contact page with the |
|
Standard controller: Extension: |
Account page with the |
|
Standard controller: Extension: |
Contact page with the |
|
Standard controller: Extension: |
Lead page with the |
|
Standard controller: Extension: |
Contact detail section for property data. It includes the |
List Pages#
The list pages below are Visualforce shells. Their source declares a standard controller and a record-set variable. Some pages also declare a list controller extension.
Page |
Standard controller |
Record-set variable |
Extension |
|---|---|---|---|
|
|
|
|
|
|
|
|
|
|
|
None |
|
|
|
None |
|
|
|
None |
Scope#
This inventory includes only .page files in force-app/main/default/pages. It does not list Aura, Lightning Web, Flow, or Visualforce component files.
Result Code Status Indicator#
Purpose#
Clean Suite includes the Aura component CleanSuiteResultcodeIndicator.
Salesforce lists the component as CS ResultCodeIndicator.
The component reads one field from the current record. It compares that field value with up to three regular expressions. It then shows a title and one colored message panel.
Use this component on a Lightning page that has a record ID.
The component is available for Lightning page types through flexipage.
This component does not interpret Clean Suite result codes by itself. You define the field, regular expressions, messages, and colors.
Rule Evaluation Flow#
The flow shows how the component evaluates a field and selects a status panel.
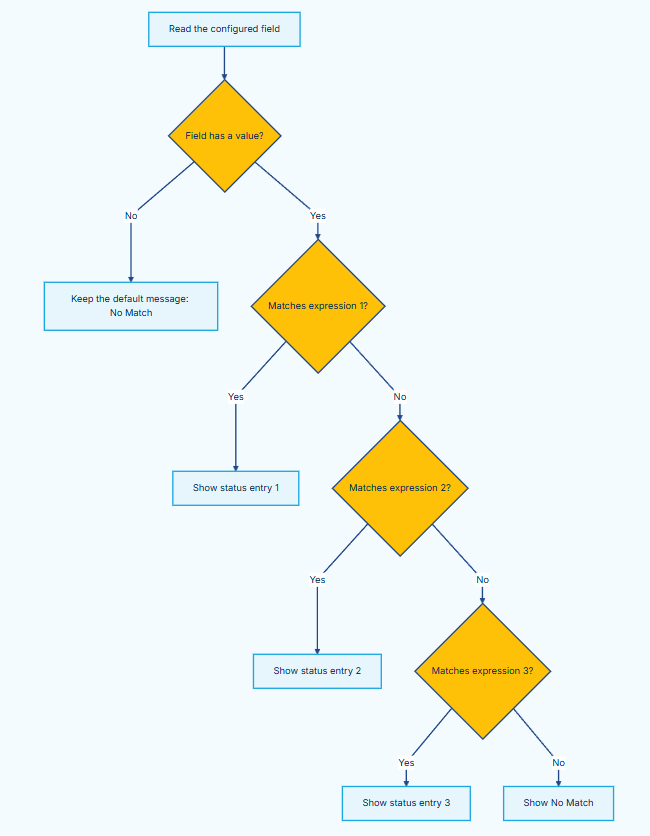
Diagram flow
Read the configured field → Field has a value?
Field has a value? → Keep the default message: No Match (No)
Field has a value? → Matches expression 1? (Yes)
Matches expression 1? → Show status entry 1 (Yes)
Matches expression 1? → Matches expression 2? (No)
Matches expression 2? → Show status entry 2 (Yes)
Matches expression 2? → Matches expression 3? (No)
Matches expression 3? → Show status entry 3 (Yes)
Matches expression 3? → Show No Match (No)
Add the Component#
Open the target record page. Click the gear icon, then select Edit Page.
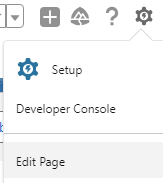
The record page opens in Lightning App Builder.
Drag
CS ResultCodeIndicatoronto the page.
To set the title, field, expressions, messages, and colors, see Configure Status Entries.
The component uses the configured field name to read the field from the current record. It does not update that field or another record field.
Configure Status Entries#
Select the component on the page to open its settings.

The settings pane opens on the right side of App Builder.
Set Title to the heading that the panel shows.
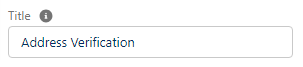
The example uses Address Verification.
Set Field Name to the API name of the field to evaluate.

The example uses the API name MDPERSONATOR__PersonatorResults__c.
Set the message for each status entry.
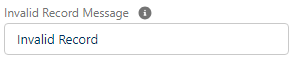
The panel shows this text when the matching expression is true.
Set the regular expression for each status entry.
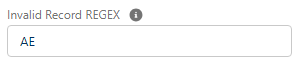
The expression runs against the value in the configured field.
Set the color for each status entry.
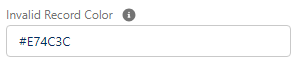
The Invalid Record Color setting takes a hexadecimal value, such as #E74C3C.
Click Save.
The page editor toolbar holds the Analyze, Activation, and Save controls.
Click Activation to activate the page.
The component does not appear on the record page until the page is active.
The component design exposes these three configuration groups:
Status entry |
Message setting |
Regular-expression setting |
Color setting |
|---|---|---|---|
1 |
Invalid Record Message |
Invalid Record REGEX |
Invalid Record Color |
2 |
Partially Valid Record Message |
Partially Valid Record REGEX |
Partially Valid Record Color |
3 |
Valid Record Message |
Valid Record REGEX |
Valid Record Color |
The component checks the expressions in this order: 1, 2, then 3. The first matching expression sets the message and background color.
Shipped Defaults#
The component design supplies these default values. The defaults are address-oriented.
Status entry |
Default message |
Default expression |
Default color |
|---|---|---|---|
1 |
|
|
|
2 |
|
|
|
3 |
|
|
|
These defaults are a starting configuration only. They are not a Clean Suite interpretation of a result code.
The design labels describe the configuration groups. The runtime does not assign a meaning to a result-code family. Use expressions that match the values stored in your selected field.
The default expressions match address codes. Change them when your field stores email, phone, or another service result. Configure the expressions and messages for the result codes that your mapping stores.
The default colors do not follow the Melissa palette. Set the color values that your page design requires.
The component shows white text on the color that you set. The three default colors do not give enough contrast for white text. Set a color that has a contrast ratio of at least 4.5:1 against white.
Configured Example#
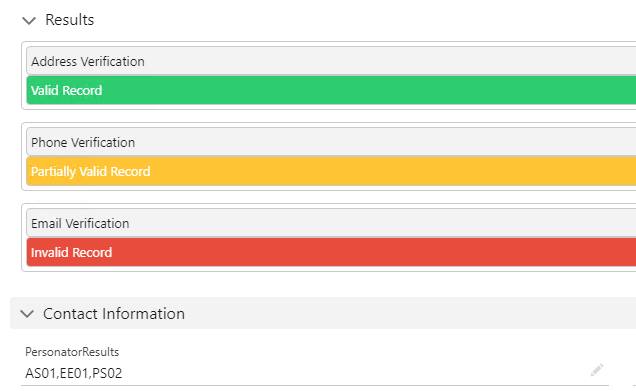
Three components on one record page. Each panel matches a different code family in the same PersonatorResults field.
Configure Result-Code Matches#
Use Result Codes when you configure expressions.
Result values are comma-delimited code strings. Match full codes, not only code prefixes.
For example, (?:^|,)AS01(?:,|$) matches AS01 as a complete code.
It also matches a value such as AS01,AS14.
Put the highest-priority expression first. The component uses the first expression that matches.
Do not use one expression for every service. Configure messages for the service and code family in your result field.
No-Match and Field Behavior#
If a nonempty field value matches none of the three expressions, the component shows No Match.
It uses the noMatchColor value for that state.
The component default for noMatchColor is #D3D3D3.
If the selected field has no value, the controller does not select a status entry.
The component keeps its initial message value, which is No Match.
The panel therefore shows No Match for an empty field and for a nonmatching value.
If Field Name is empty, the controller does not request a field value.
The component evaluates the field when it initializes.
It evaluates the field again after force:recordData reports a CHANGED update.
Results and Logs#
The indicator evaluates one configured field. It does not show batch-job results or a Clean Suite log.
If the server cannot read the configured field, MD_UtilExt.getFieldValue writes a Clean Suite log record.
The indicator controller does not show a separate error message for that failure.
Use the Clean Suite Log tab to review batch-job and API-call logging. Use the result fields and result objects that your Clean Suite mapping creates to review service results.