Mailers+4 Tutorials#
Web Tutorials#
The Basics#
Get To Know Mailers+4#
Presented by Peter Handfield on September 20, 2017
Live streamed by Peter Handfield on March 23, 2017
Live streamed by Peter Handfield on April 20, 2017
Live Demonstrations#
Presented by Peter Handfield on October 16, 2017
Live streamed by Tony Deacon on September 20, 2017
Live streamed by Peter Handfield on October 19, 2017
Saturation Mailing#
Live streamed by Peter Handfield on June 15, 2017
Marketing Mail (Standard)#
Presented by Tony Deacon on November 4, 2016
Palletization#
Presented by Tony Deacon on November 4, 2016
Mail Merge#
Live streamed by Peter Handfield on May 18, 2017.
SmartMover Tutorial#
SmartMover uses NCOALink technology to securely transfer encrypted data to and from our servers for processing in order to keep up with customers (Individuals, Families, and Businesses) that have filed a Change of Address (COA) with the USPS over the last 48 months; and meet the Move Update requirement for Postal Discounts.
SmartMover will:
Validate and standardize U.S. addresses with USPS CASS-certified processing.
Provide change of address information for Individuals, Families, and/or Businesses by matching against the full 48-month USPS NCOALink database.
Meet the USPS Move-Update requirement for a period of 95 days from the date of processing.
Generate USPS required report (form 3553)
NCOALink Summary report
SmartMover does not do Canadian Change of Address Processing
Who is SmartMover for?
List Owners that have completed a Processing Acknowledgement Form (PAF) can utilize NCOALink technology to securely upload their data to our servers for change of address processing.
How does SmartMover Work?
Mailing lists are processed through our CASS-Certified address verification engine in order to append ZIP+4 and validate delivery point.
Each address that has a confirmed delivery-point will then be processed through NCOALink.
New addresses are only returned if the Original Input Name and Address match the Change of Address file.
Minimum Requirements
Active Mailers+4 and SmartMover subscription.
Completed Processing Acknowledgement Form on File.
Minimum of 100 records.
Minimum Fields: Company and/or Full Name (or First and Last Name) with Address, City, State, Postal Code.
Getting Started#
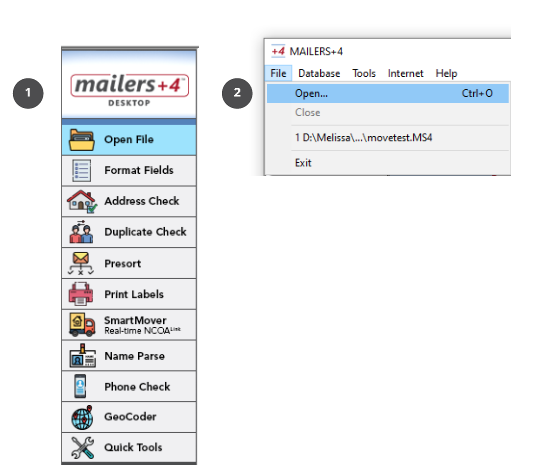
Open File#
Click Open File.
-OR-
Click File and select Open.
Format Fields#
Format the input fields of your file.
Click Format Fields and select the NCOA tab to format fields beneficial for NCOA Processing.
-OR-
Click File from the menu bar and select Format Fields and then select the NCOA tab.
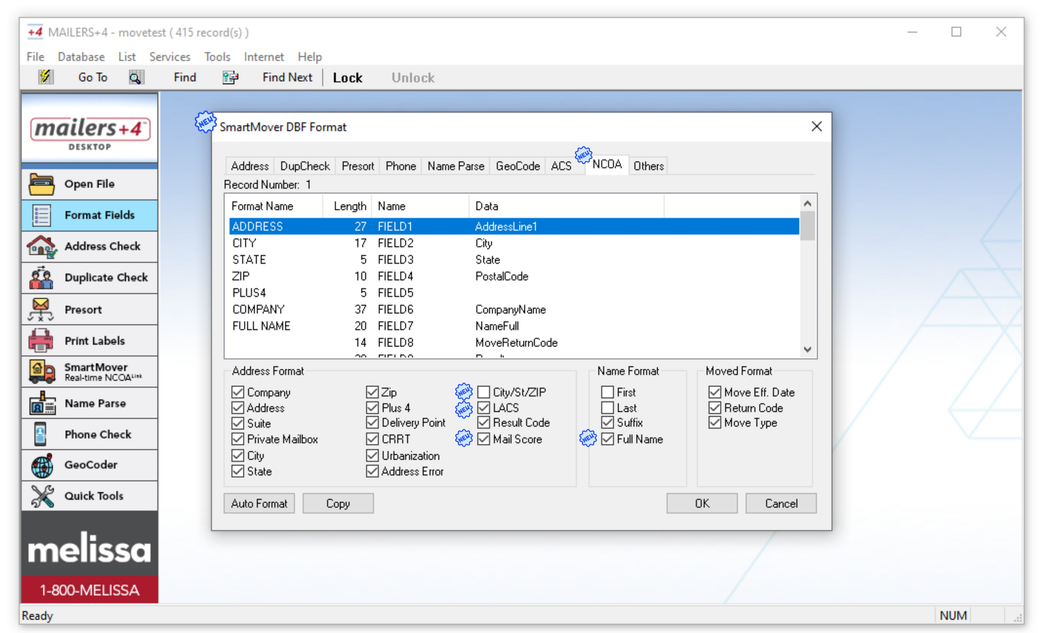
In order to process a mailing list SmartMover requires that the following Input fields and all desired Output Fields are formatted before processing.
Required Input Fields
Company and/or Full Name (or First Name and Last Name)
Address 1, City, State, Postal Code
Recommended Output Fields
Suite
Result Code
Return Code
Move Type
Move Effective Date
Mail Score
Click Auto Format to automatically format your records.
Use the mp4auto.ini file to manually assign auto-format fields.
Click Copy to copy the format of an existing .ms4 file.
Click OK to Accept changes and return to Mailers+4.
Click Cancel to Cancel any changed and exit the Format Fields window.
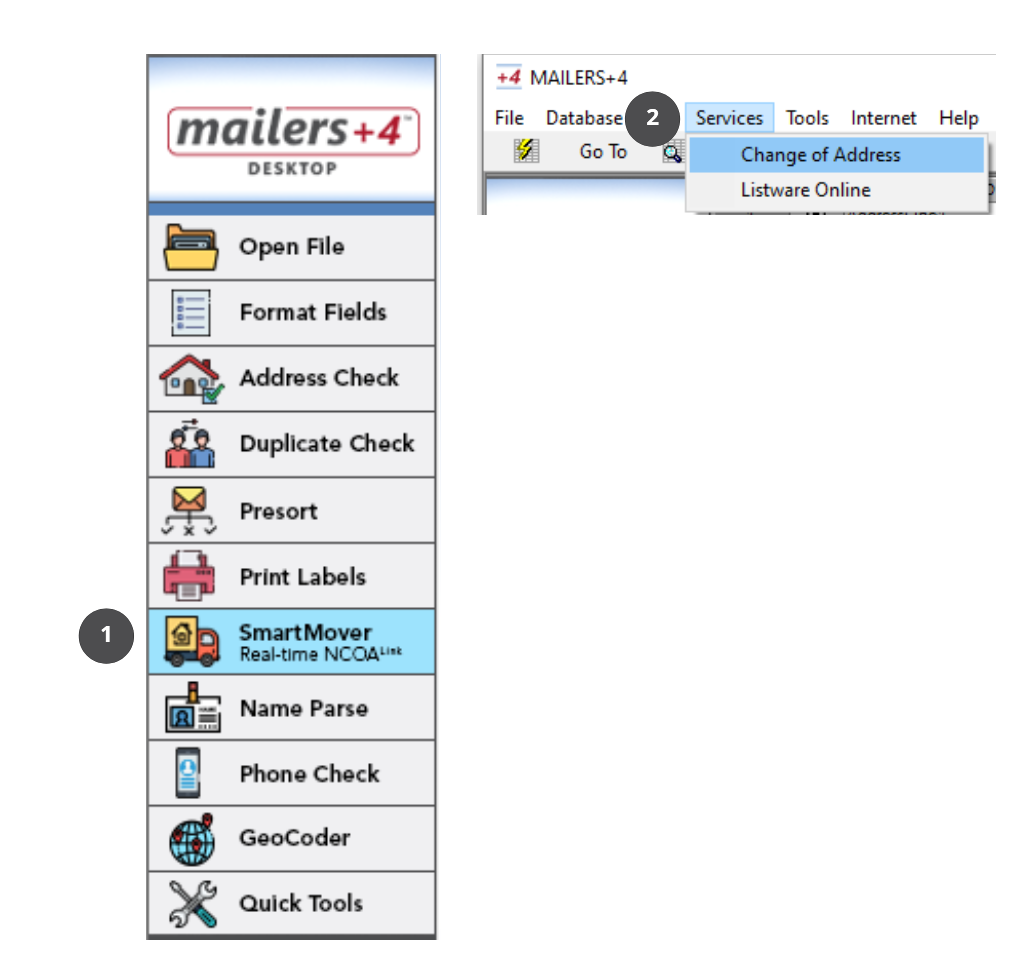
Open SmartMover#
Once you have formatted the required fields and added any Optional fields that you would like to return information on, open SmartMover to begin processing.
Click the SmartMover Real-time NCOALink button located in the all-in-one taskbar on the left
-OR-
Click Services and select Change of Address.
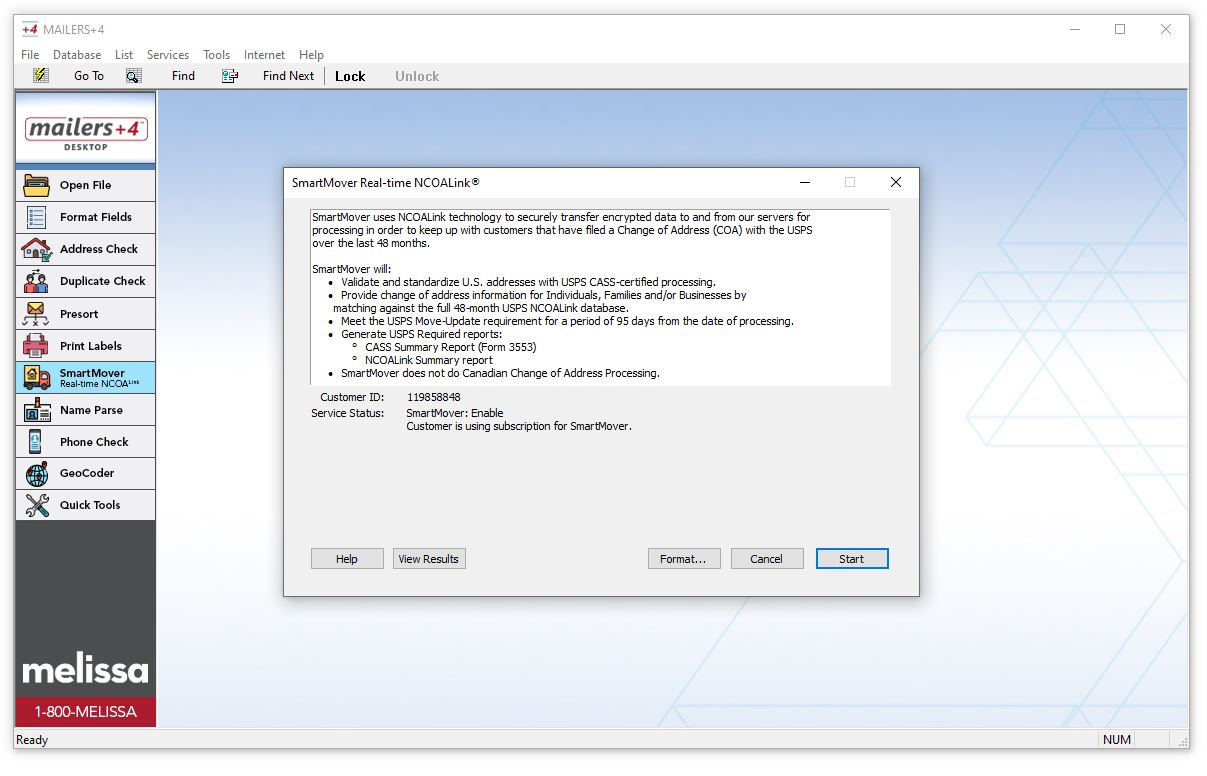
Click Start to begin processing.
Click Help to learn more information.
Click View Results to view the result window of a previously processed file.
Click Format to make sure the required fields are formatted.
Click Cancel to exit the SmartMover window.
View Results#
Once your file is done processing, view your results on the SmartMover Real-time NCOALink Results window.
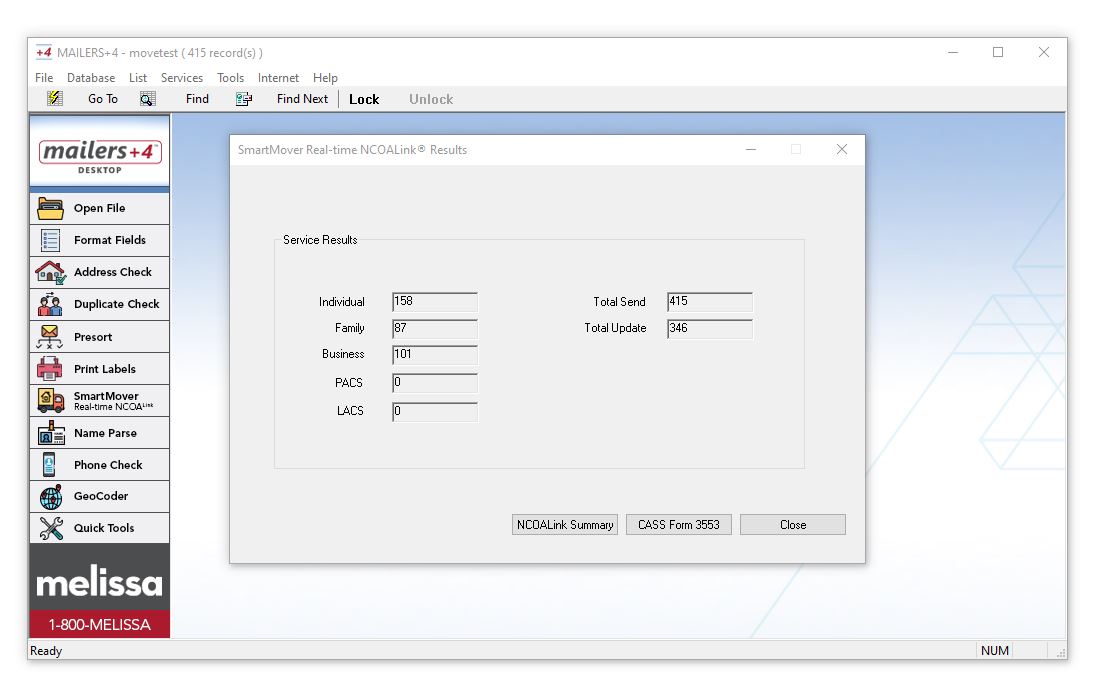
The Service Results will include the number of:
Individual
Family
Business
PACS
LACS
Total Send
Total Update
What reports are generated by SmartMover?#
SmartMover will generate the following Reports:
CASS Form 3553
NCOALink Summary Report
The NCOALink Summary Report and the CASS Form 3553 will automatically save in the same folder as your processed file as “FileName_NCOASummaryReport.html” and “FileName_CASS3553.html”. If your list has already been processed, then these files will open in a browser regardless if you are connected to the internet.
Click the NCOALink Summary or CASS Form 3553 button to open the report in a browser window for easy viewing. The files can be Saved as a PDF or Printed by right clicking the page and selecting “Print” and then “Print to PDF” or choose a Printer to print from.
Click NCOALink Summary to view the NCOALink Summary Report. This will automatically generate in the same folder as your processed file.
Click CASS Form 3553 to view the CASS Summary Report. This will automatically generate in the same folder as your processed file.
Click Close to exit SmartMover.
Uploading Maildat#
Upload Mail.Dat files to the USPS® PostalOne!® and your Dashboard#
Before you can upload Mail.dat, or eDocs, to the USPS PostalOne! client, you must have access to the USPS Business Customer Gateway (BCG) with a Username and Password. If you do not, please see the “Creating your MID and CRID” instructions.
If you have a Mailer ID (MID) and Customer Registration ID (CRID) for your organization, be sure that you have your Username and Password secured as they are required for uploading to PostalOne!® using the MDRClient software. Please note that you will need to check back with the BCG periodically for any updates to the Maildat client.
The Mail.dat Windows Client Application can be downloaded from the USPS BCG - Electronic Data Exchange page under “Mail.dat Support for Production”.
Requirements for uploading to PostalOne!
USPS Business Customer Gateway Username and Password approved for electronic upload to PostalOne!
Maildat Windows Client Application for Operating System
Learning Objectives
How to download the USPS PostalOne! Maildat Client
How to upload Maildat files to the USPS Business Customer Gateway via PostalOne! Maildat Client.
Sign into the Business Customer Gateway (BCG) with User Name and Password#
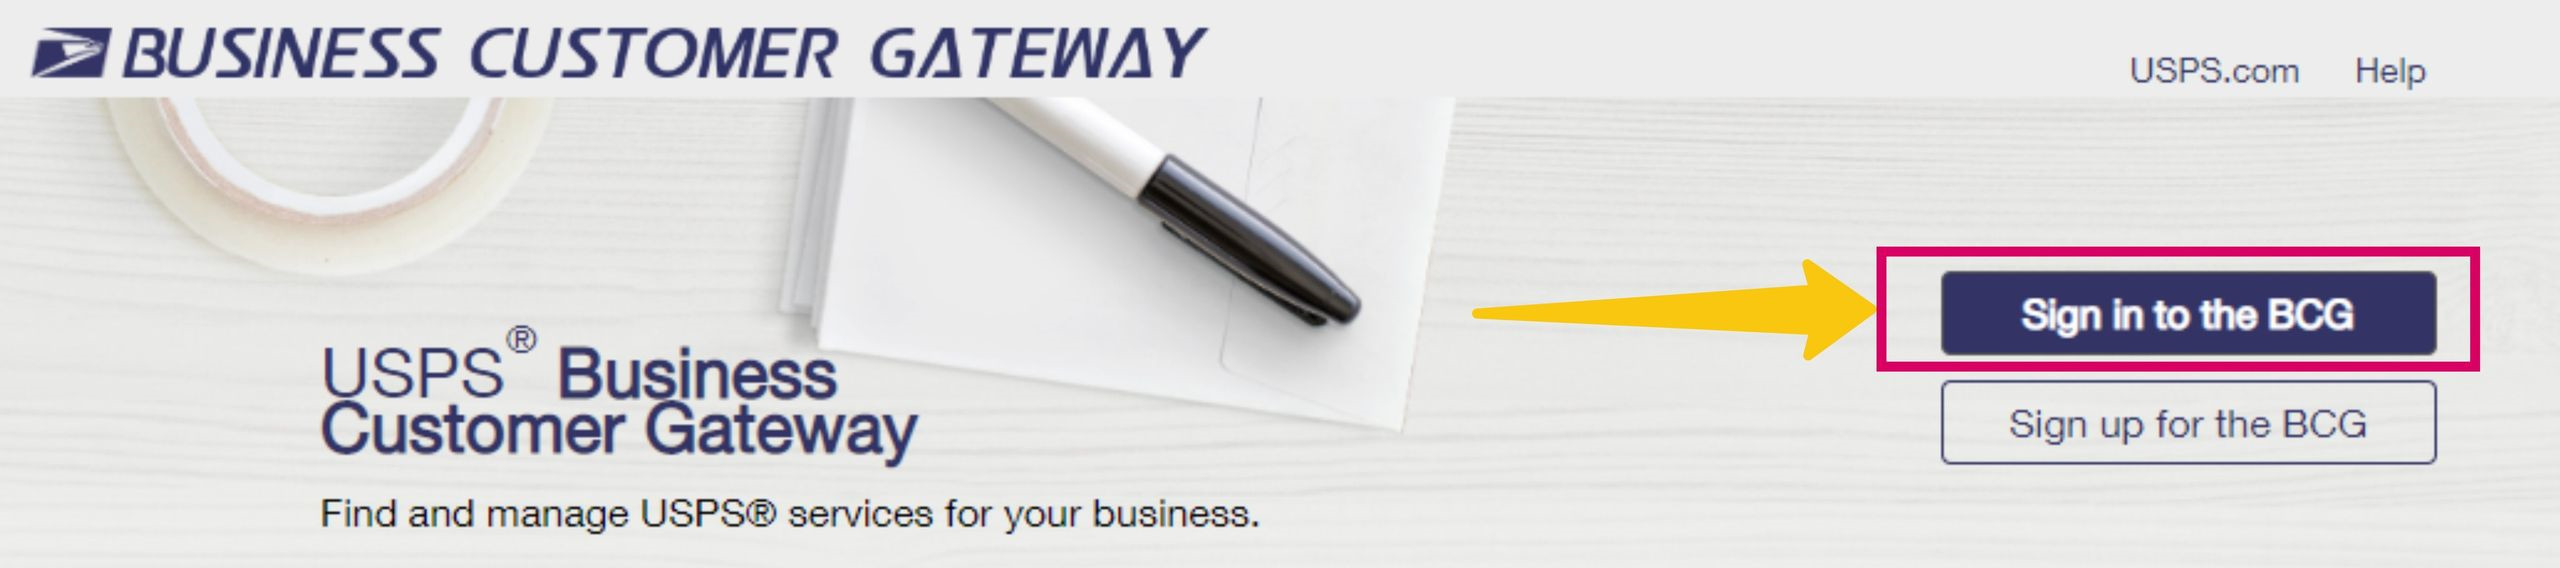
Go to the USPS Business Customer Gateway website: https://gateway.usps.com/eAdmin/view/signin
Click “Sign in to the BCG”.
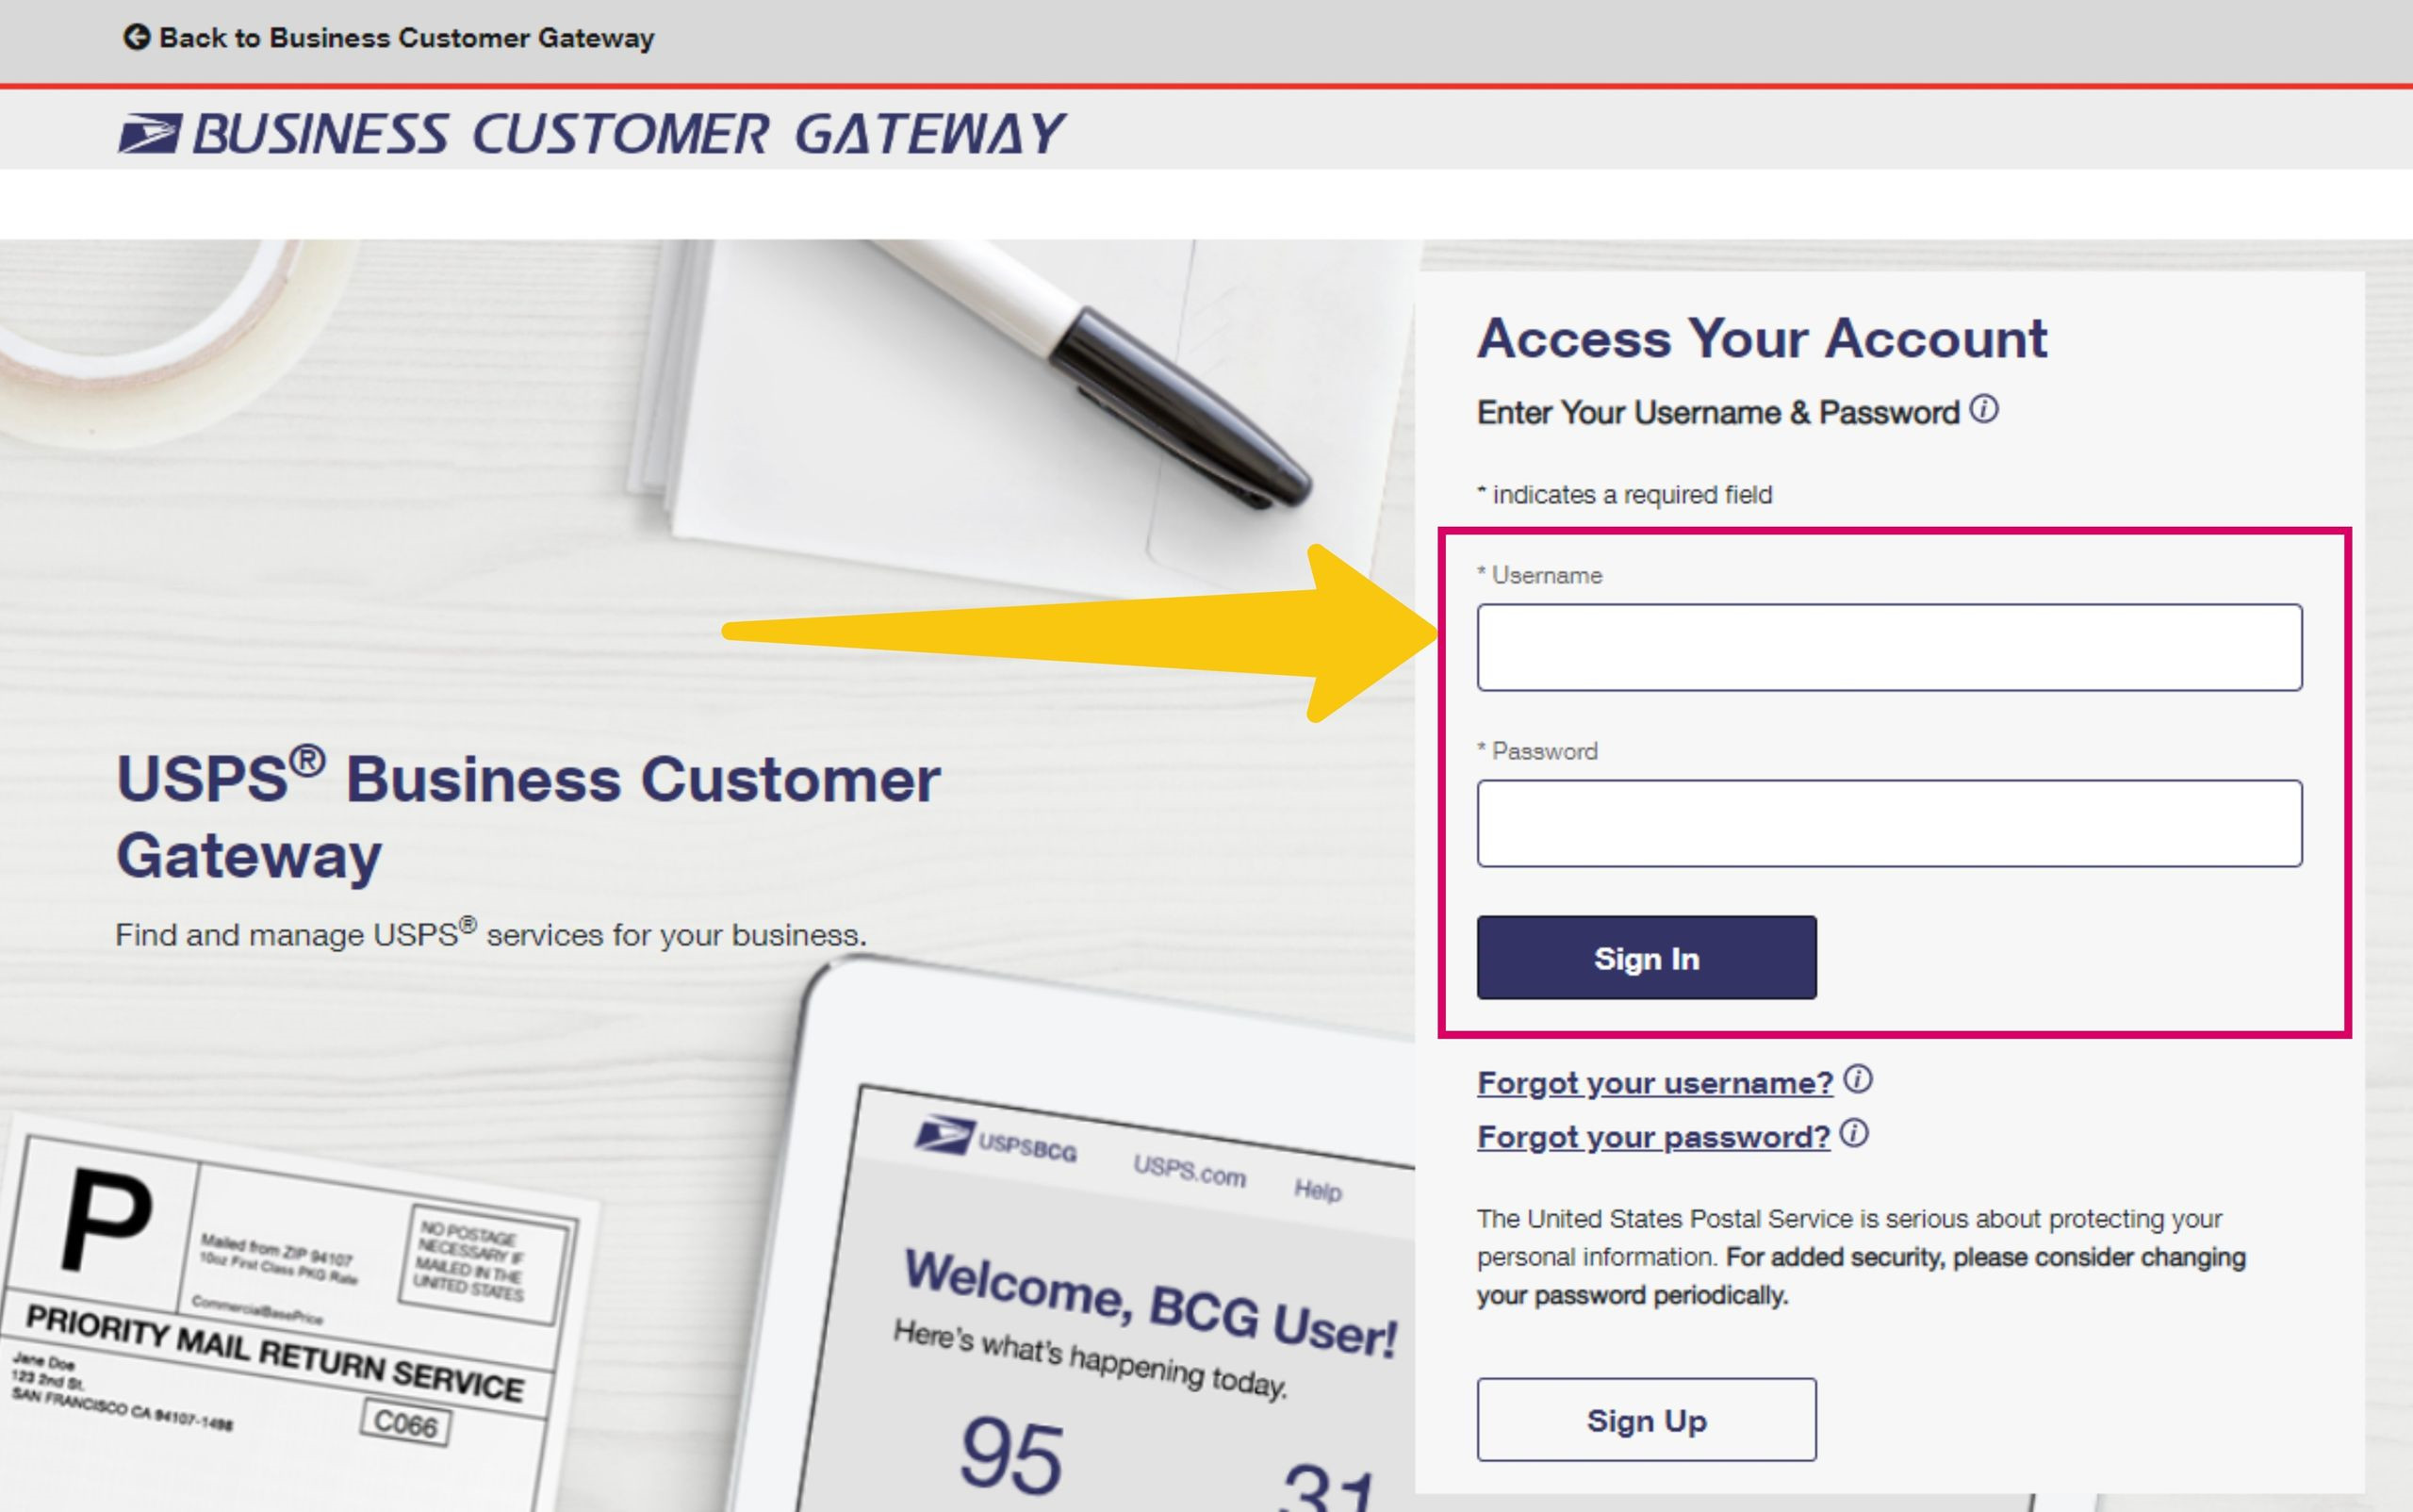
Enter User Name, Password and then click “Sign In”.
Download & Extract the Mail.dat client#
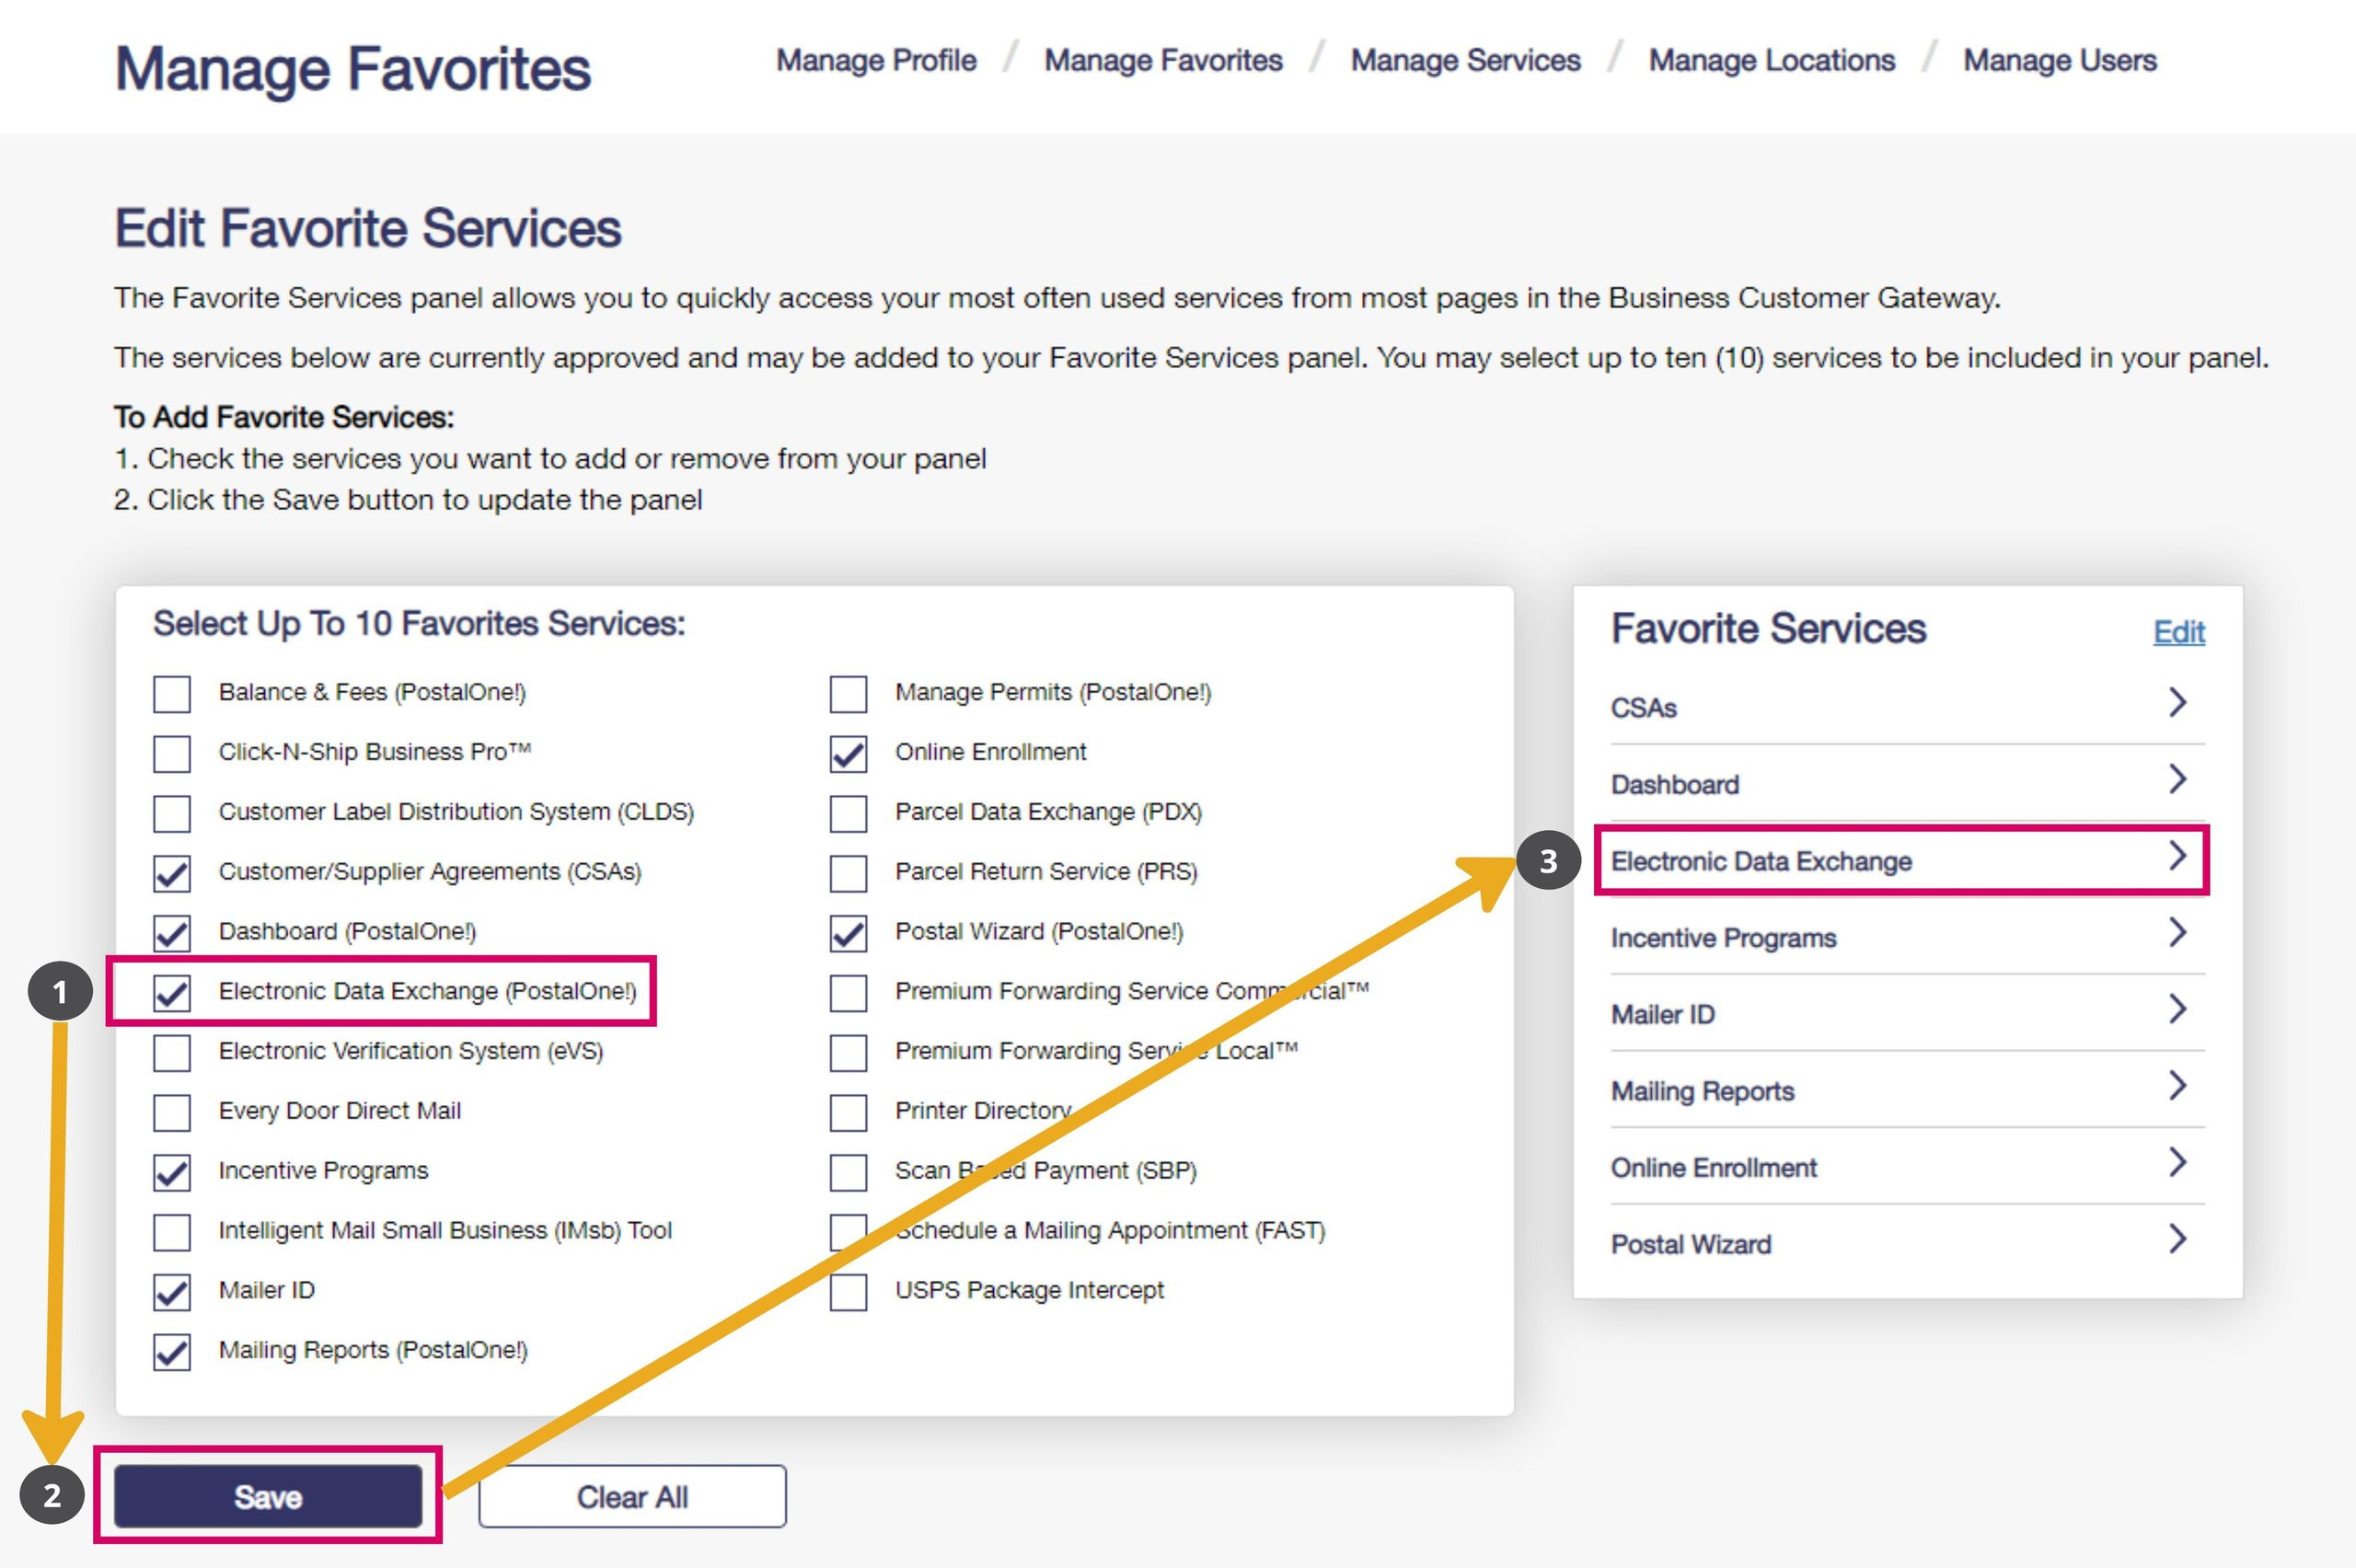
If you do not have the “Electronic Data Exchange” button set as one of your Favorite Services, click “Edit” to go to the Manage Favorites page.
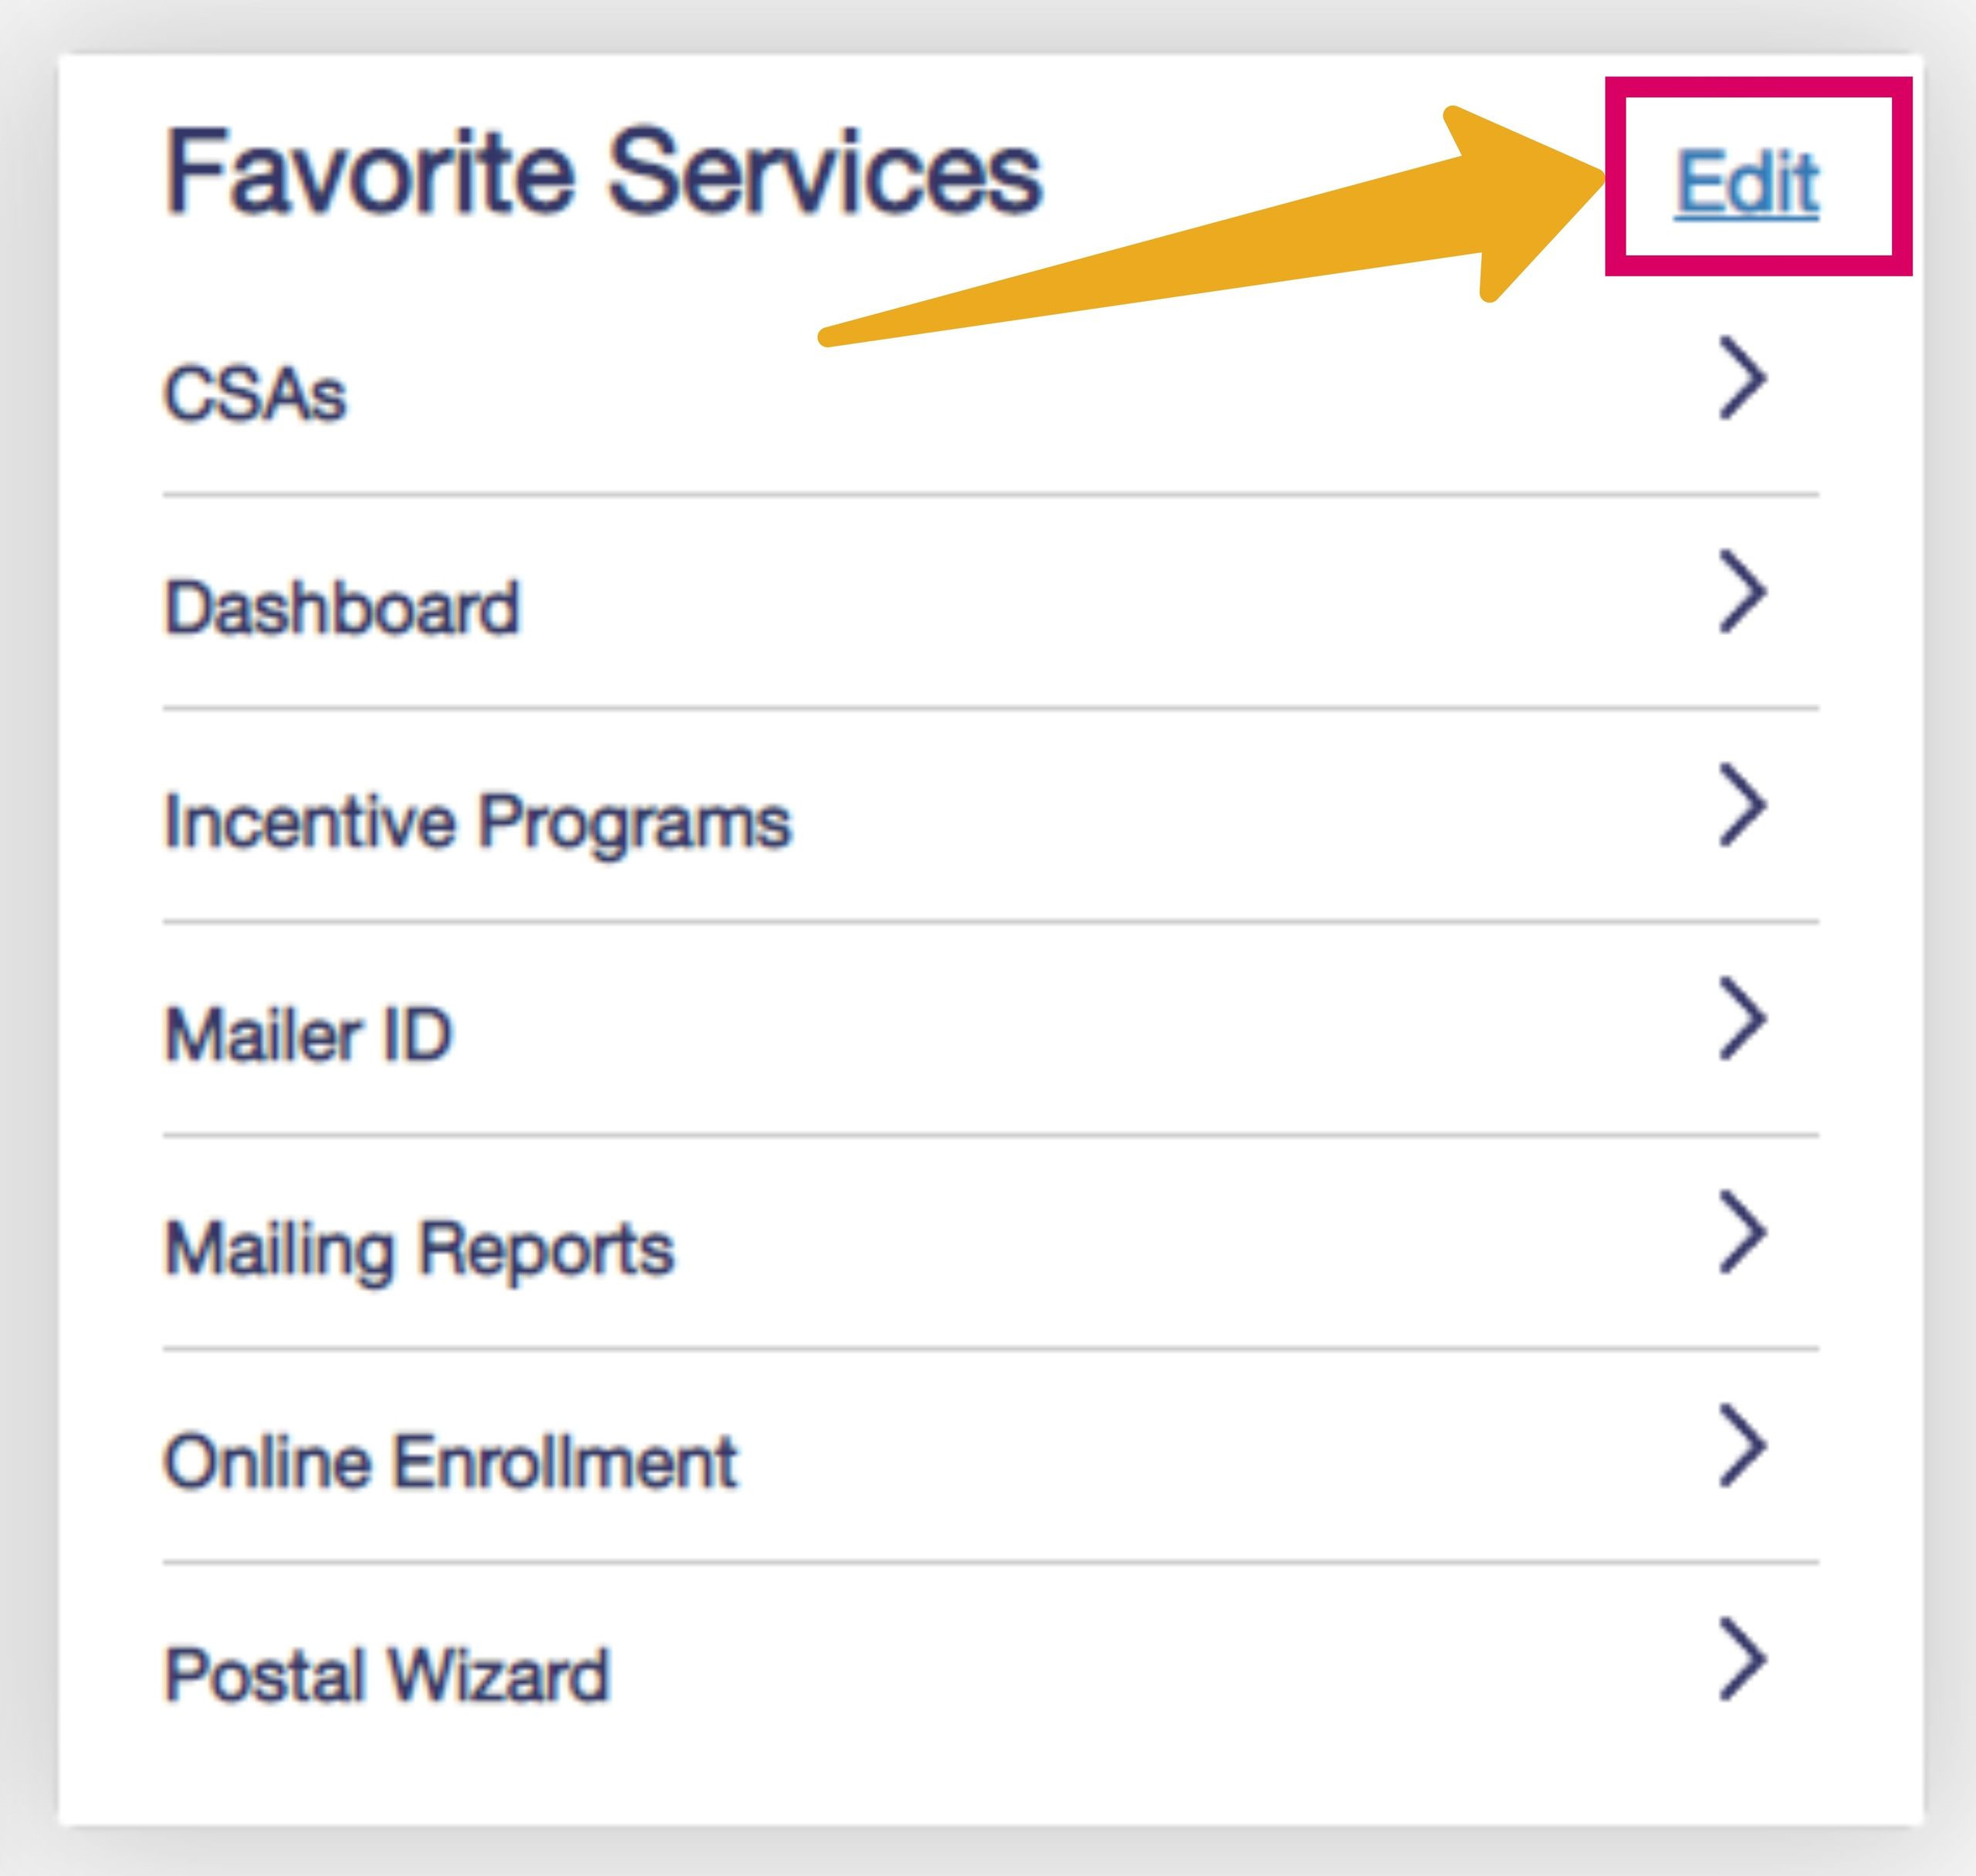
Check the box next to “Electronic Data Exchange (PostalOne!)” and click “Save”.
Click “Electronic Data Exchange” under Favorite Services.
Select which Client Application to download; Windows is the most common. In order to make the download easy to find, create a new desktop folder (example: “PostalOne”) and save the download here.
Click “Download Client Application” for your Operating System (Windows 32-bit or 64-bit ).

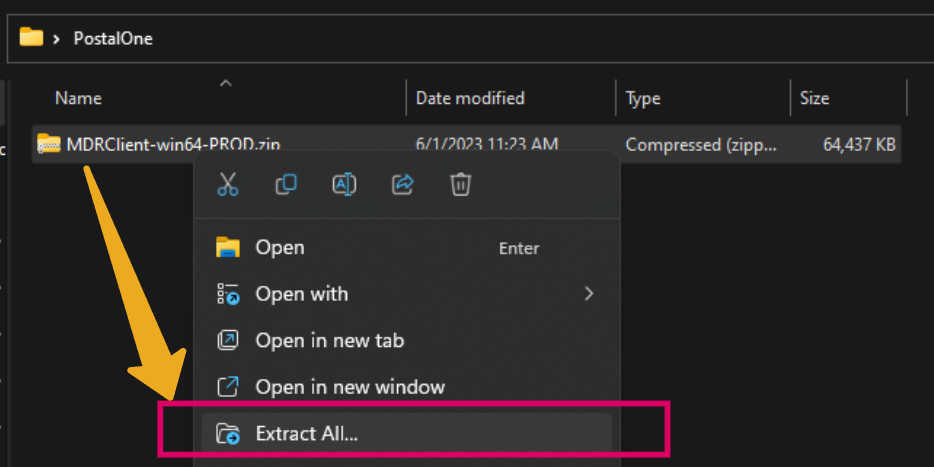
Right click the Maildat client zip folder (Example: “MDRClient-win64-PROD.zip”) and select “Extract All”.
Open the PostalOne! Maildat Client and Sign-In#
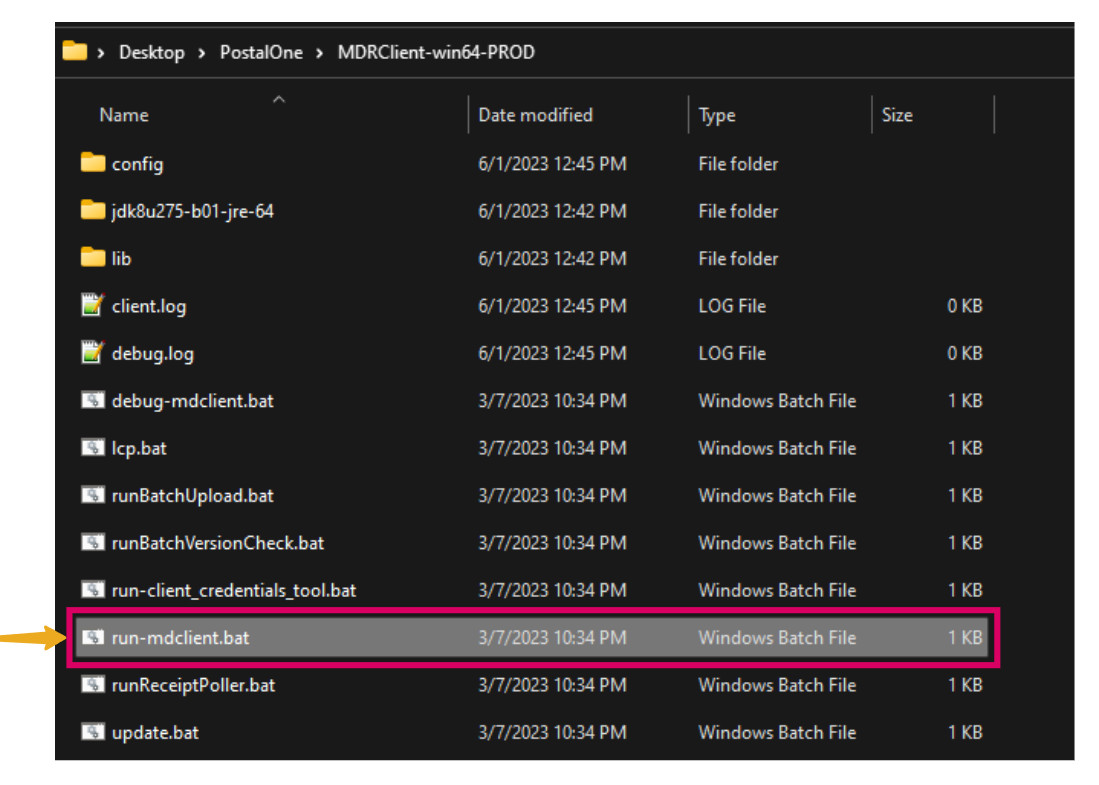
Open the extracted MDRClient folder and double-click “run-mdclient.bat” to launch the USPS PostalOne! Maildat client.
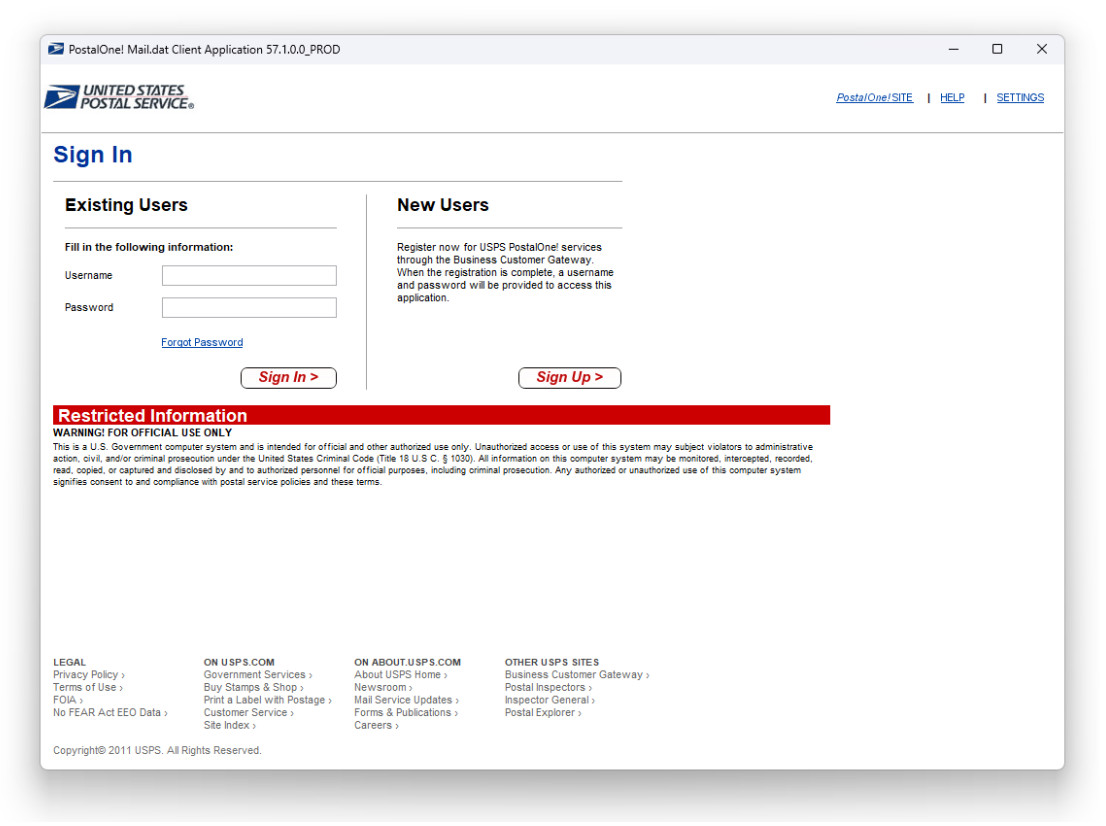
Sign in using the USPS Business Customer Gateway User Name & Password that has permission to upload Maildat files.
Upload Mail.dat Files to the USPS Business Customer Gateway#
After you are signed in to PostalOne!, perform the following steps to upload Maildat files to the Business Customer Gateway:
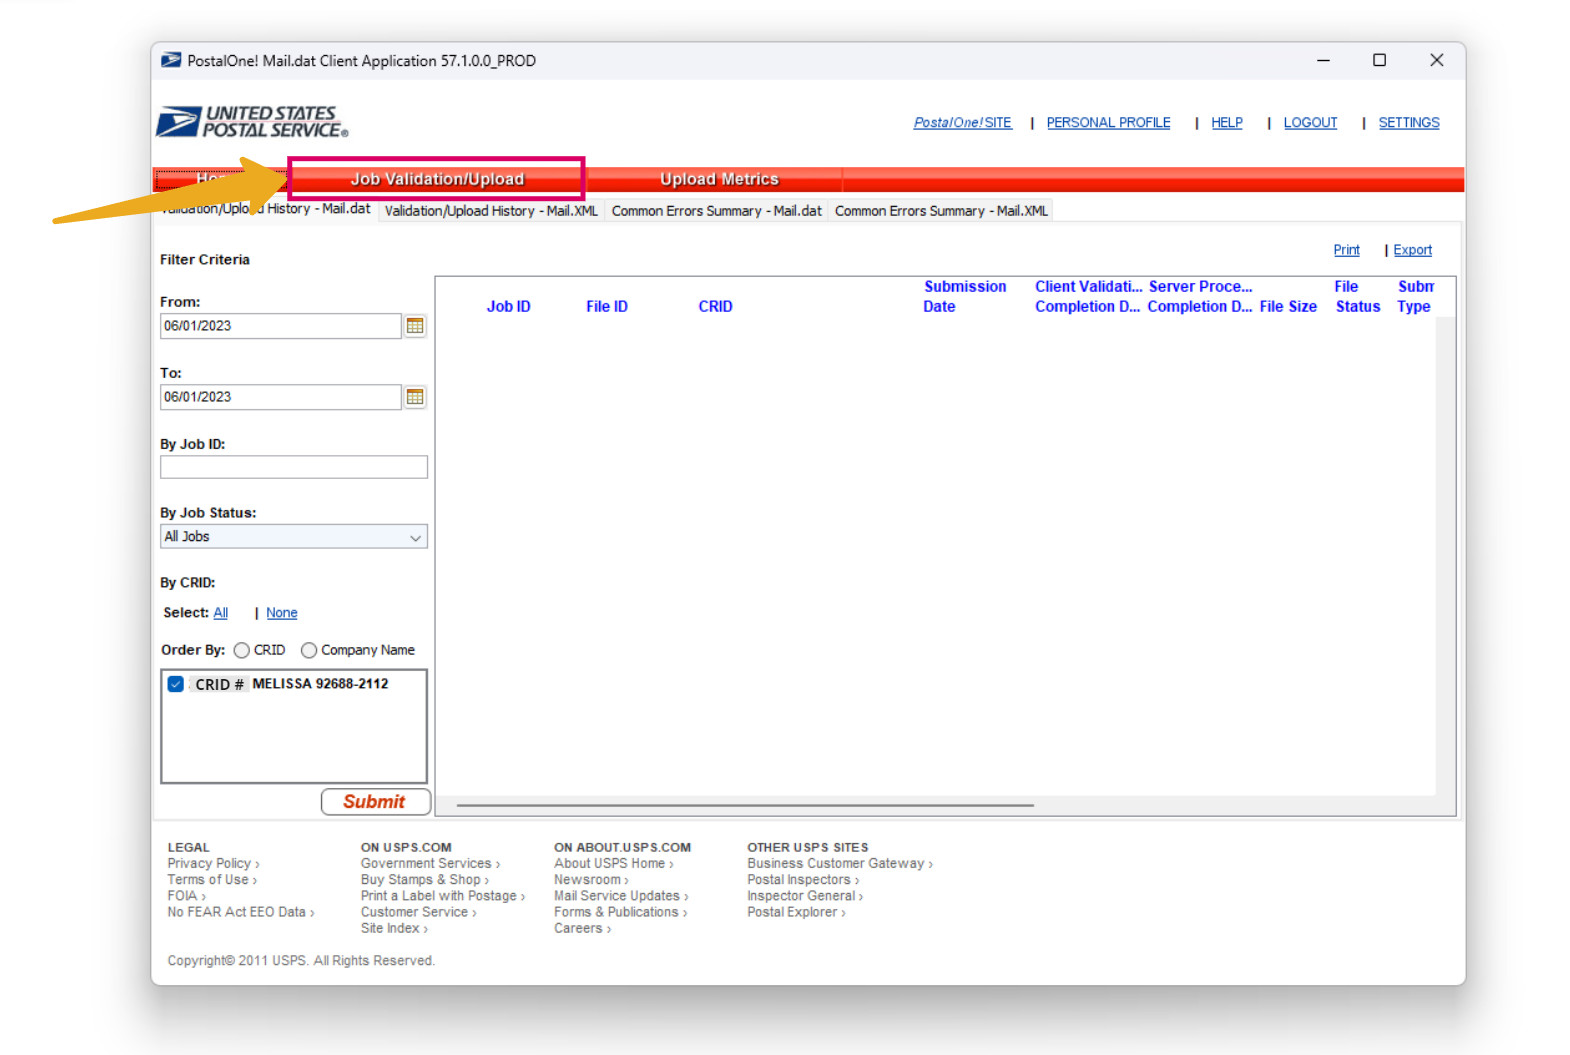
Select “Job Validation/Upload” tab.
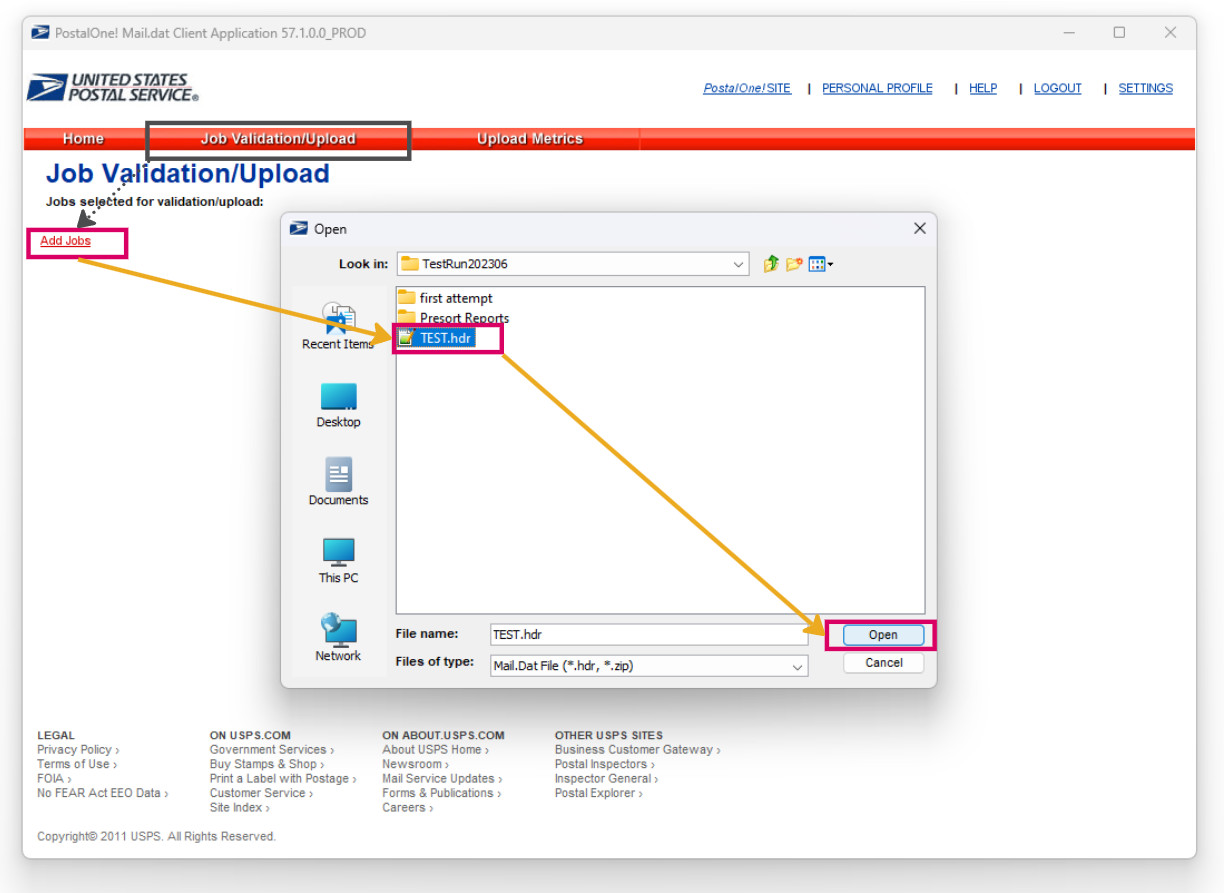
Click “Add Jobs” and select the directory of the saved Mail.dat files that need to be uploaded.
Select the Job’s Maildat “*.hdr” file and click “Open”.
This screen shows the Job/Mail.dat attached and ready for processing.
4. Select “Just Validate Job(s)” and then click “Validate” to check Mail.dat files for any potential issues before officially uploading to the USPS Business Customer Gateway. This helps to prevent any errors that could occur and be fixed before officially uploading.
If Validate shows “VALIDATED COMPLETED” then that signals there were no errors found within the Maildat files. Click “View Details” to preview all of the files uploaded.
NOTE! - If there are any errors, please review and fix the presort before re-uploading. If you need help troubleshooting the error, please send a screenshot of the PostalOne! error along with the Maildat files to tech@melissa.com for assistance.
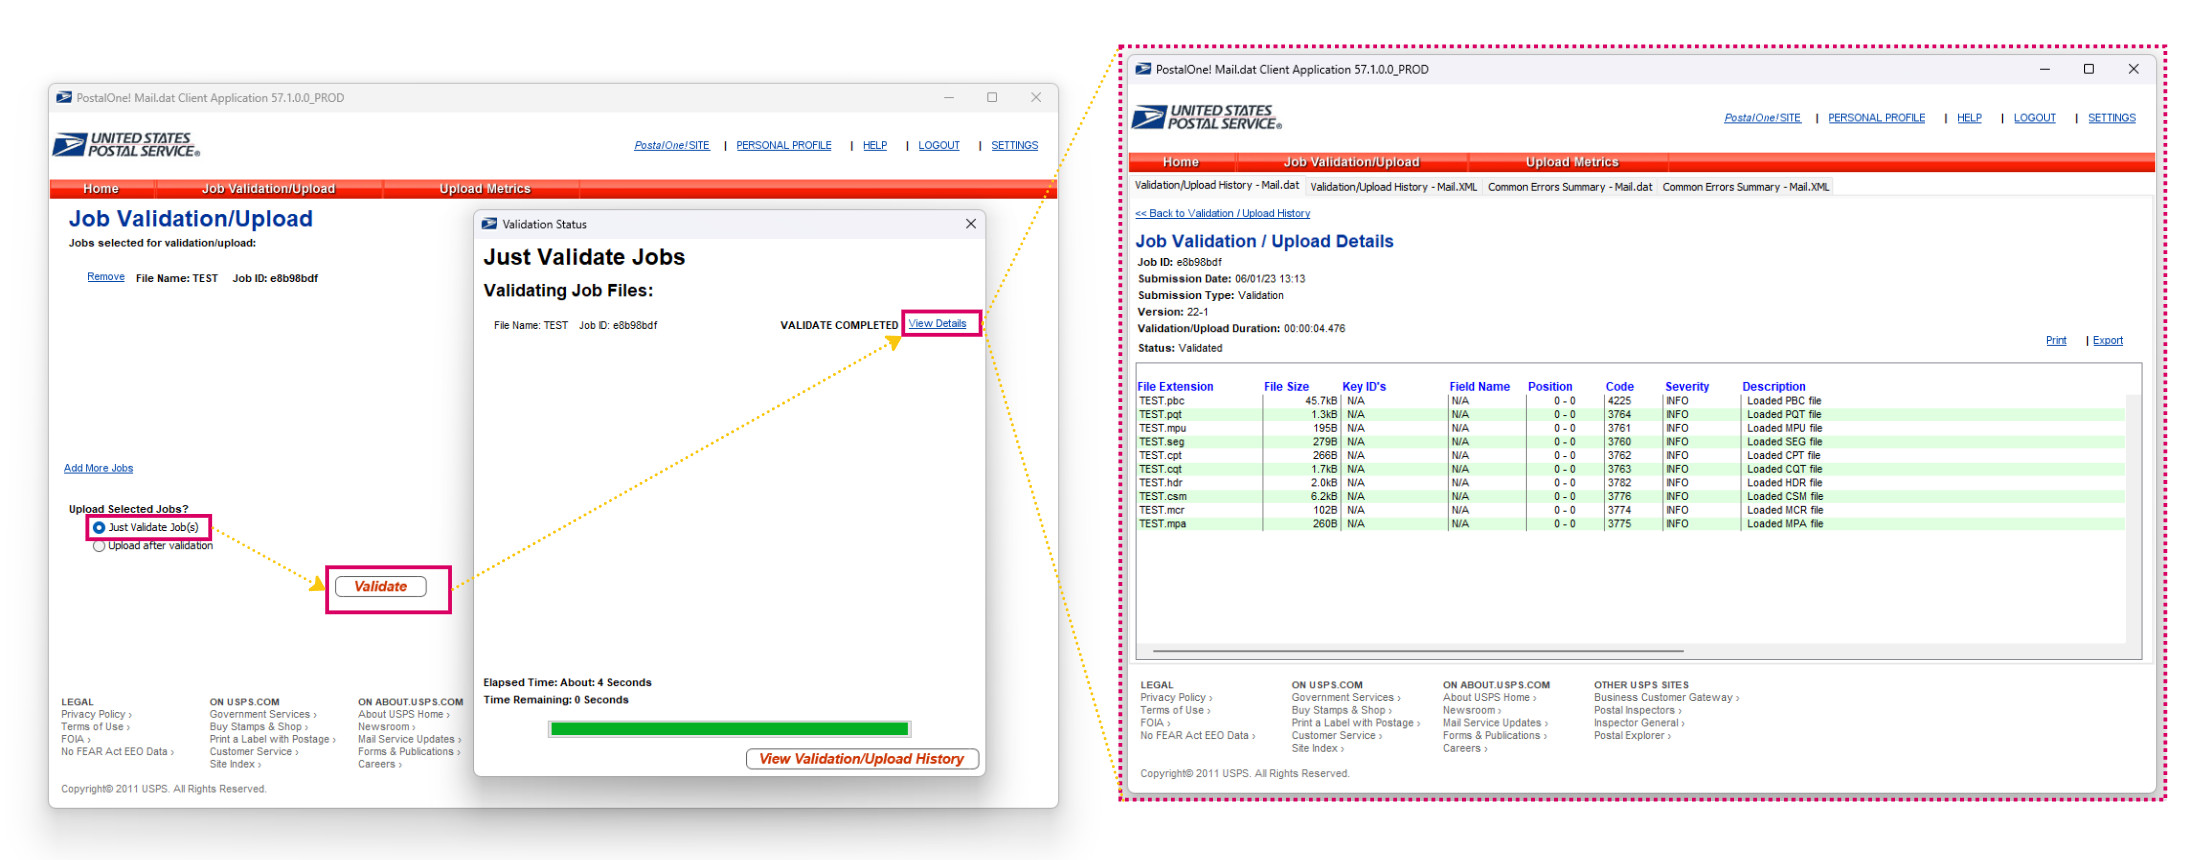
Click “Just Validate Job(s)” to preview before upload.
If the files validated without any issues, then repeat the steps and select “Upload after Validation” to officially upload to the USPS Business Customer Gateway.
Select “Job Validation/Upload” tab.
Click “Add Jobs” and select the directory of the saved Mail.dat files that need to be uploaded.
Select the Job’s Maildat “.hdr” file and click “Open”.
Select “Upload after Validation” and then click “Validate and Upload” to officially upload.
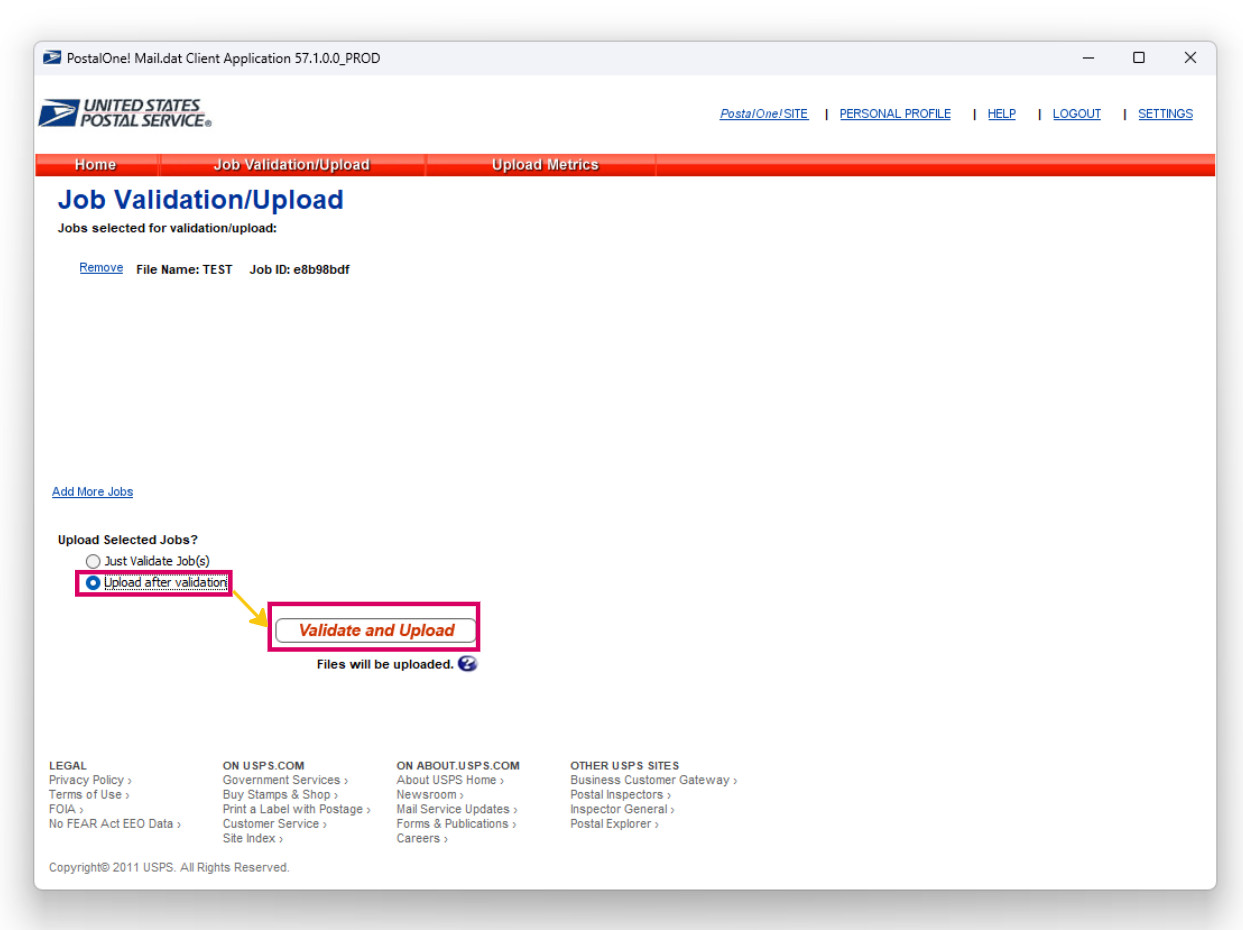
Click “Upload After Validation” to officially upload.