

Reference Only
Melissa legacy products are for reference only. They are NOT recommended for new development.
If you have any questions about any of these features, please feel free to contact Melissa Support at Tech@Melissa.com or 800-MELISSA ext. 4 (800-635-4772 ext. 4).
Reference Guide#
Introduction#
Melissa Add-Ons for Microsoft Dynamics CRM make it easy to capture, clean, and complete your global address data.
Add-On List#
Melissa has the following add-ons available for Dynamics CRM:
Global Verify - Verify and standardize mailing addresses from across the world with the flexibility and accuracy delivered by Melissa Data products.
Personator - An all-in-one contact verification and appending cloud API that allows you to pass in names, addresses, phone numbers, and email addresses; simultaneously parsing them, making conservative corrections, and even appending data derived from the input. It can also leverage all of these inputs to verify whole contact records.
System Requirements#
Minimum Requirements#
2.9 GHz or faster x86- or x64-bit dual core processor with SSE2 instruction set
Super VGA with a resolution of 1024 x 768
2 GB RAM
Recommended Requirements#
3.3 GHz or faster 64-bit dual core processor with SSE2 instruction set and 3 MB or more L3 cache
Super VGA with a resolution of 1024 x 768
4 GB RAM
Components#
Business Coder#
Business Coder searches for Business Demographics data based on the address and company name.
You can use Business Coder to:
Search for businesses using the phone number, stock ticker, and web address.
Discover business SIC codes, sales volumes, employee sizes, phone numbers, etc.
Installing Business Coder#
Begin by navigating to Solutions. To do this, first click Sales along the top, then click Settings in the menu that drops down, then click Solutions under the Customization category.
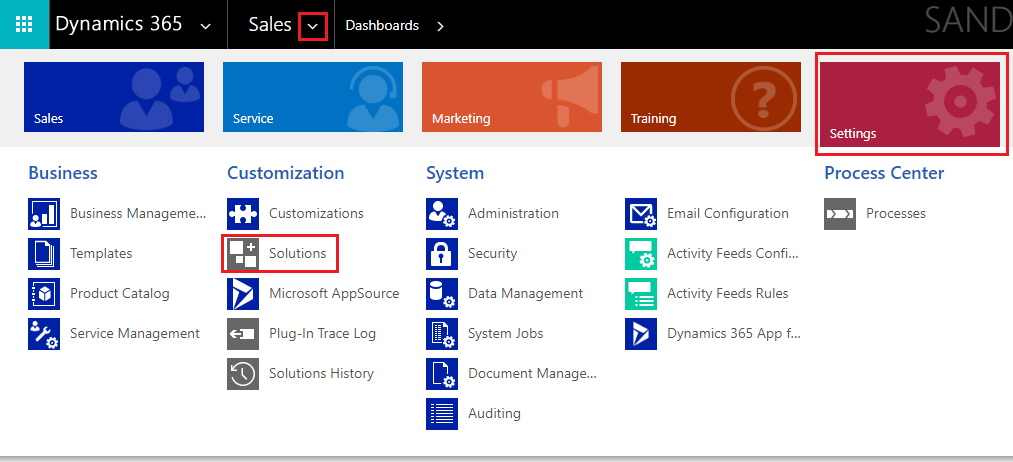
Click Solutions#
Click the Import button.
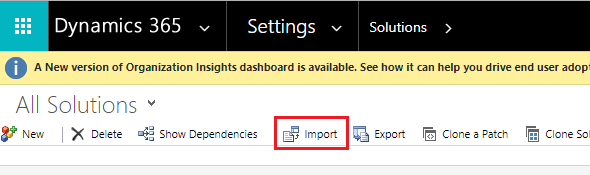
Click Import#
A window will pop-up. Click the Choose File button to select a solution package, then click Next.
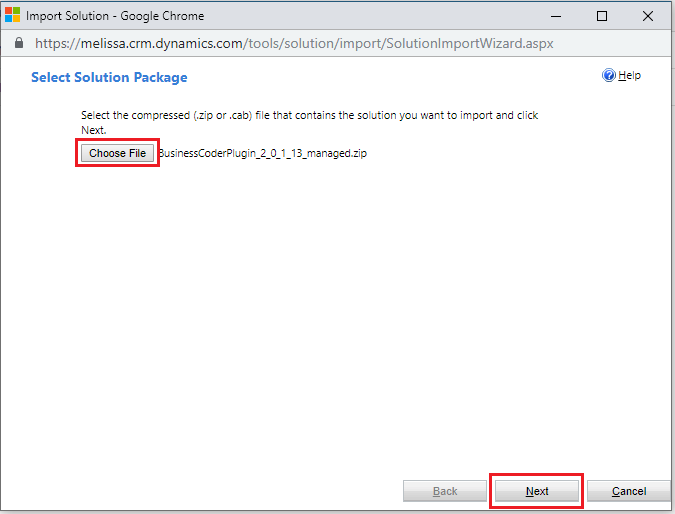
Click Choose File#
A file explorer window will pop-up. Please locate the plugin .zip file that contains the Business Coder solution. Click Open and then click Next.
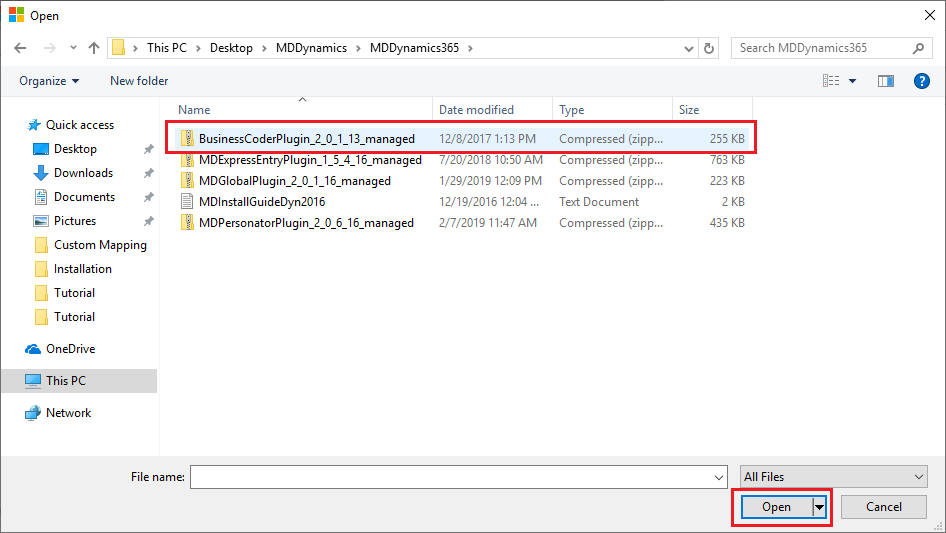
Click Open then Next#
A window will display the solution information for the Business Coder Plugin. Click Next.
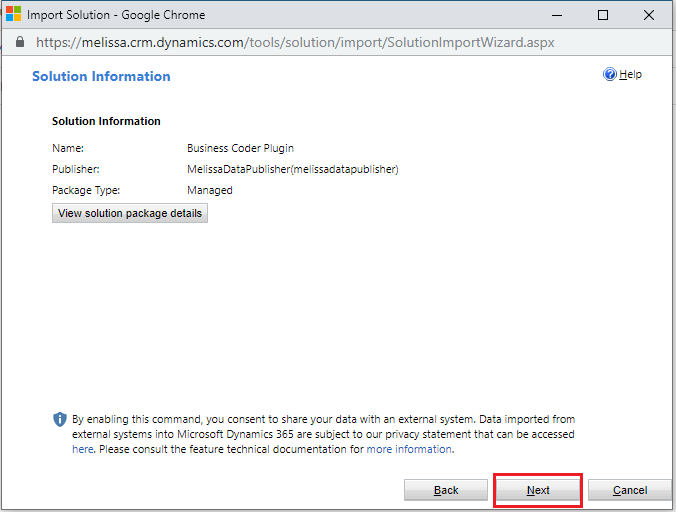
Click Next#
Then the import options will display. Click Import.
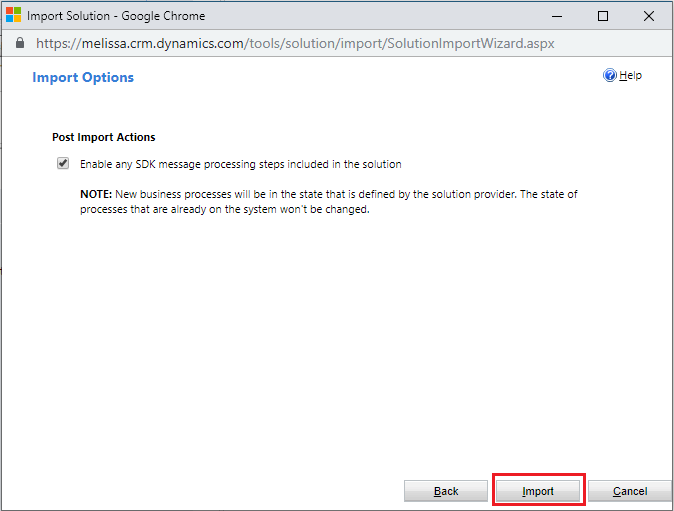
Click Import#
Wait for the solution to finish importing.
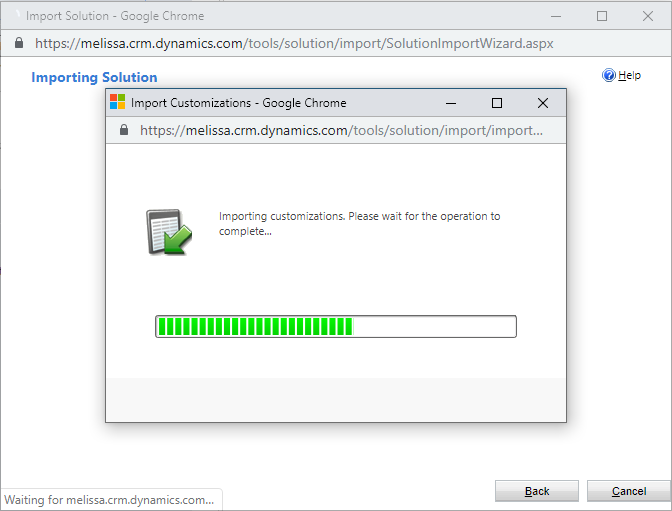
Wait for importing to finish#
The Buseiness Coder Plugin import should complete successfully. Click Close.
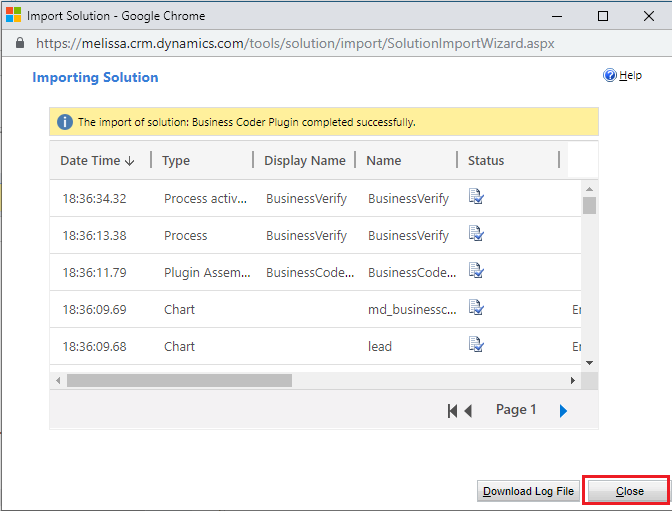
Click Close#
Click Publish All Customizations. The installation is now complete.
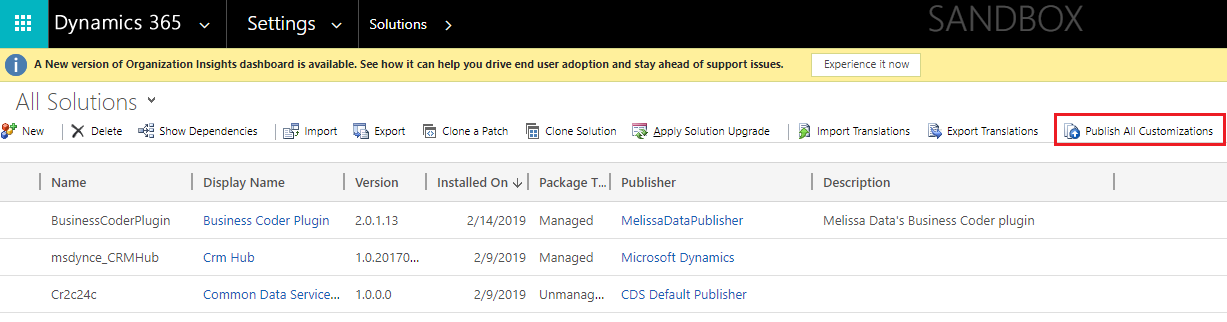
Click Publish All Customizations#
Configuring Business Coder#
Begin by navigating to Solutions. To do this, first click Sales along the top, then click Settings in the menu that drops down, then click Solutions under the Customization category.
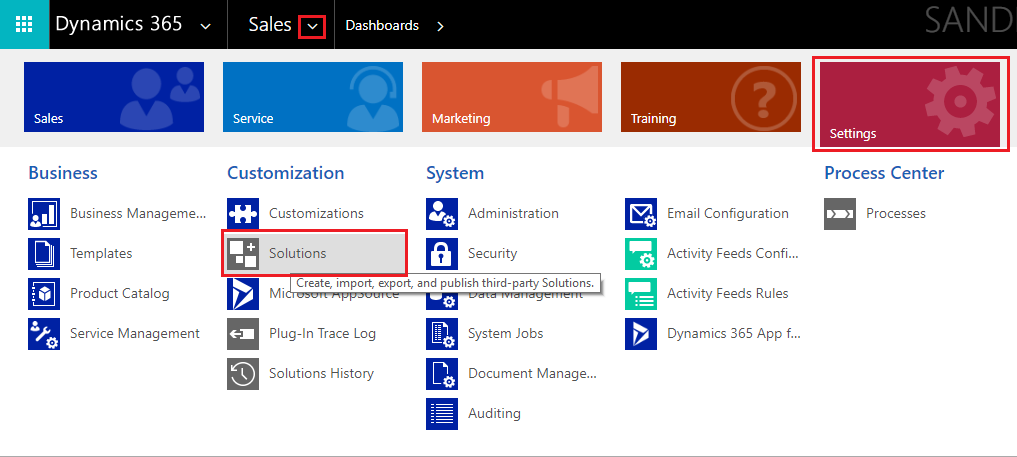
Click Solutions#
Click the Business Coder Plugin under Display Name.
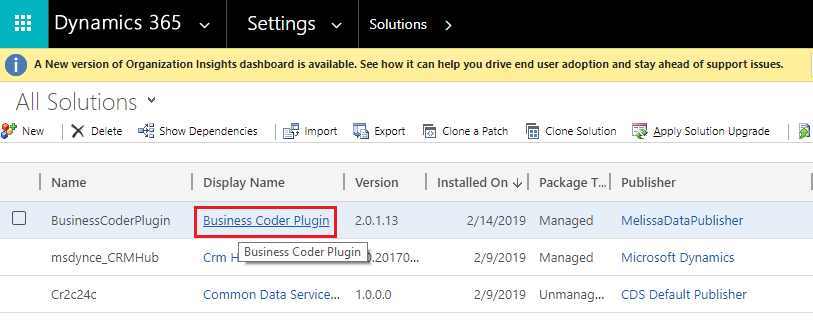
Click the Business Coder Plugin under Display Name#
Click Configuration in the solution pane located on the left side of the window. Then enter your License Key into the specified field.
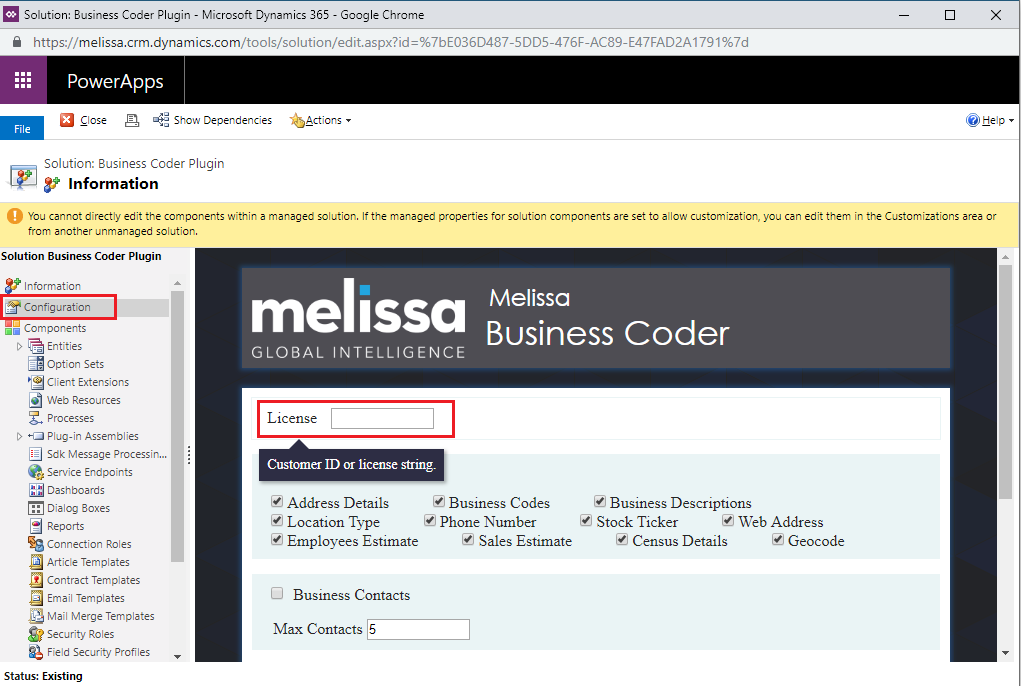
Enter your License Key#
Select your desired options.
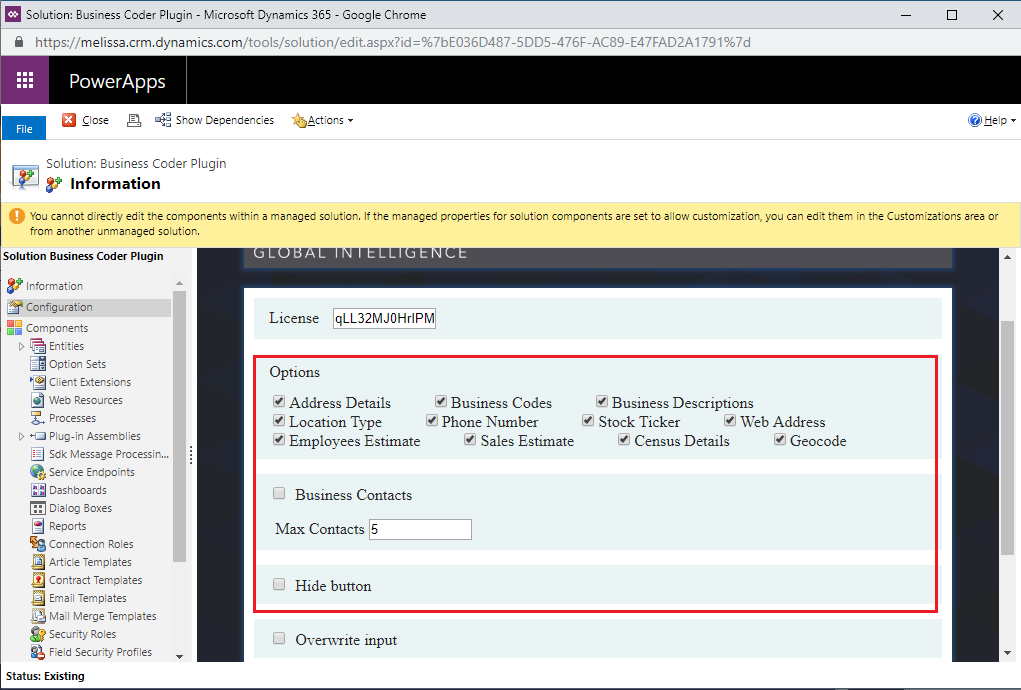
Select options#
Choose if you want to Overwrite Input.
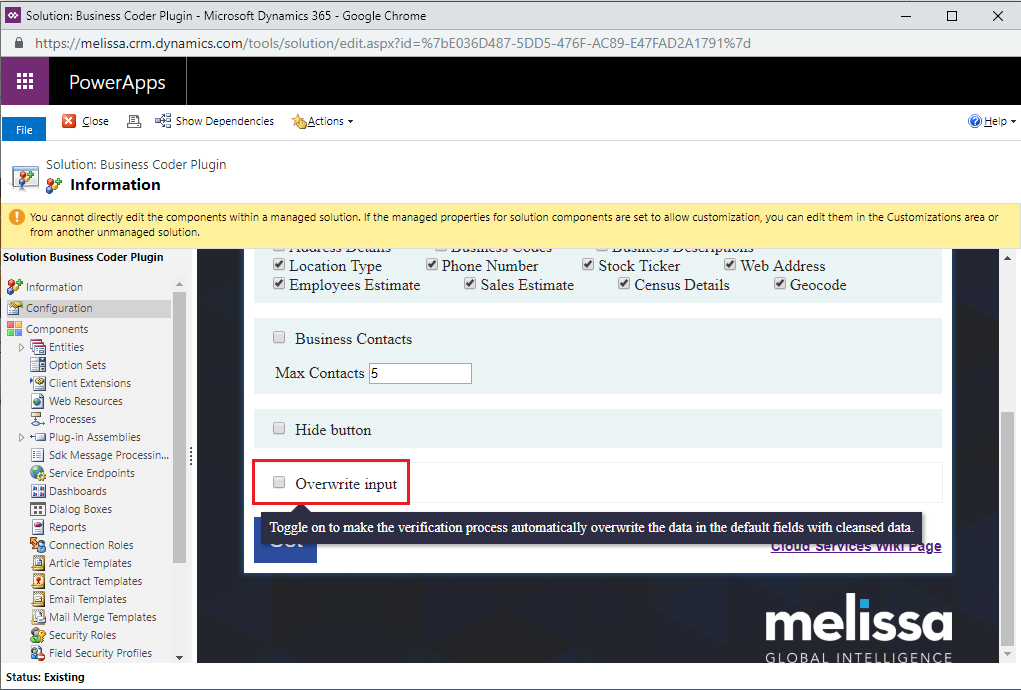
Choose Overwrite Input#
Click Set to save these configurations. This completes the configuration.
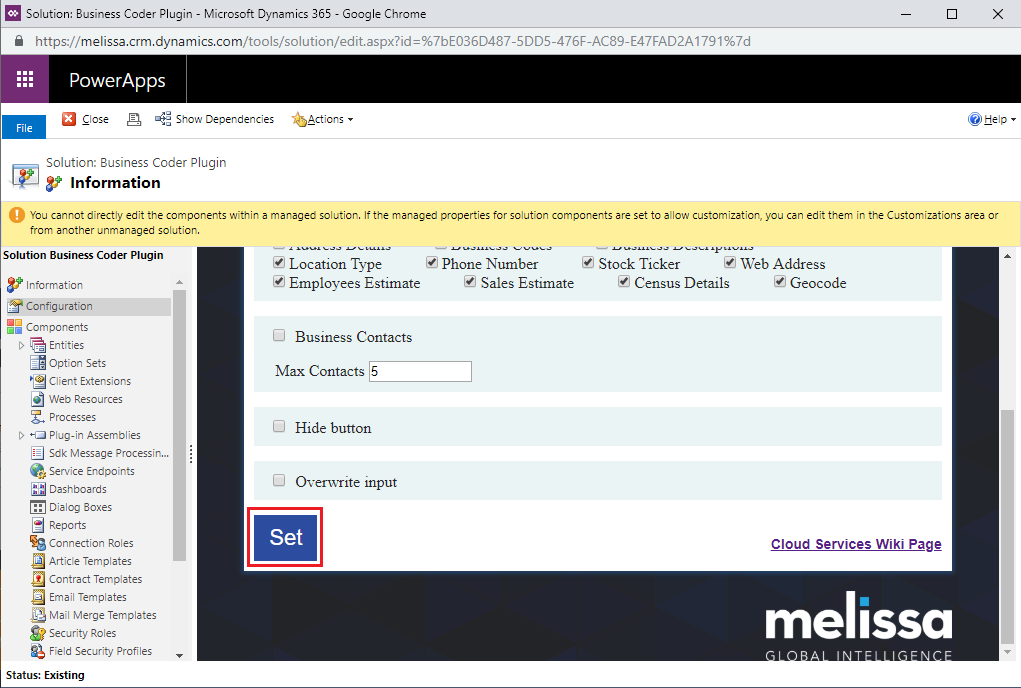
Click Set#
Business Coder Fields#
Business Information#
Field Name |
Description |
||||||||||
|---|---|---|---|---|---|---|---|---|---|---|---|
Location Type |
Code denoting the business location type.
|
||||||||||
Phone Number |
10-digit phone number. |
||||||||||
Stock Ticker |
The assigned stock exchange abbreviation/symbol for the business. |
||||||||||
Web Address |
The web address/domain for the business. |
||||||||||
Employees Estimate |
The number of employees who work at this business location. |
||||||||||
Sales Estimate |
The sales volume and/or assets of the business. |
SIC/NAICS Codes#
Field Name |
Description |
|---|---|
SIC Code 1 |
A 6-digit SIC code for the business’s primary line of business. |
SIC Code 2 |
The second SIC code. |
SIC Code 3 |
The third SIC code. |
NAICS Code 1 |
North American Industry Classification System code. This is related to SIC Code 1. |
NAICS Code 2 |
Second NAICS code. This is related to SIC Code 2. |
NAICS Code 3 |
Third NAICS code. This is related to SIC Code 3. |
SIC/NAICS Descriptions#
Field Name |
Description |
|---|---|
SIC Description 1 |
First SIC code description. Related to SIC Code 1. |
SIC Description 2 |
Second SIC code description. Related to SIC Code 2. |
SIC Description 3 |
Third SIC code description. Related to SIC Code 3. |
NAICS Description 1 |
First NAICS code description. Related to NAICS Code 1. |
NAICS Description 2 |
Second NAICS code description. Related to NAICS Code 2. |
NAICS Description 3 |
Third NAICS code description. Related to NAICS Code 3. |
Express Entry#
Express Entry enables more accurate and convenient entry of address data by checking data as it is typed.
You can use Express Entry to:
Save time and effort by completing addresses with less than 1/2 of the keystrokes necessary to type the full address, checked against Melissa Data’s Multi-sourced data.
Validate addresses while they are being typed in, making sure that as addresses are added, misspellings and other errors are prevented.
Installing Express Entry#
This is how to install the Express Entry Solution once you have downloaded it.
Begin by navigating to Settings. To do this, click the down arrow next to Sales, then click Settings in the menu that drops down.

Click Settings#
Click Solutions in the Customization category.
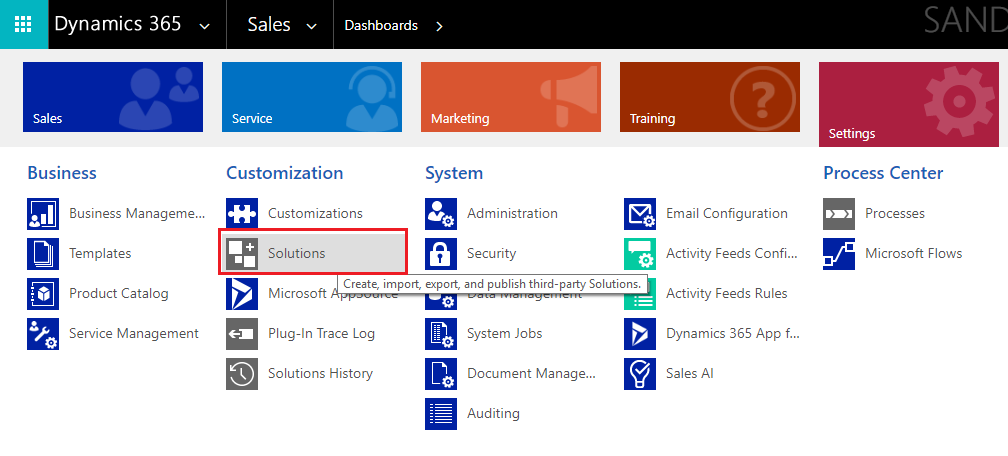
Click Solutions#
Click the Import button.
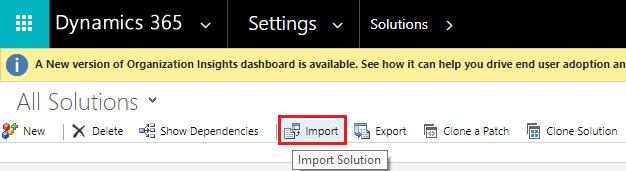
Click Import#
A window will pop-up. Click the Choose File button.
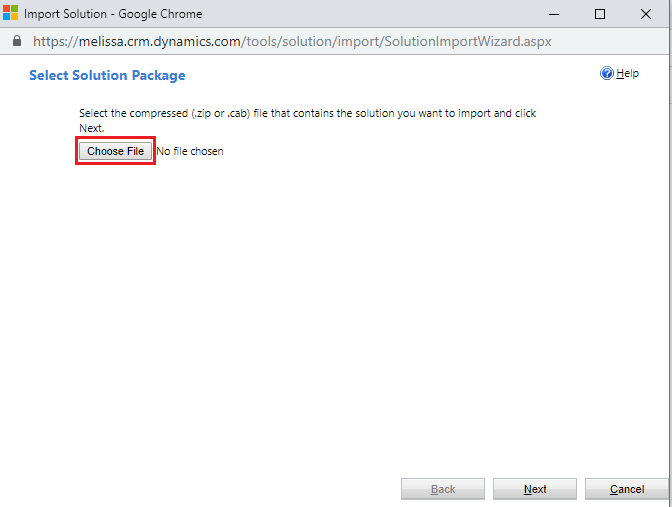
Click Choose File#
A file explorer window will pop-up. Locate the plugin .zip file that contains the Express Entry solution. Click Open.
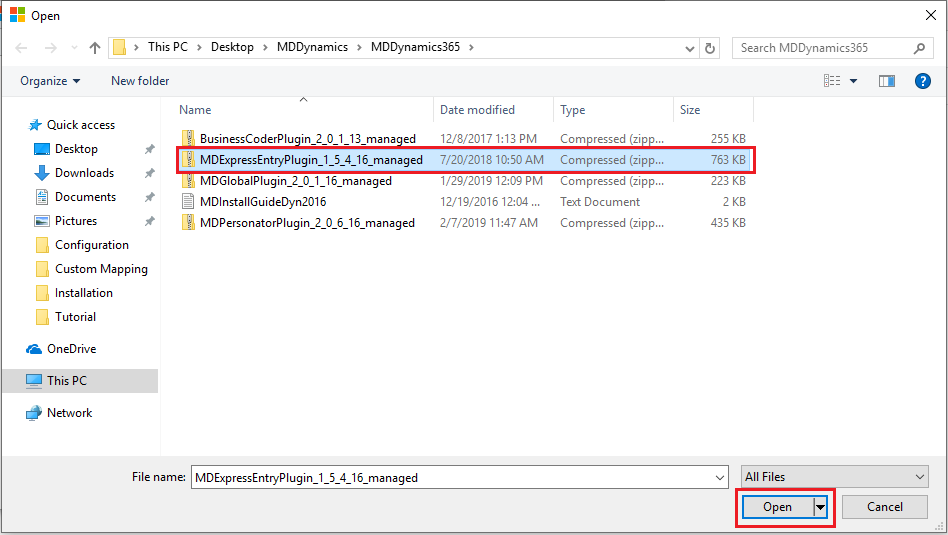
Click Open#
Then click Next.
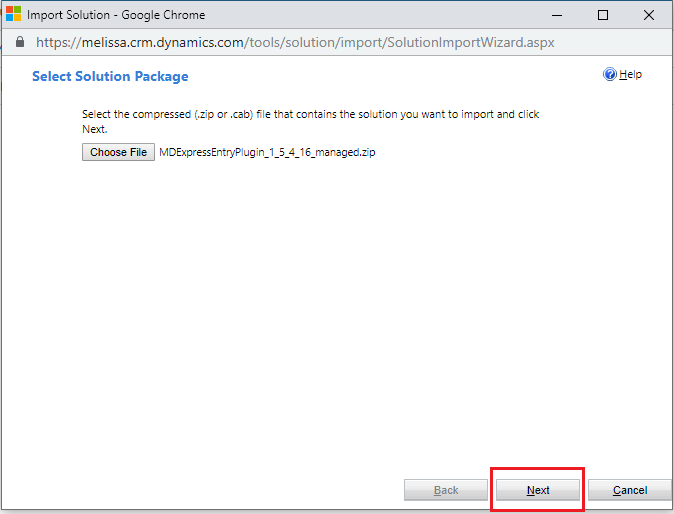
Click Next#
The window will show the Solution Information. Click Import.
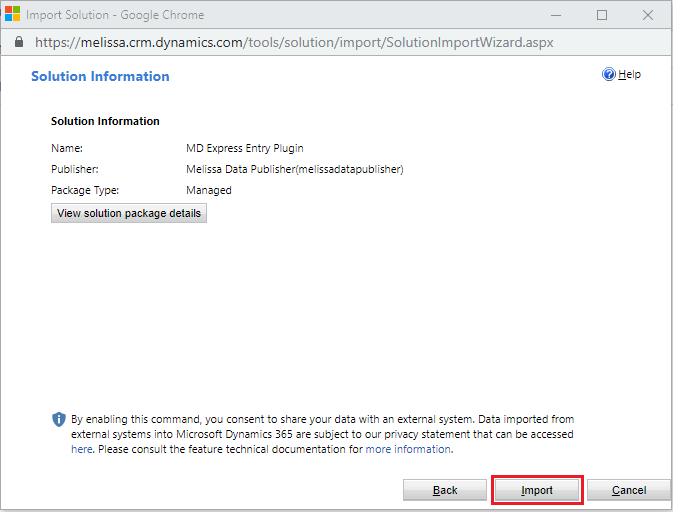
Click Import#
Wait for the solution to finish importing.
The installation is now complete. Click Close.
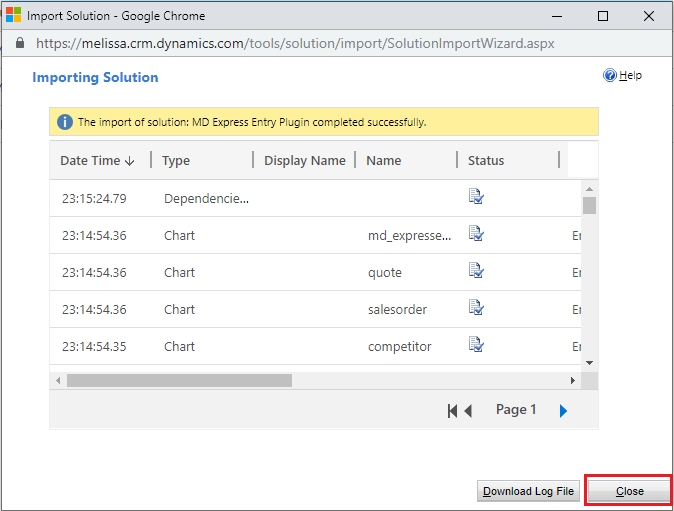
Installation complete#
Configuring Express Entry#
This is how to configure Express Entry once you have completed the installation.
Begin by navigating to Settings. To do this, click the down arrow next to Sales, then Settings in the menu that drops down.

Click Settings#
Then click Solutions in the Customization category.
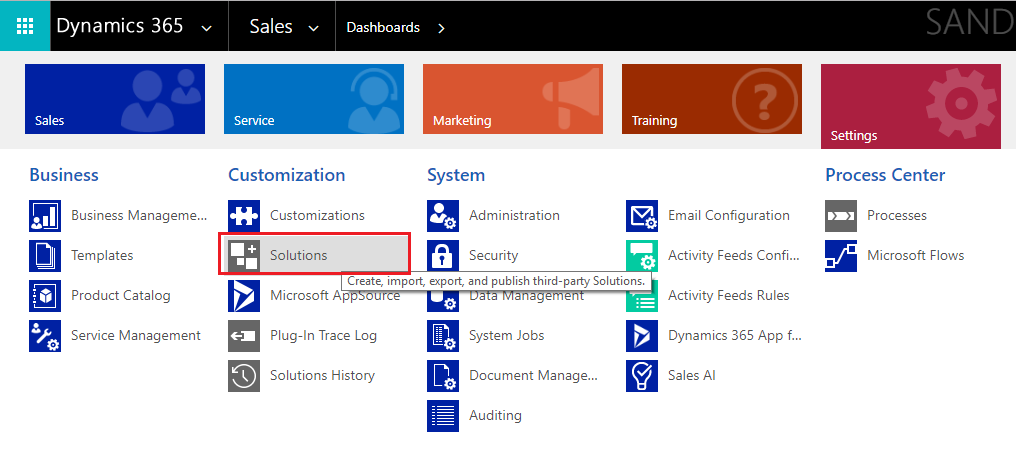
Click Solutions#
Click the MD Express Entry Plugin under Display Name.
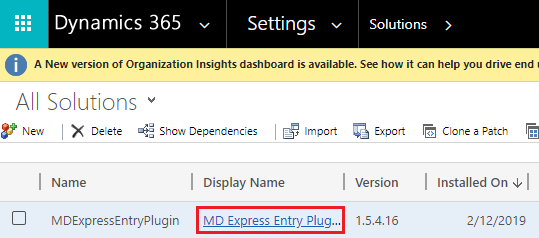
Click MD Express Entry Plugin#
Click Configuration in the solution pane located on the left side of the window. Then enter your License Key into the License field and check the Activate Express Entry.
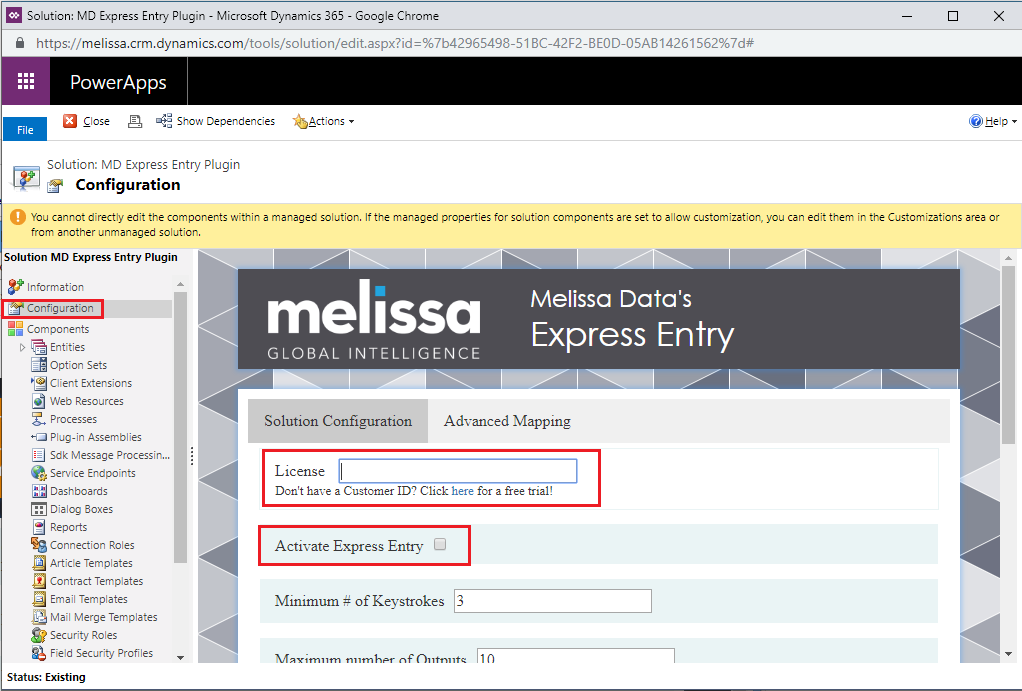
Click Configuration#
Setup your desired options. Then click Set to save this configuration. This completes the configuration.
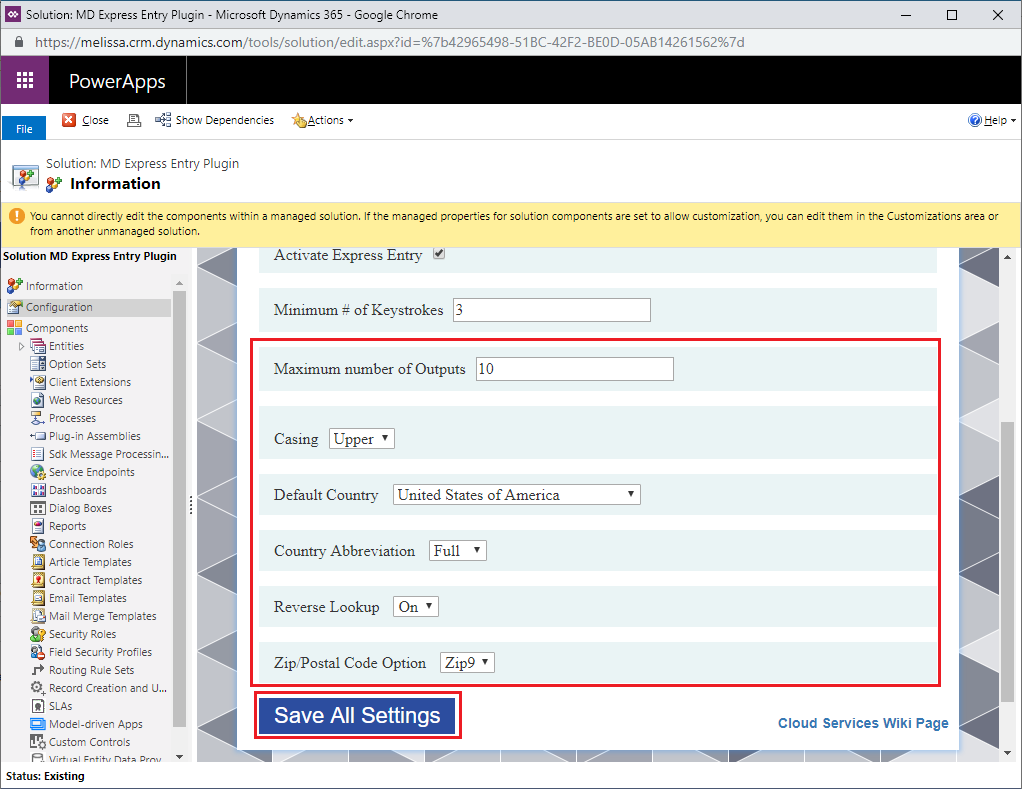
Click Save all Settings#
Global Verify#
Global Verfiy for Dynamics CRM seamlessly integrates Melissa Data’s Global Address verification technology into the Dynamics CRM environment. This solution is built into the existing Dynamics CRM forms, inserting a number of extra fields and a verify address button. One click will verify and standardize the address of a new or existing record.
Covers 240+ countries
Allows you to verify and standardize address data for the Account, Contact, Lead, Competitor, Quote, Order, and Invoice entities
No coding required, set up simply requires importing the solution into your dynamics environment
In addition to verifying and standardizing the address, also appends numerous other fields to the entity providing more detailed information on the address
Can also append latitude and longitude
Verify on click and verify on save options available
Installing Global Verify#
Begin by navigating to Settings. To do this, click the down arrow next to Sales, then click Settings in the menu that drops down.
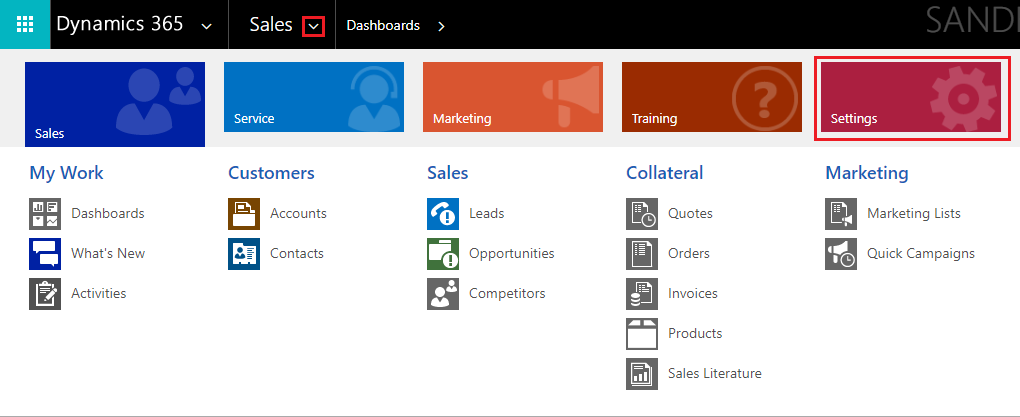
Click Settings#
Click Solutions in the Customization category.
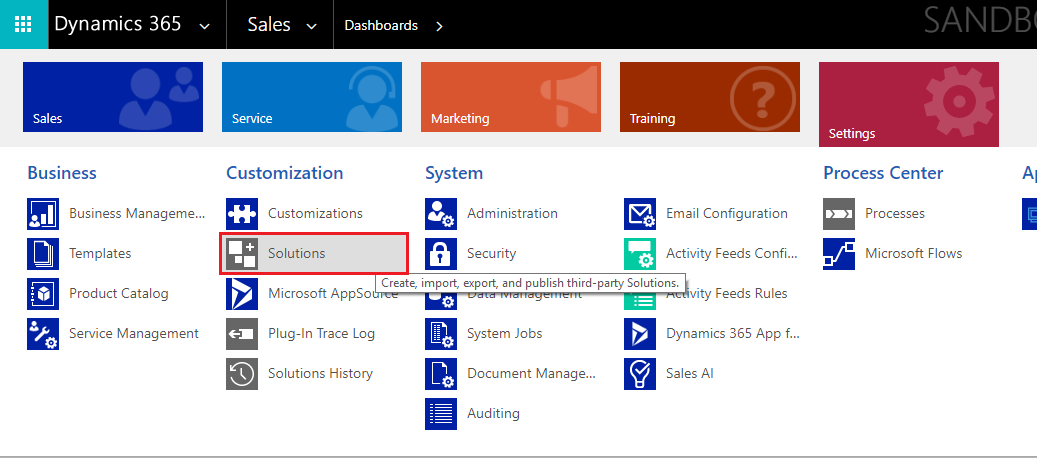
Click Solutions#
Click the Import button.
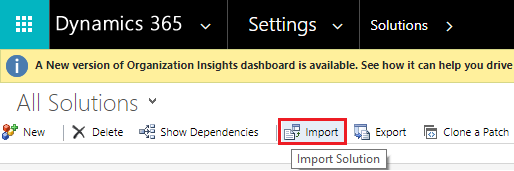
Click Import#
A window will pop-up. Click the Choose File button.
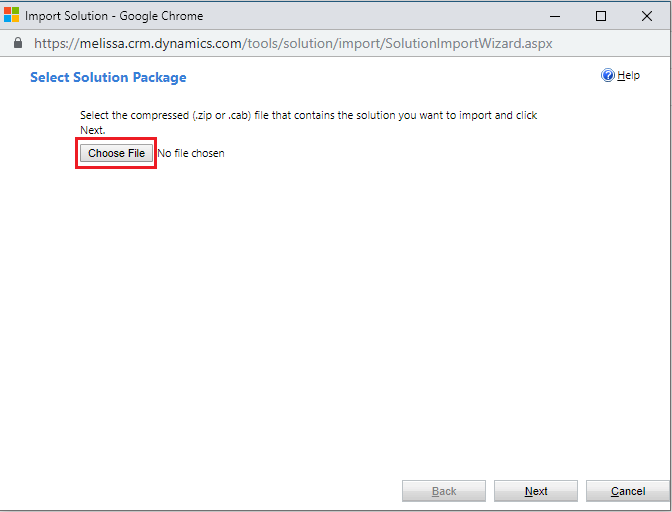
Click Choose File#
A file explorer window will pop-up. Locate the plugin .zip file that contains the Global Verify solution. Click Open.
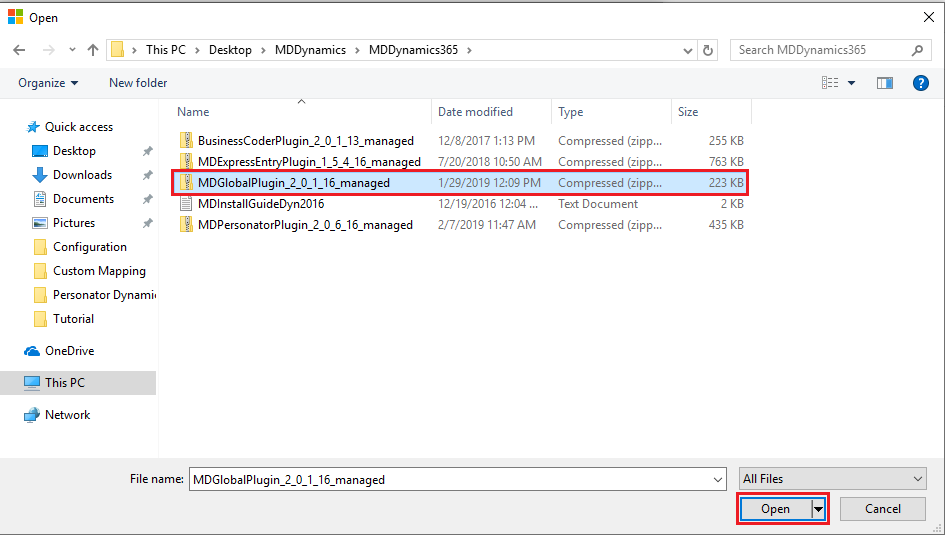
Click Open#
Then click Next.
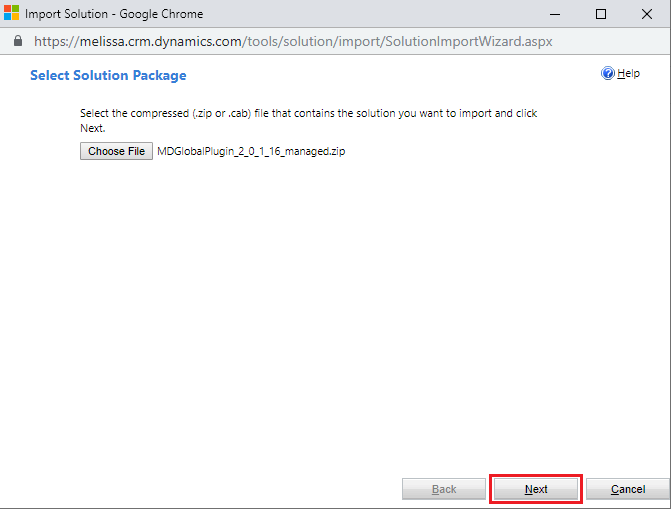
Click Next#
The window will show the Solution Information. Click Import.
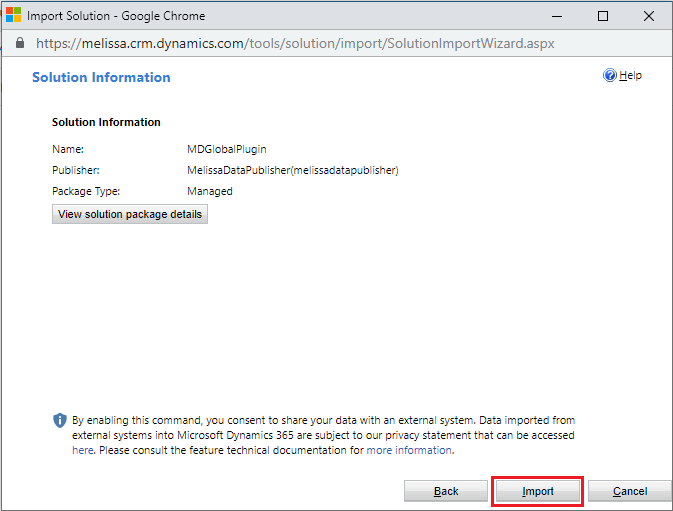
Click Import#
Wait for the solution to finish importing.
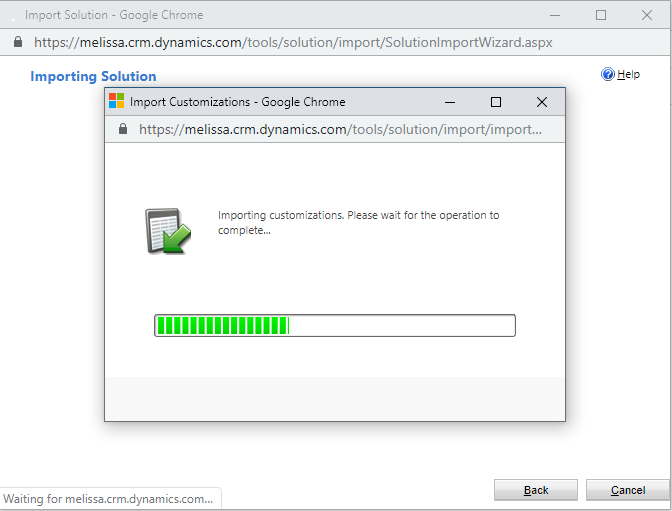
Wait for importing to finish#
The installation is now complete. Click Close.
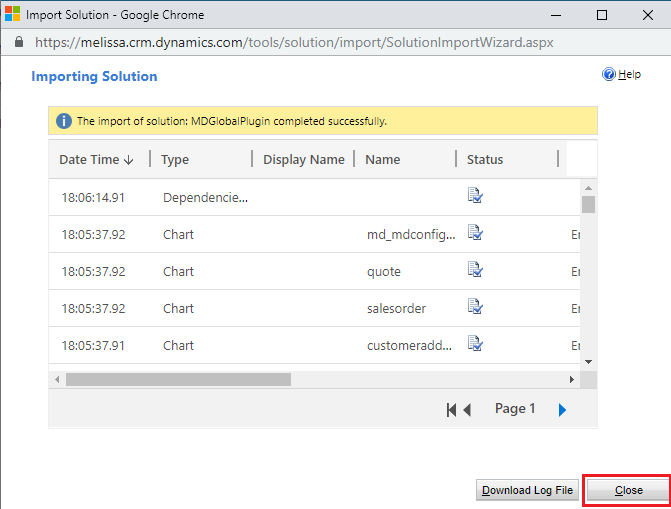
Installation complete#
Click Publish All Customizations to ensure all changes are applied to your default solution.
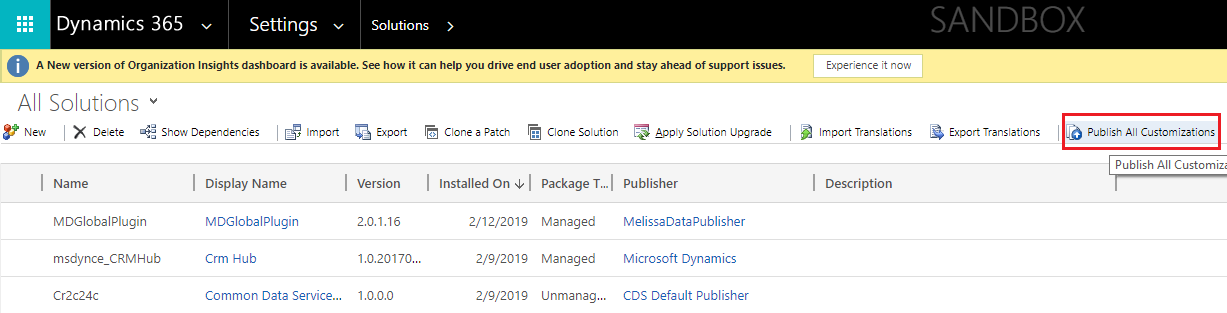
Click Publish All Customizations#
Configuring Global Verify#
Begin by navigating to Settings. To do this, click the down arrow next to Sales, then Settings in the menu that drops down.

Click Settings#
Then click Solutions in the Customization category.
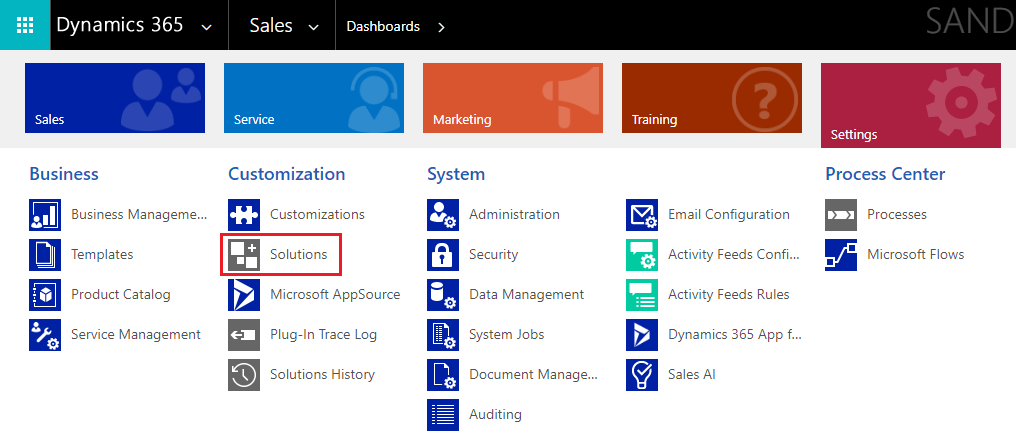
Click Solutions#
Click the MDGlobalPlugin under Display Name.
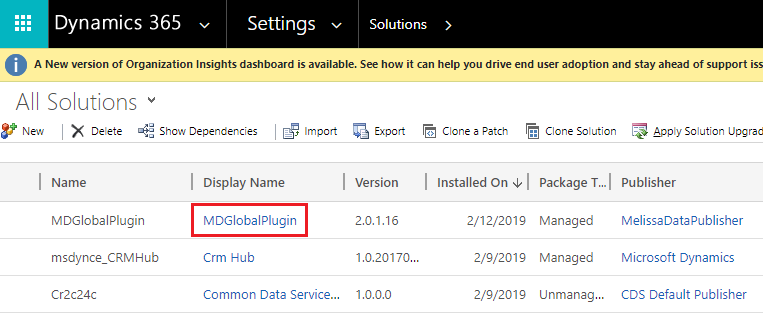
Click MDGlobalPlugin#
Click Configuration in the solution pane located on the left side of the window.
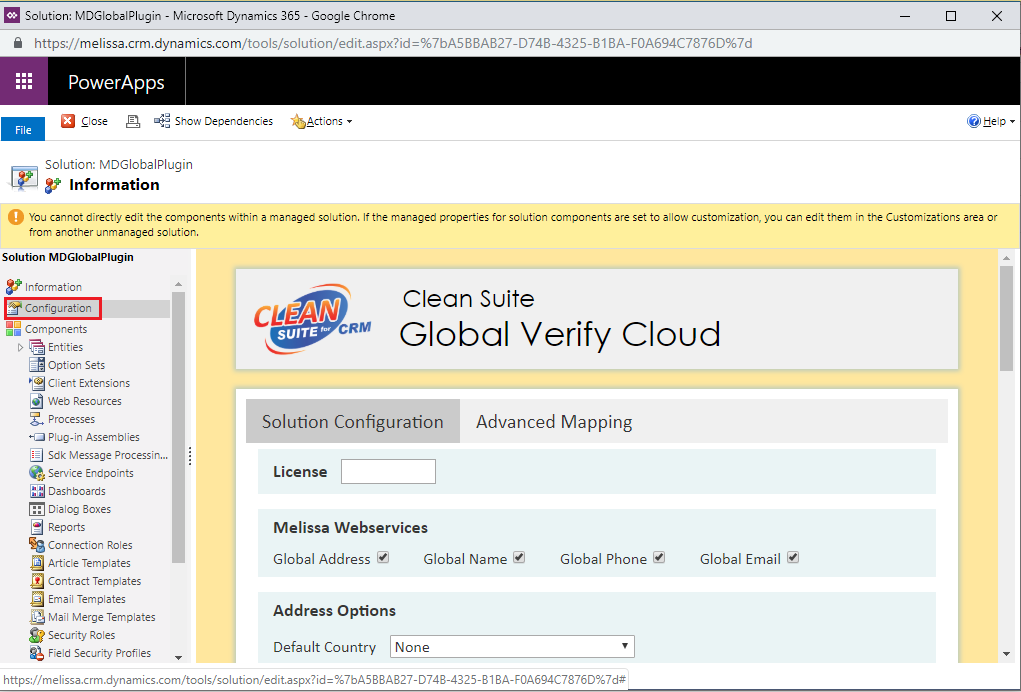
Click Configuration#
Enter your License Key into the License field.
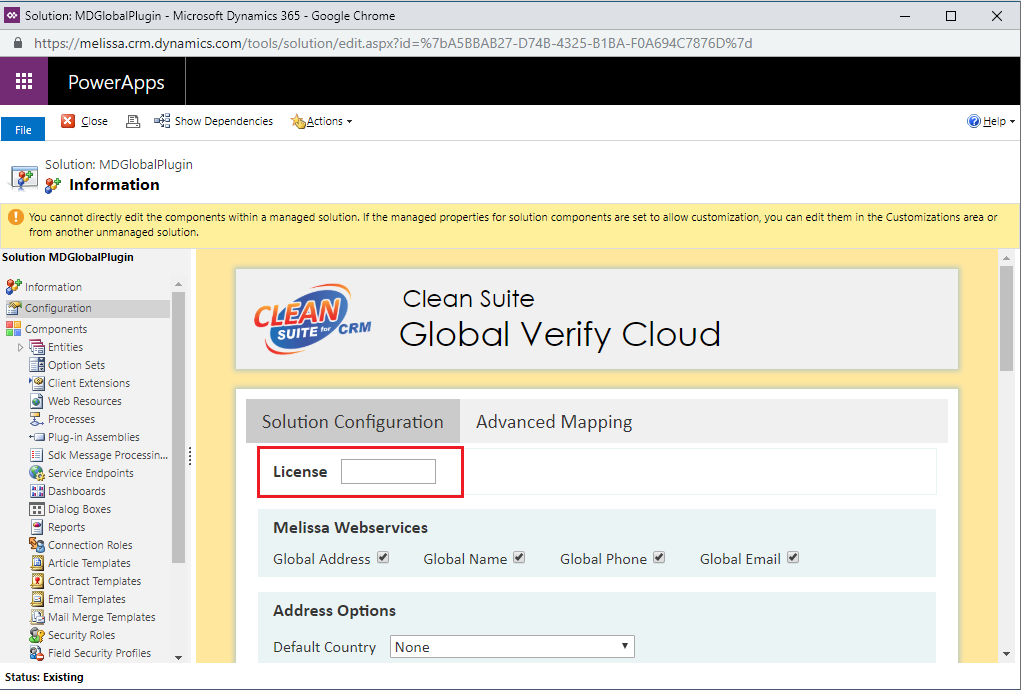
Enter your License Key#
Select the Melissa Webservices you would like to use.
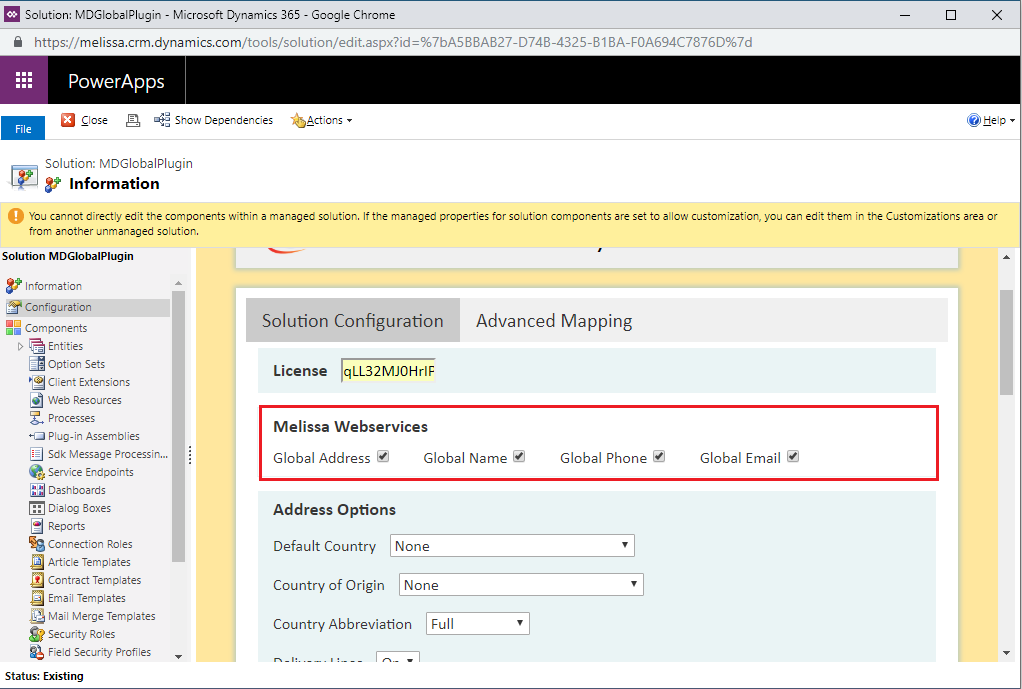
Select services#
Select your desired options for Address Options. A country must be selected in order to use the Global Address Verification service. The result code section sets the success/failure conditions given during the use of the service. For more information, see Global Address Verification Options.
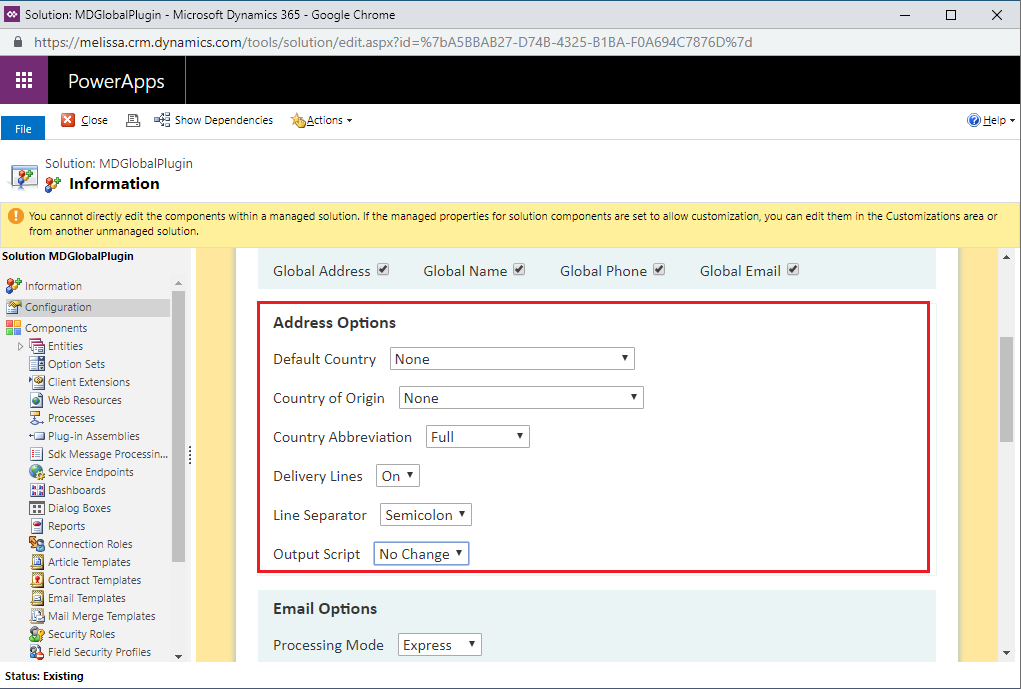
Select Address Options#
Select your desired options for Email Options. The Premium version of the service requires a subscription and will incur additional fees. For more information, see Global Email Options.
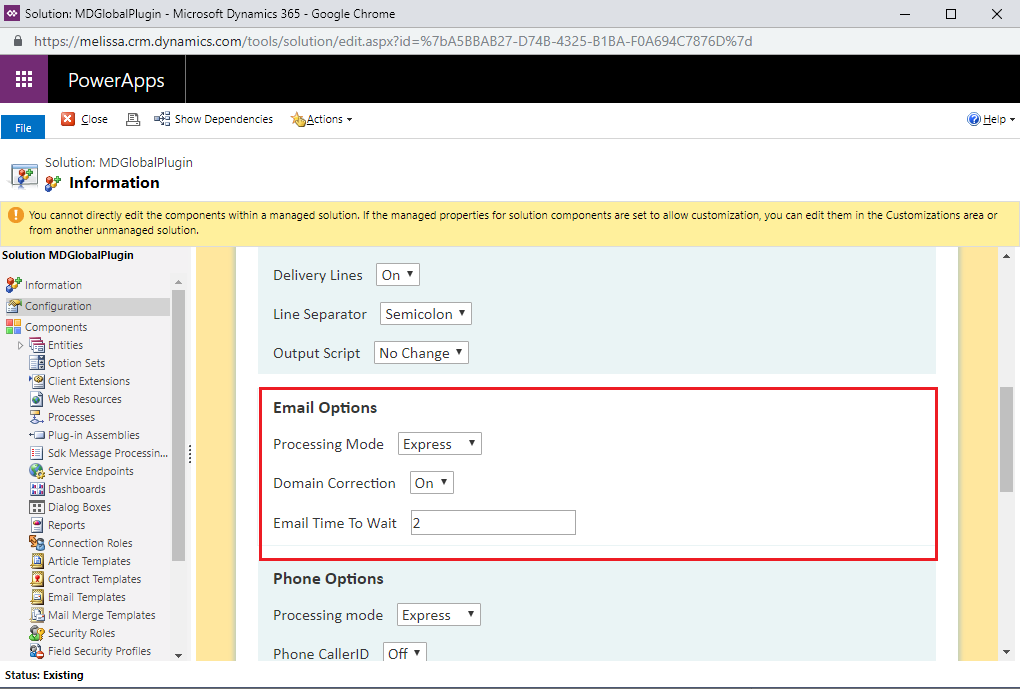
Select Email Options#
Select your desired options for Phone Options. The Premium version of the service requires a subscription and will incur additional fees. For more information, see Global Phone Options.
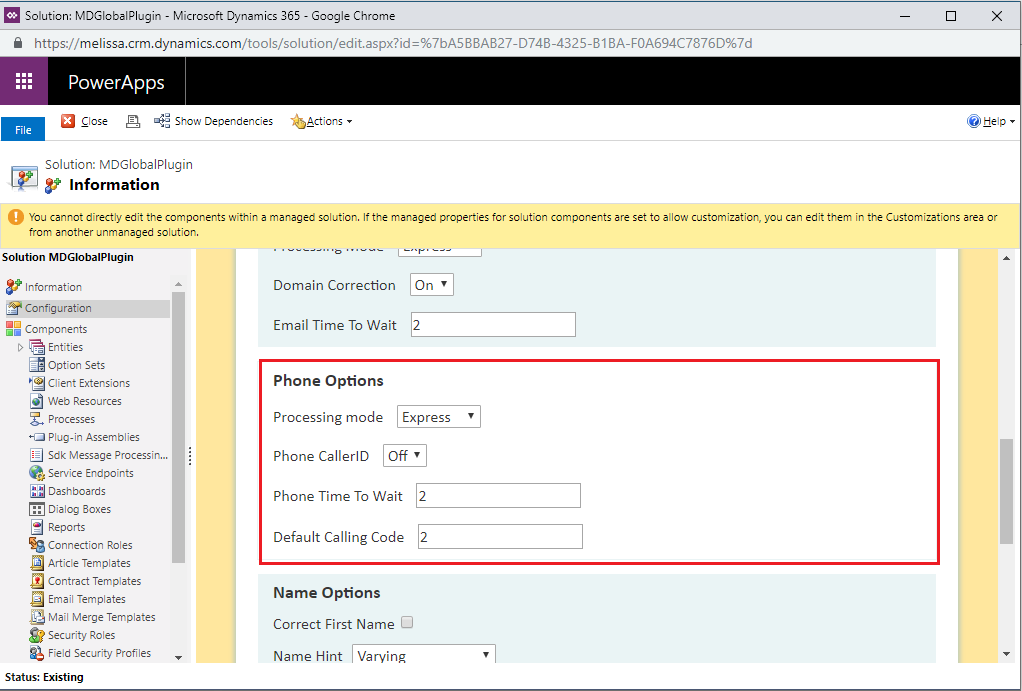
Select Phone Options#
Select your desired options for Name Options. These options determine how aggressive the name parsing can be. For more information, see Global Name Options.
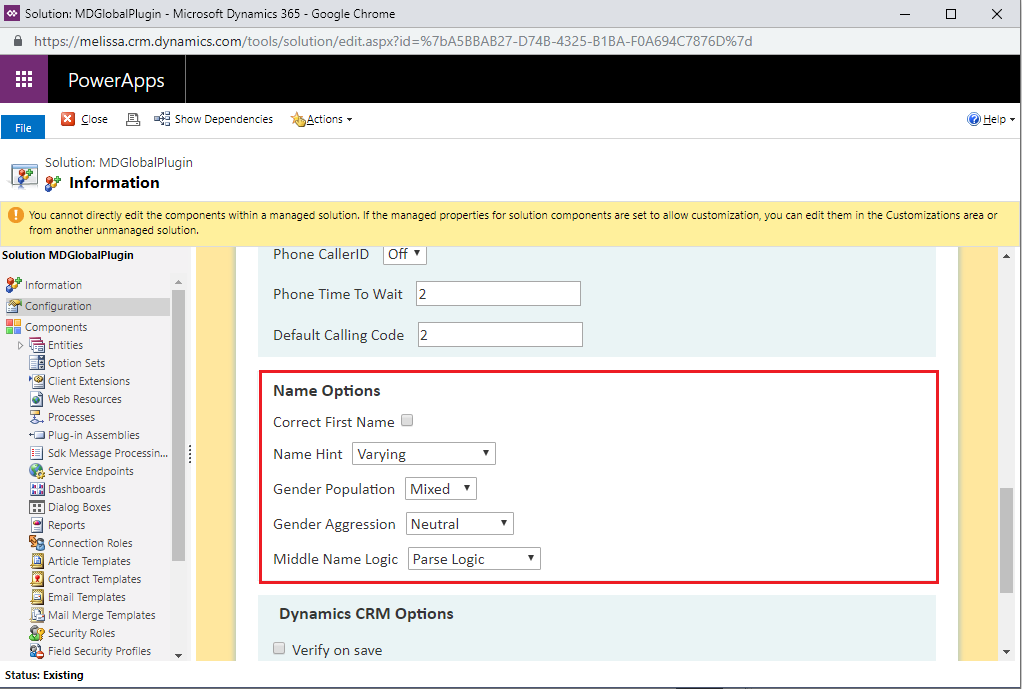
Select Name Options#
Select your desired options for Dynamics CRM Options.
Check Verify on save to process your input fields every time a record is saved.
Check Overwrite input to overwrite your input fields as well as fill in some of the out of the box fields where available. If left unchecked, the service will simply fill-in the fields created for our service.
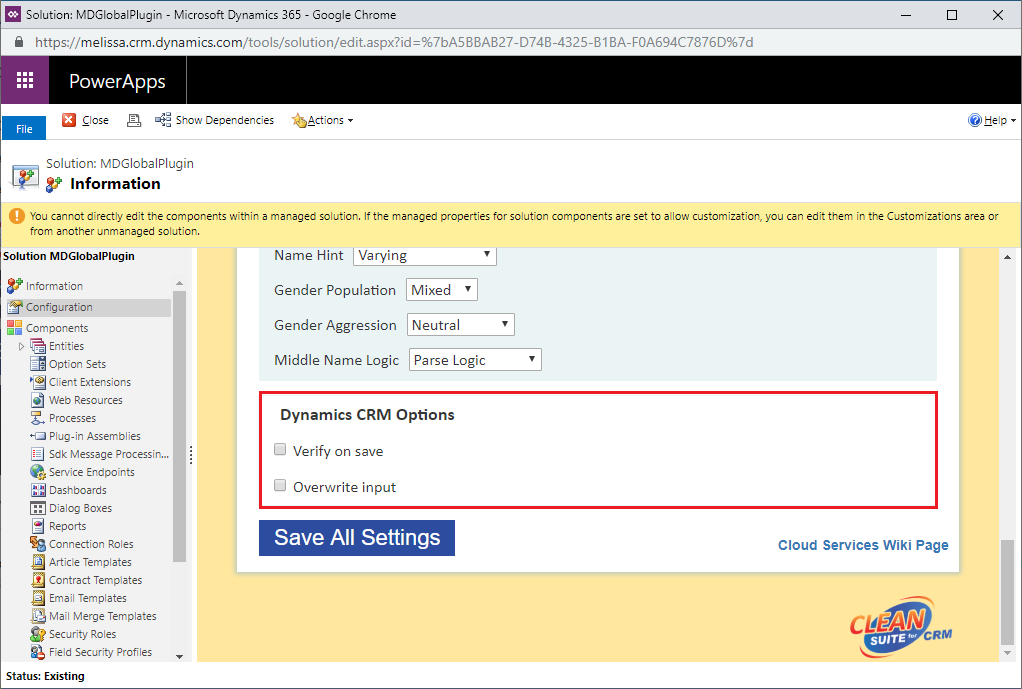
Select Dynamics CRM Options#
Click Save All Settings to save these configurations. This completes the configuration.
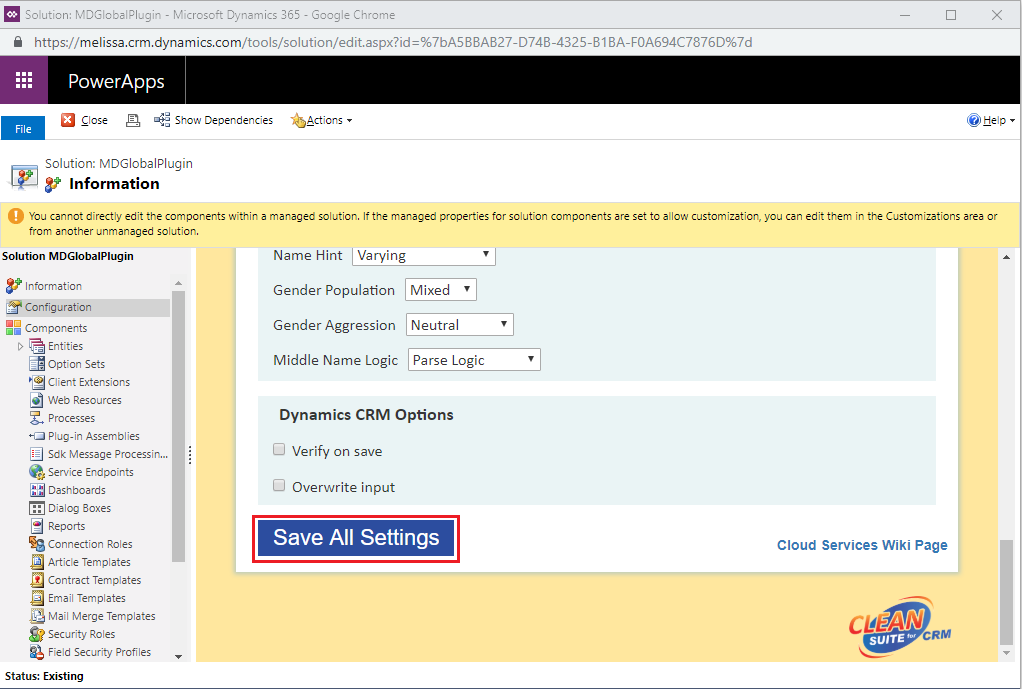
Click Save All Settings#
Global Verify Custom Mapping#
Begin by navigating to the Configuration screen.
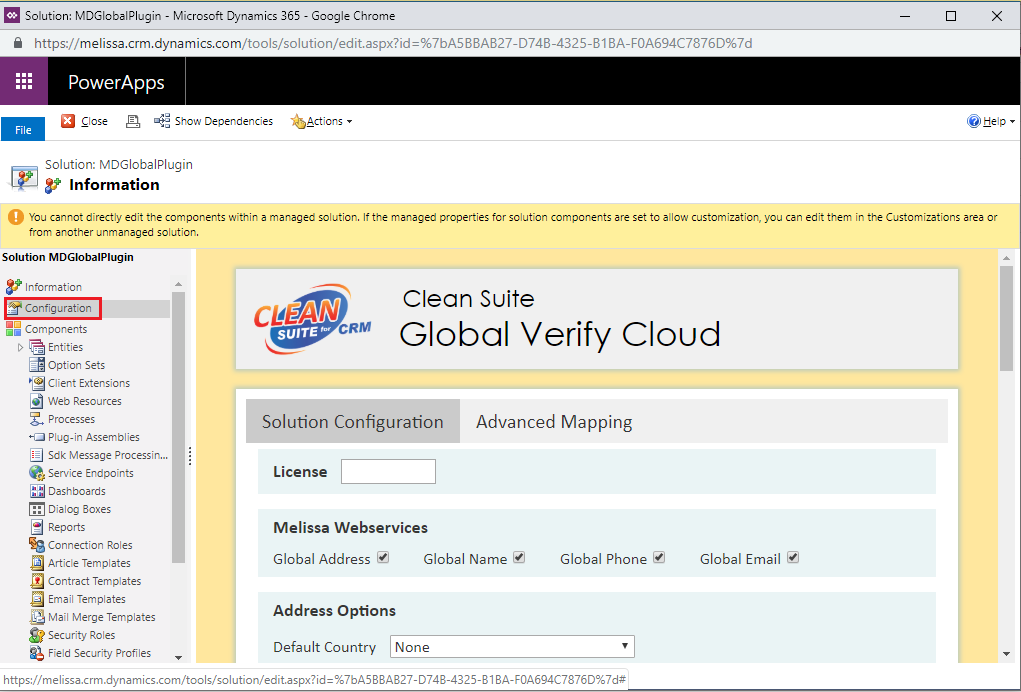
Navigate to Configuration#
Click the Advanced Mapping tab.
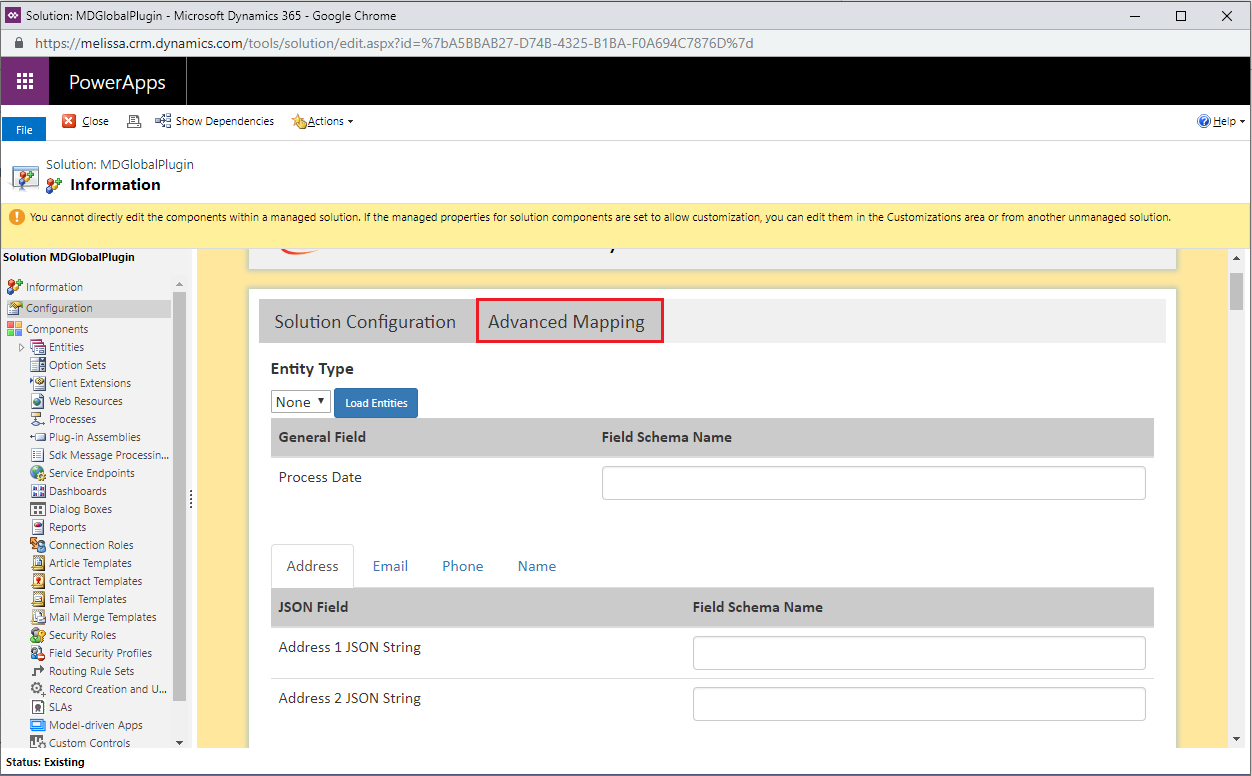
Click Advanced Mapping tab#
Click the Load Entities button. This queries the Dynamics organization for a full list of the entities that exist within your system and populates the list of attributes that are associated with the entity.
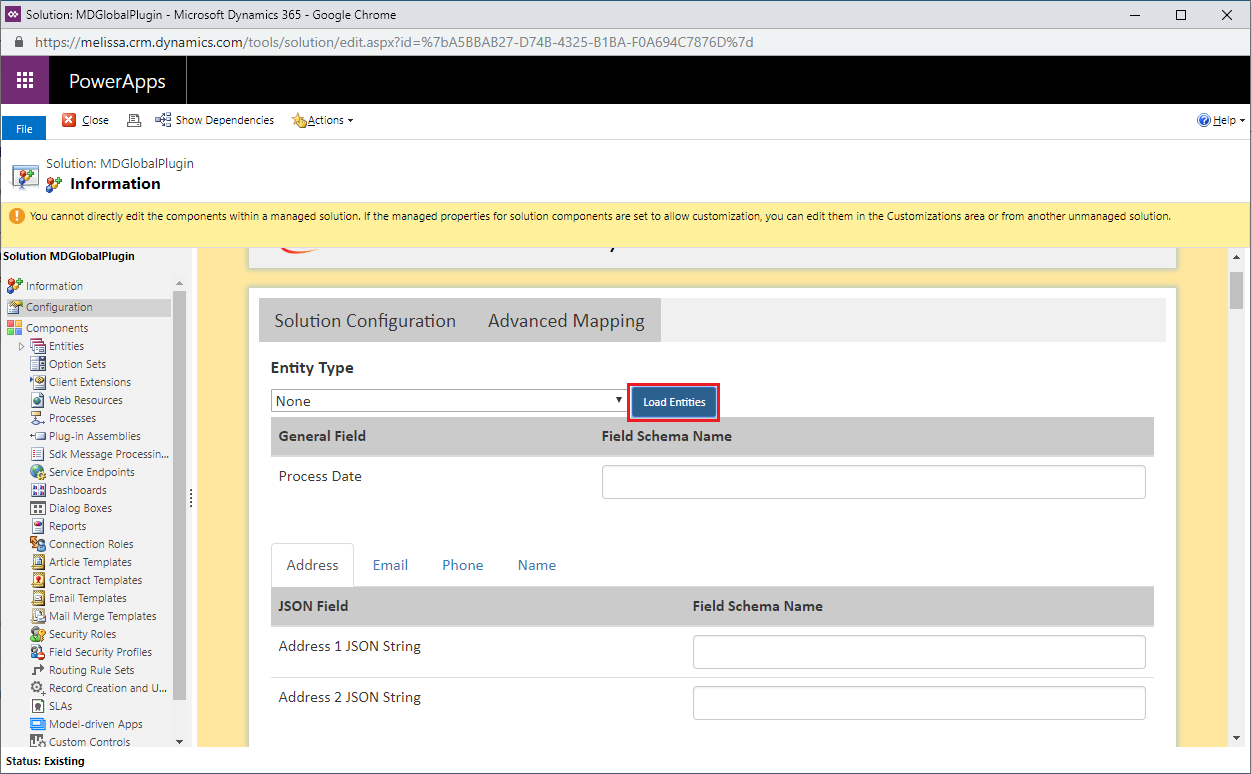
Click Load Entities#
Select the desired entity from the drop down list. If a mapping has already been established for the selected entity, the fields should automatically be populated with the previous values.
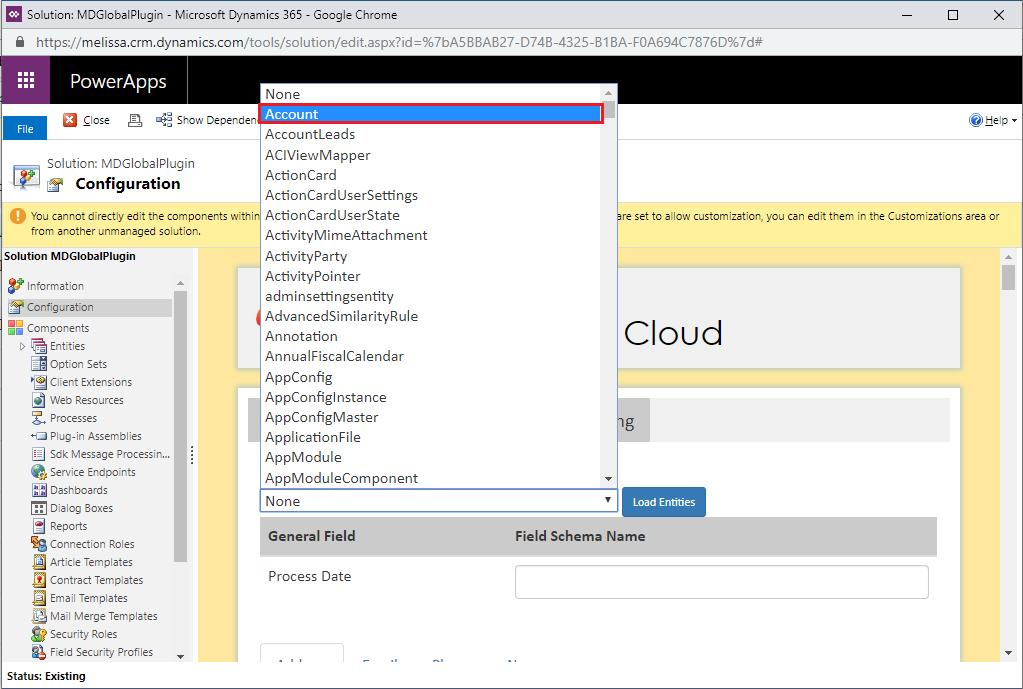
Select desired entity#
Type the name of the desired custom or out of the box field. In order to assist the field entry process, the field names should be auto-completed with only the correct field names for the selected entity.
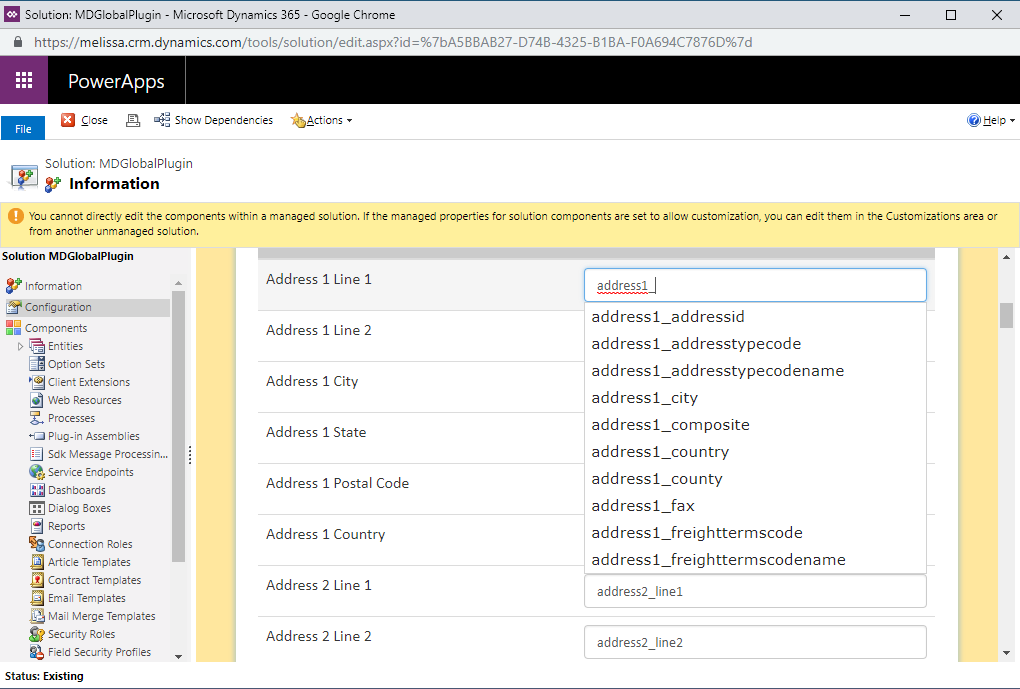
Type the field name#
The names should be the exact names that are assigned in Dynamics. These names can be viewed in the Fields section for that particular entity in the default solution.
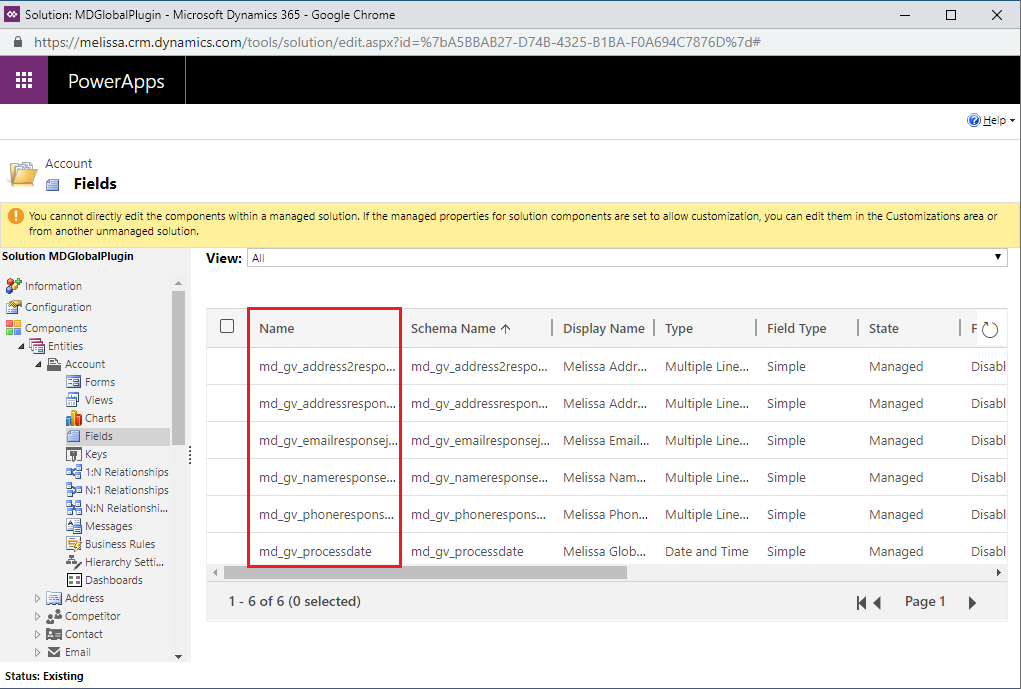
View entity field names#
Once the fields have been filled in click the Save Mapping button.
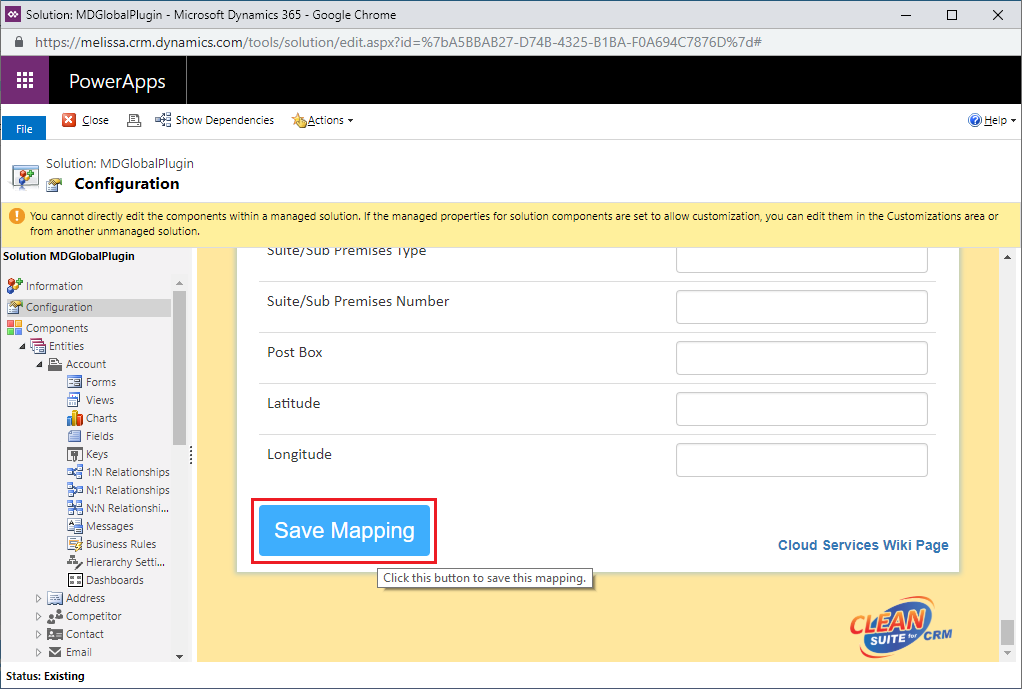
Click Save Mapping#
Custom Entity#
These steps will walk you through how to add Global Verify to custom entities.
Click the down arrow next to Sales, click Settings, then click Customizations under the Customization category.
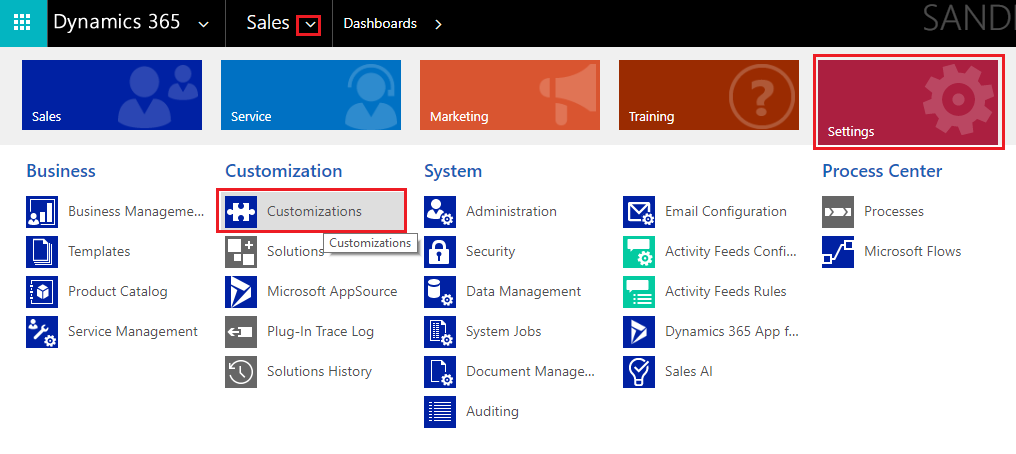
Click Customizations#
Click Customize the System.
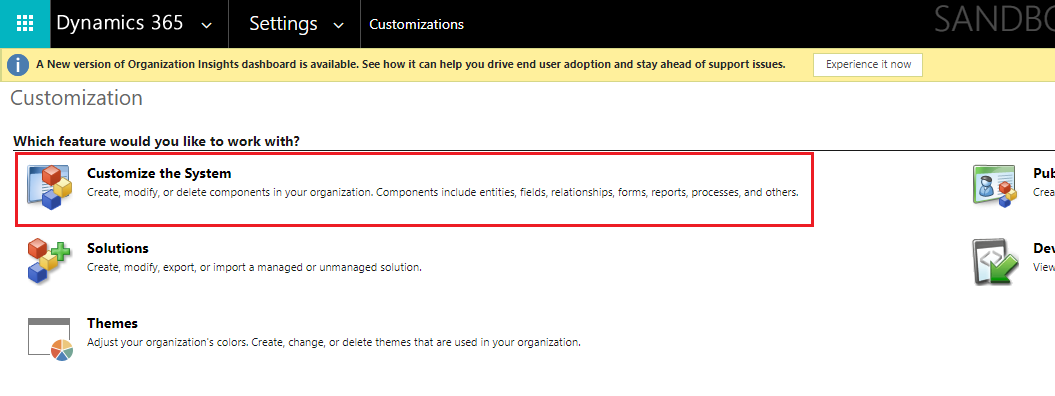
Click Customize the System#
On the left side of the new window that popped up, expand the Entities section to find the entity you want to add Global Verify to.
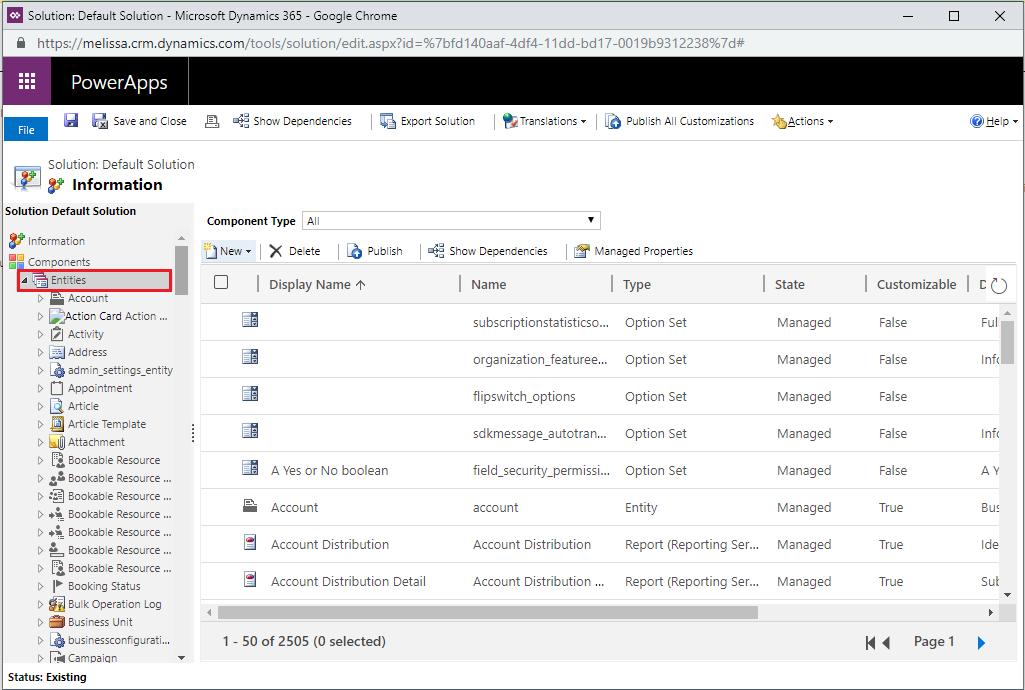
Expand Entities section#
In this case the test entity I am going to add it to is called md_testEntity.
Once you expand the entity, click the Forms tab then click on the Main form type.
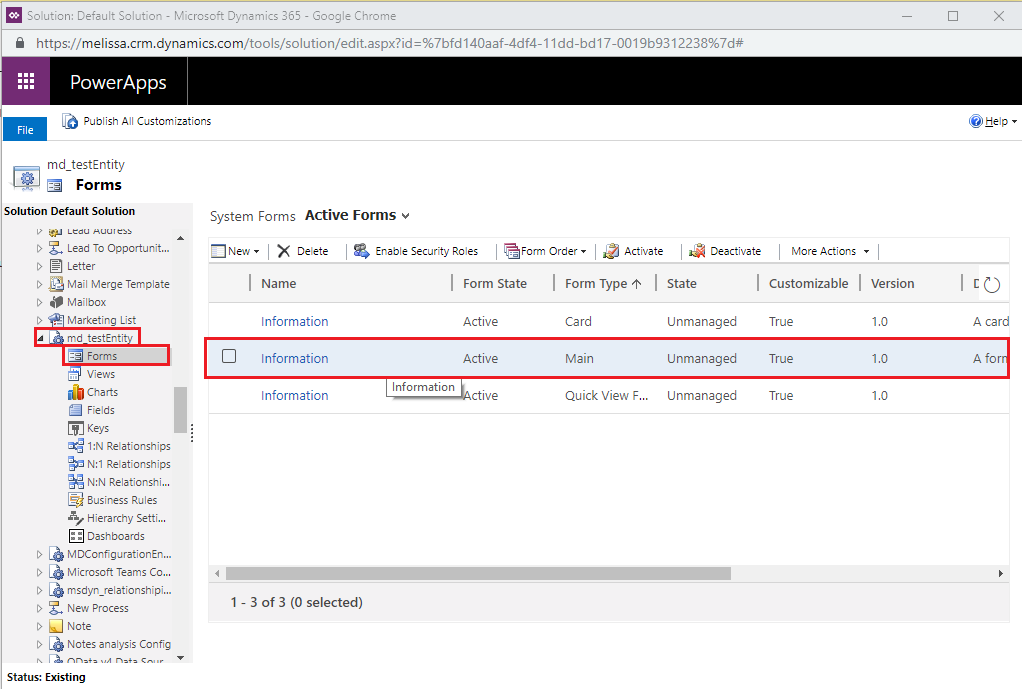
Click Main form#
Click the Insert tab, and then click the Web Resource button. This button is small and easy to miss, so reference the screenshot below.
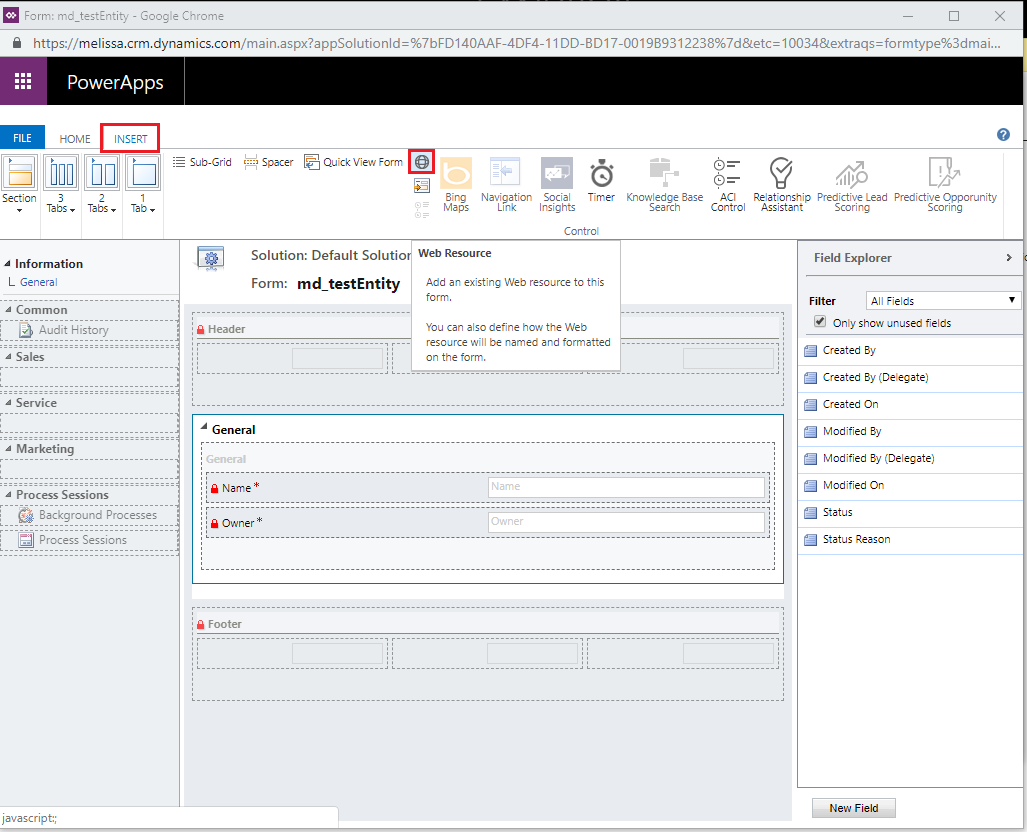
Small Web Resource button#
You can expand the popup window to see it easier.
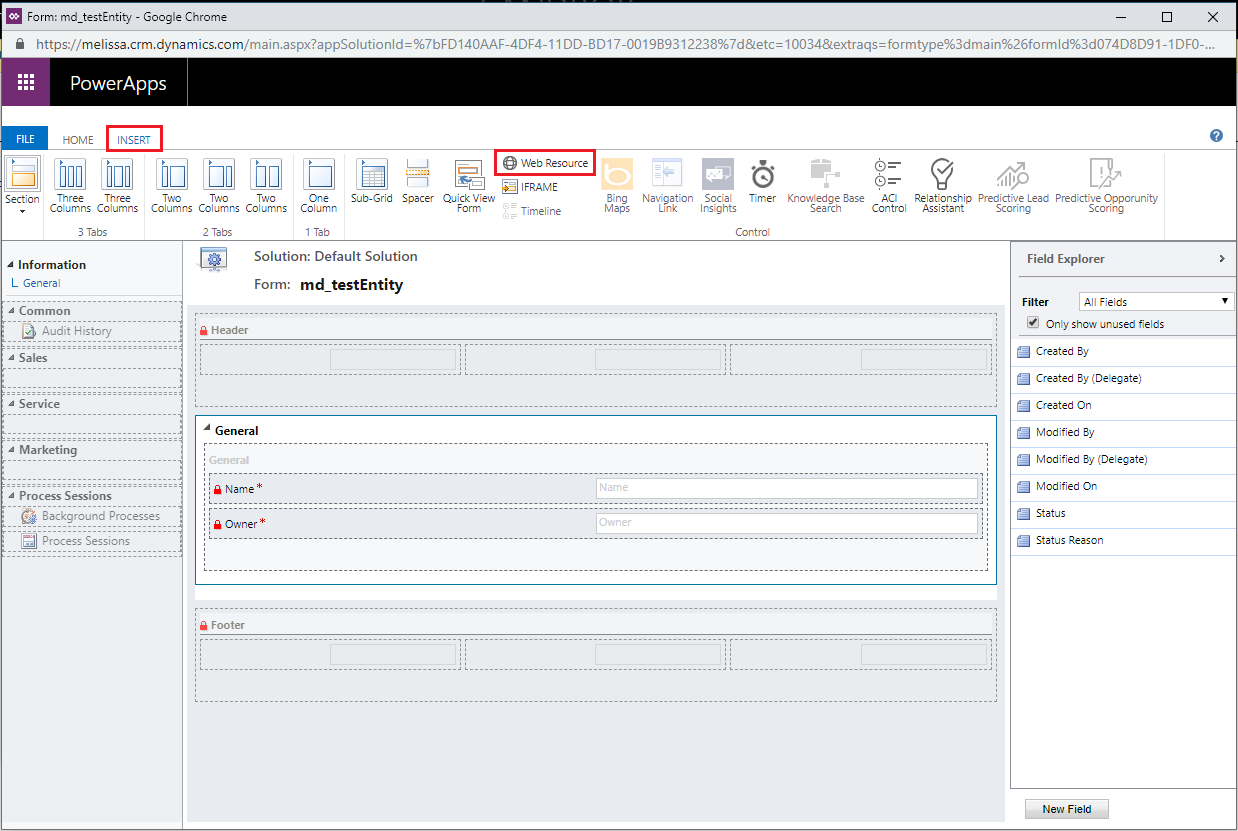
Click Web Resource button#
Type
md_gv_FormHTMLinto the Web Resource field. Then click the search button to populate a drop down menu. Select the corresponding item in that menu.
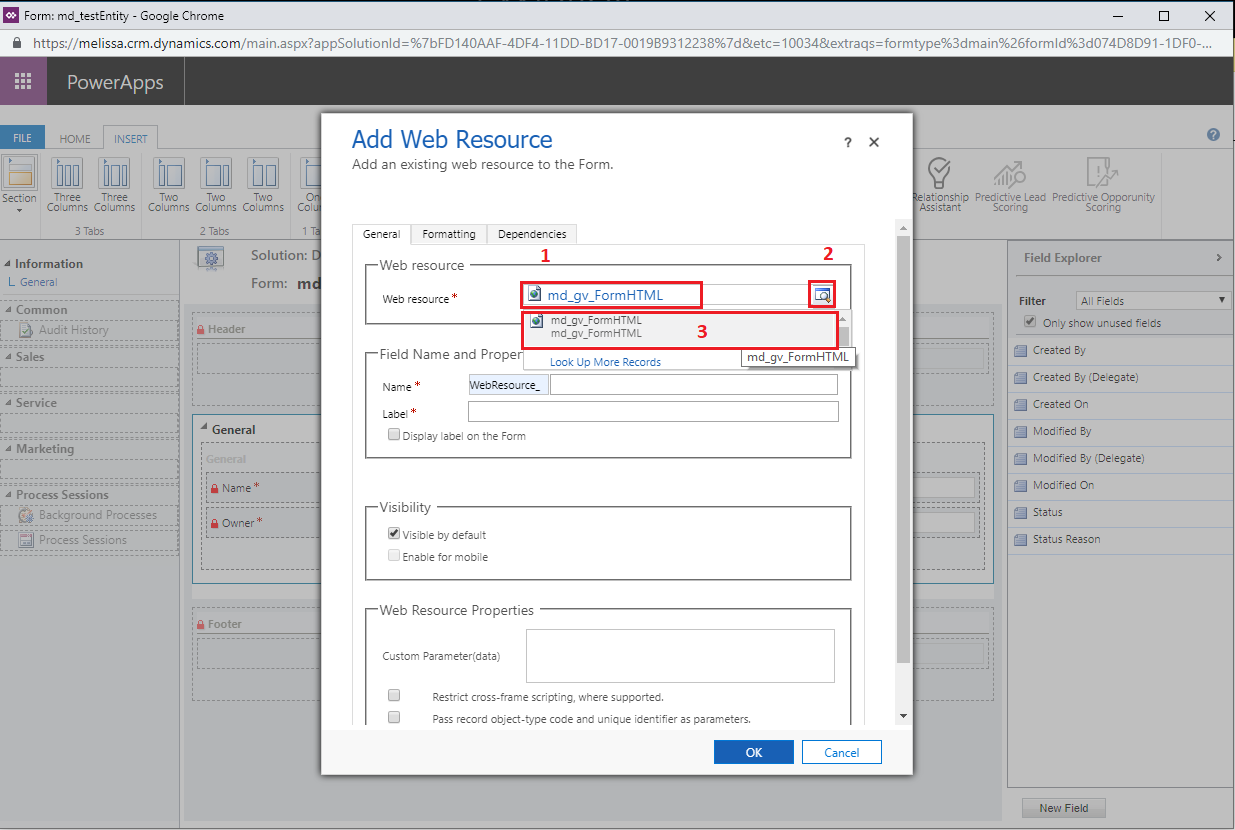
Select the corresponding field.#
Name the Web Resource
Global Verify. The Label field should auto-fill itself with the name you typed in.
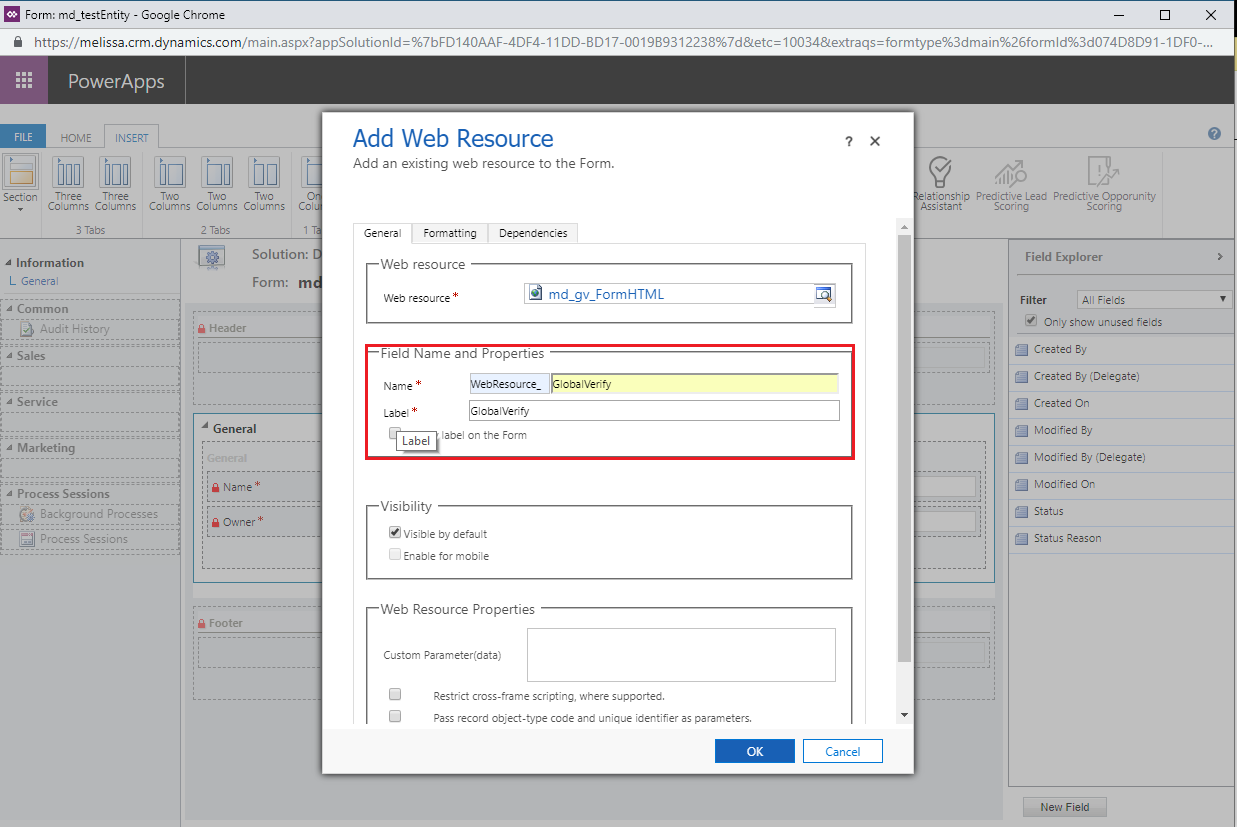
Name the Web Resource#
Click the Formatting tab and change the Row Layout number to
20. This increases the number of rows to make the Global Verify details easier to read.
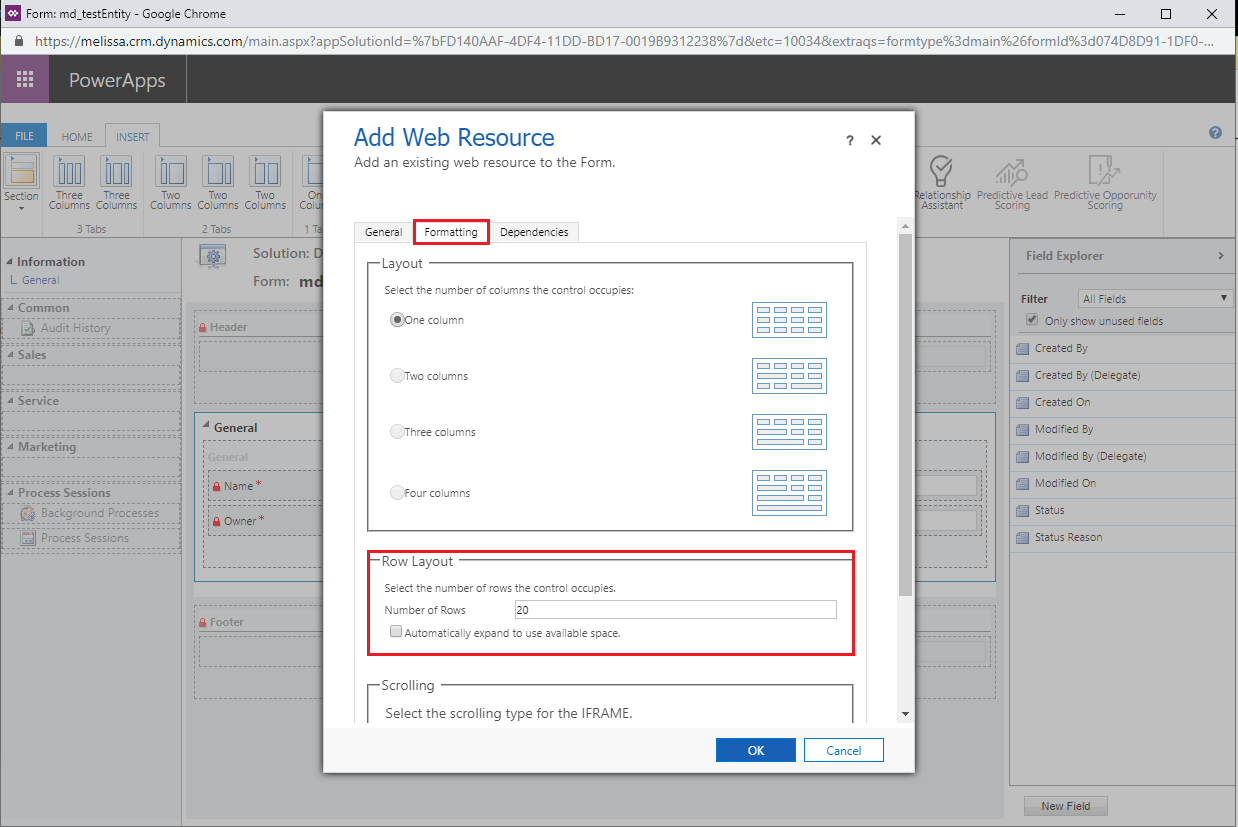
Change the Row Layout number#
Click OK at the bottom of the window.
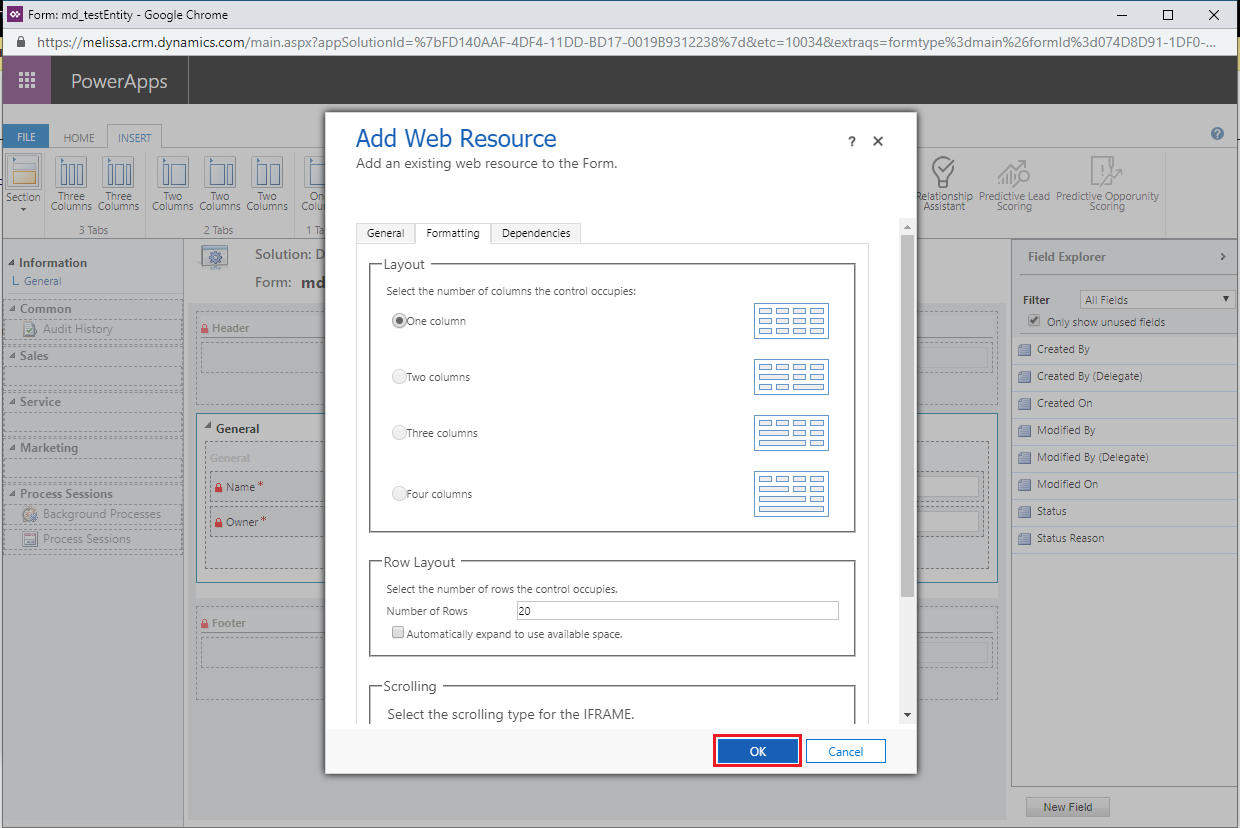
Click OK#
From the Home tab click Save. Then click the Publish button to save the modifications made.
After the form is added to the page, there are a handful of fields that need to be added for certain options to work correctly.
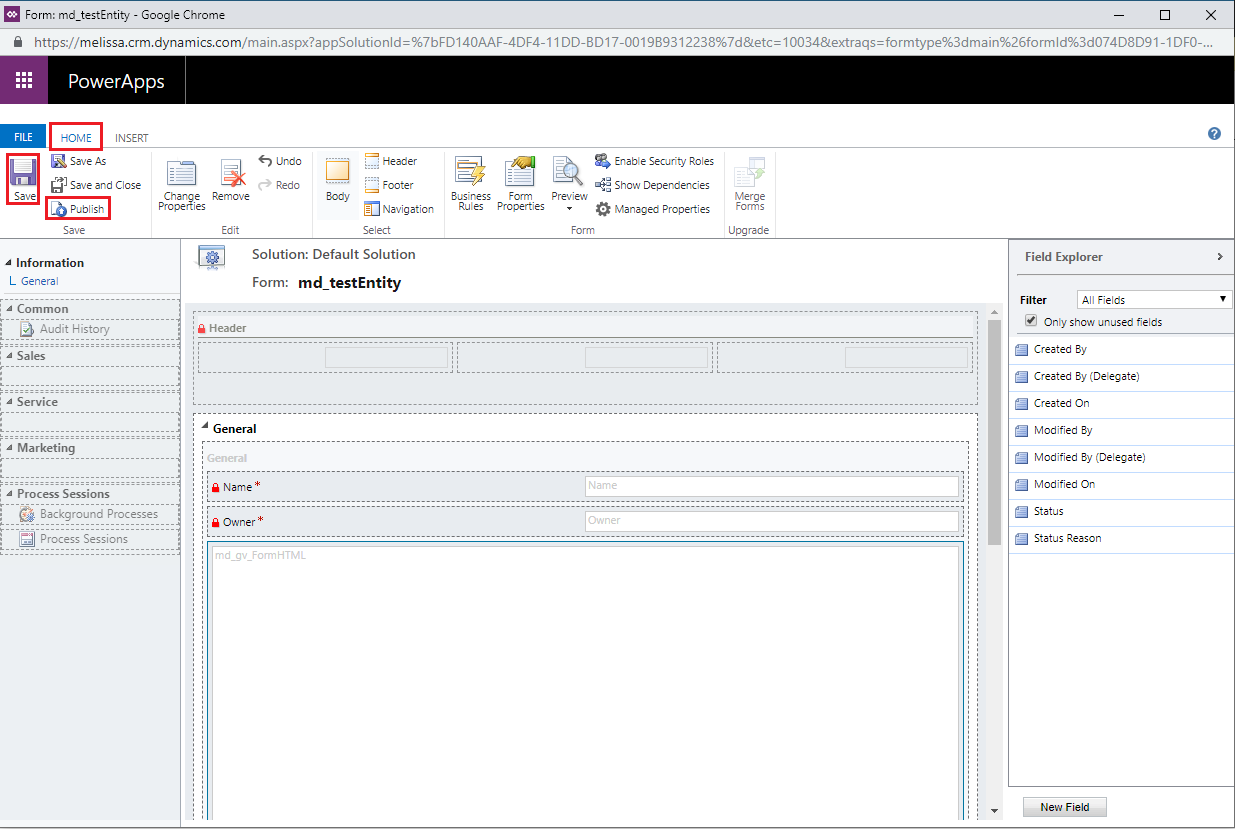
Click Save#
Additional Fields#
To add additional fields, open up the Fields tab for the entity you added
md_gv_FormHTMLto and click the New button.
There are two different types of fields you should make: Multiple Lines of Text, and Date and Time.
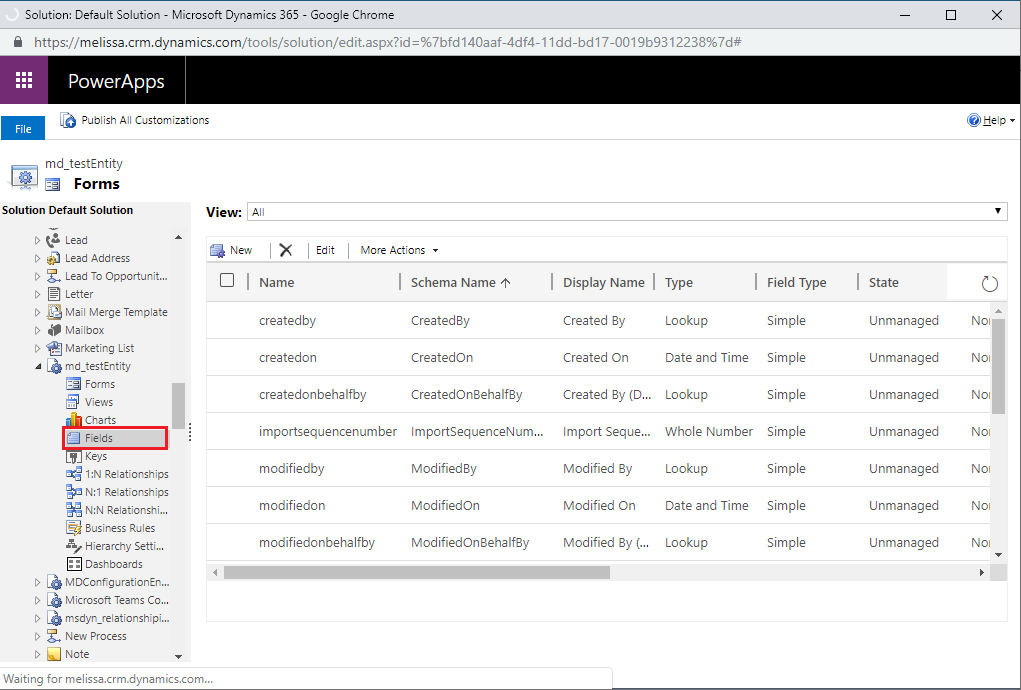
Click New in Fields tab#
Multiple Lines of Text Field#
Under the Type section, change the Data Type field from Single line of Text to Multiple Lines of Text.
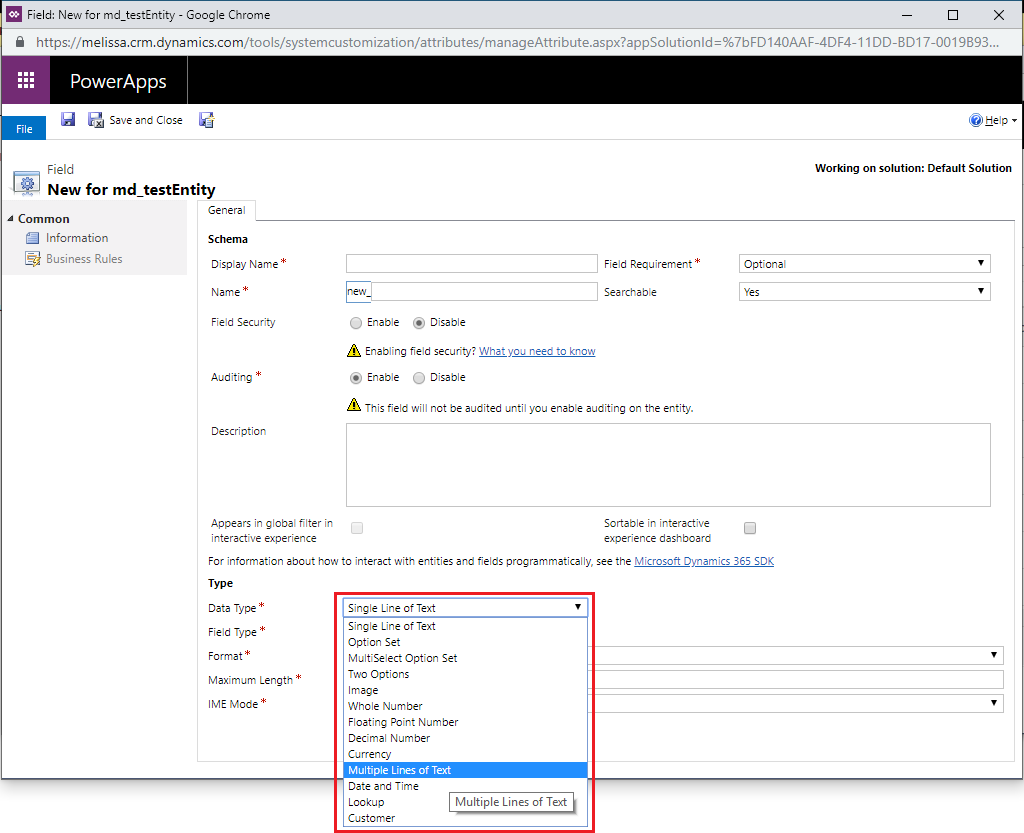
Change the Data Type#
Change the Maximum Length value to
50,000.
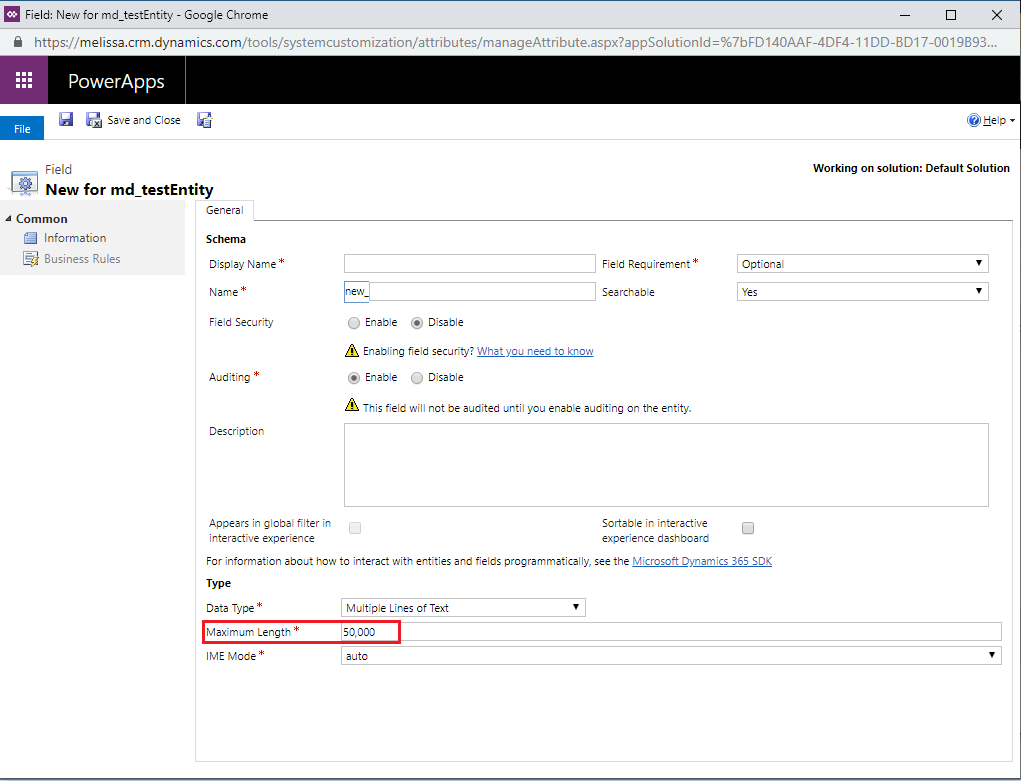
Change the Maximum Length#
Then enter
md_gv_adressresponsejsonstringinto the Name and Display Name fields.
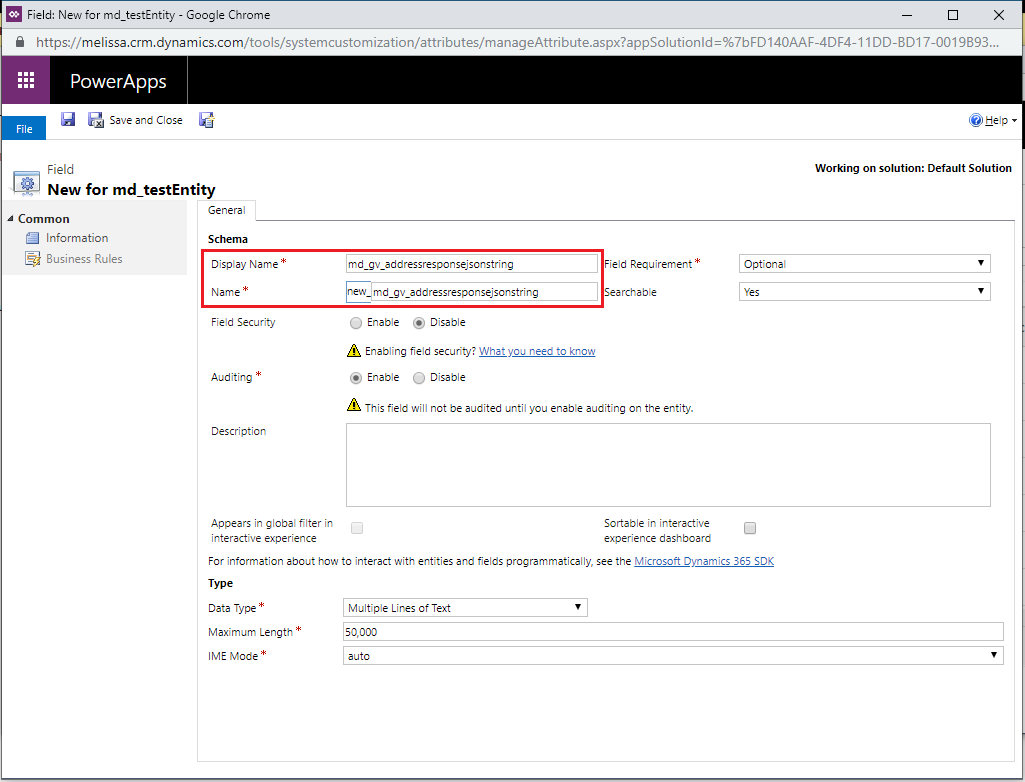
Enter Name and Display Name fields#
Click the Save and Close button.
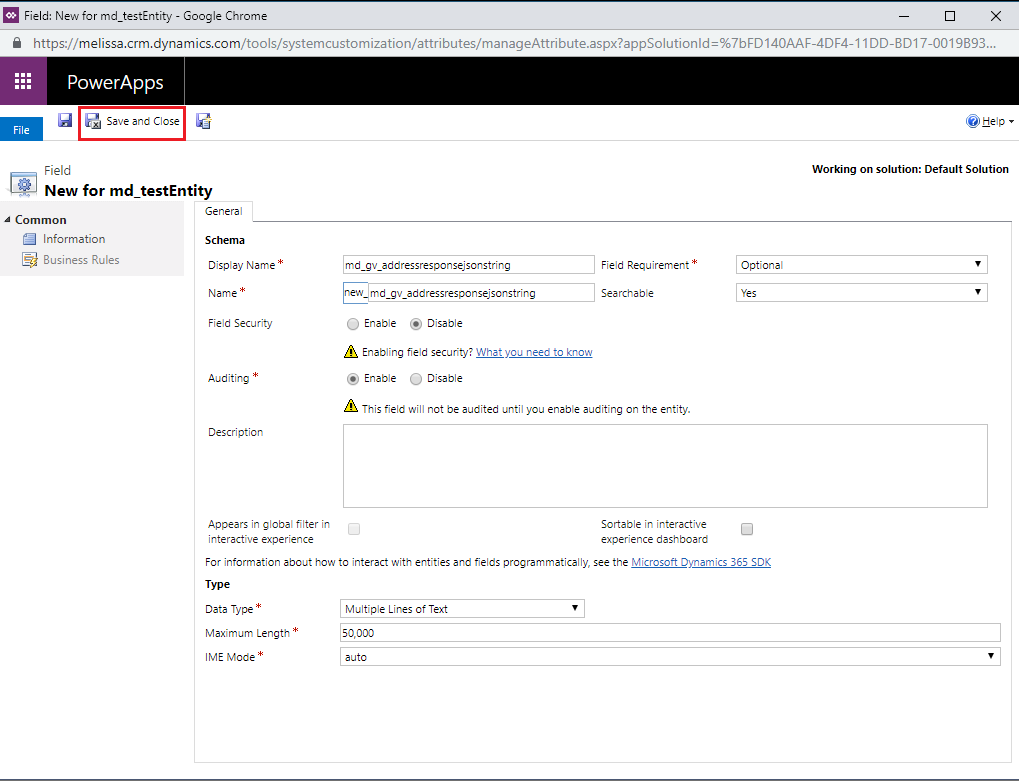
Click Save and Close#
REPEAT Steps 18-21 for md_gv_address2responsejsonstring, md_gv_emailresponsejsonstring, md_gv_nameresponsejsonstring, and md_gv_phoneresponsejsonstring.
Make sure to change the name for step 20 to the correct name.
Date and Time Field#
The next step follows from Step 17.
Change the Data Type field from Single Line of Text to Date and Time.
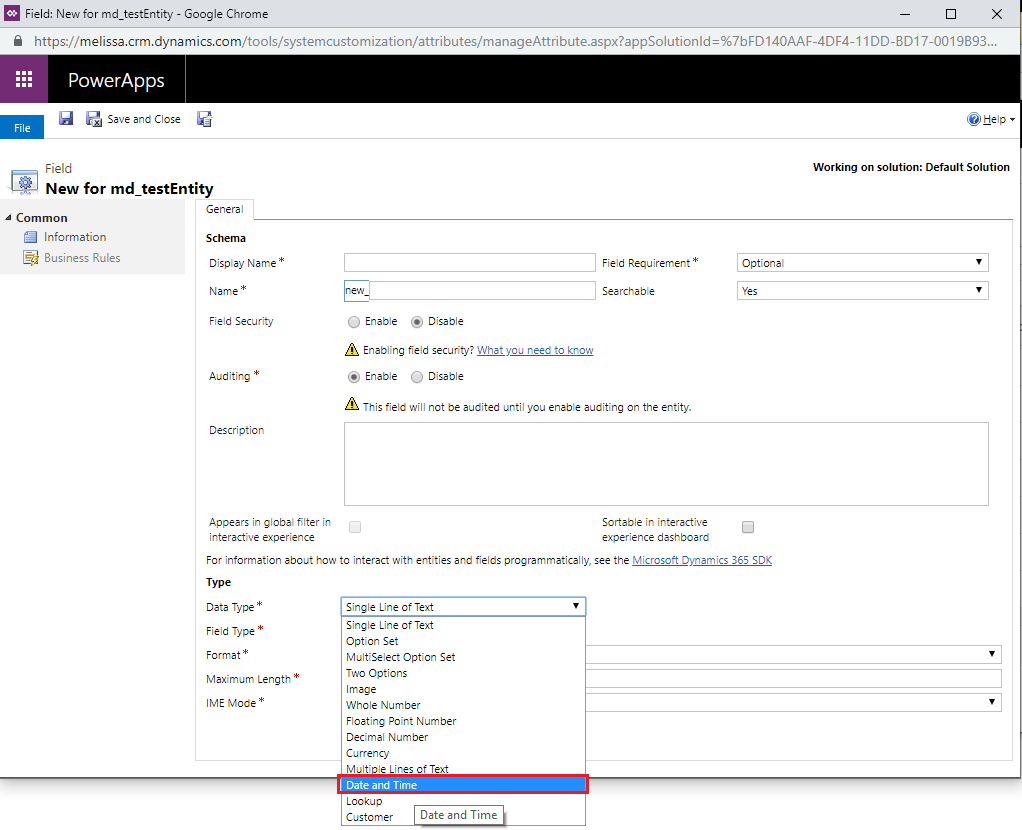
Change Data Type#
Change the Format field to Date and Time.
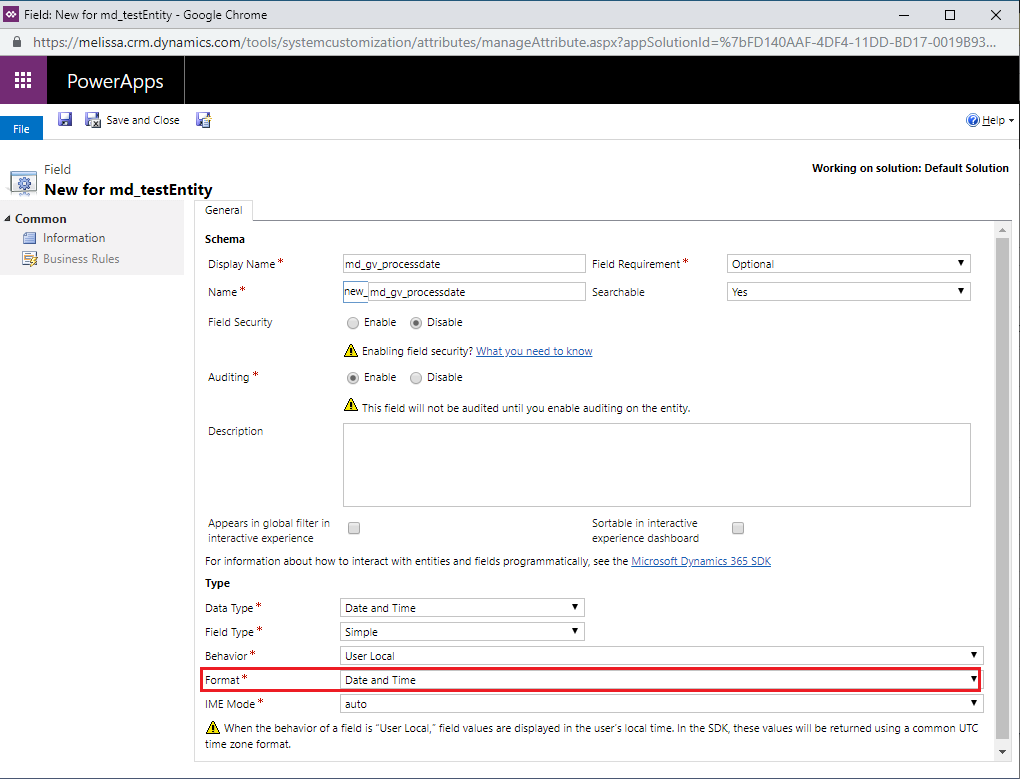
Change Format#
Add in
md_gv_processdateto the Name field, andProcess Dateto the Display Name field.
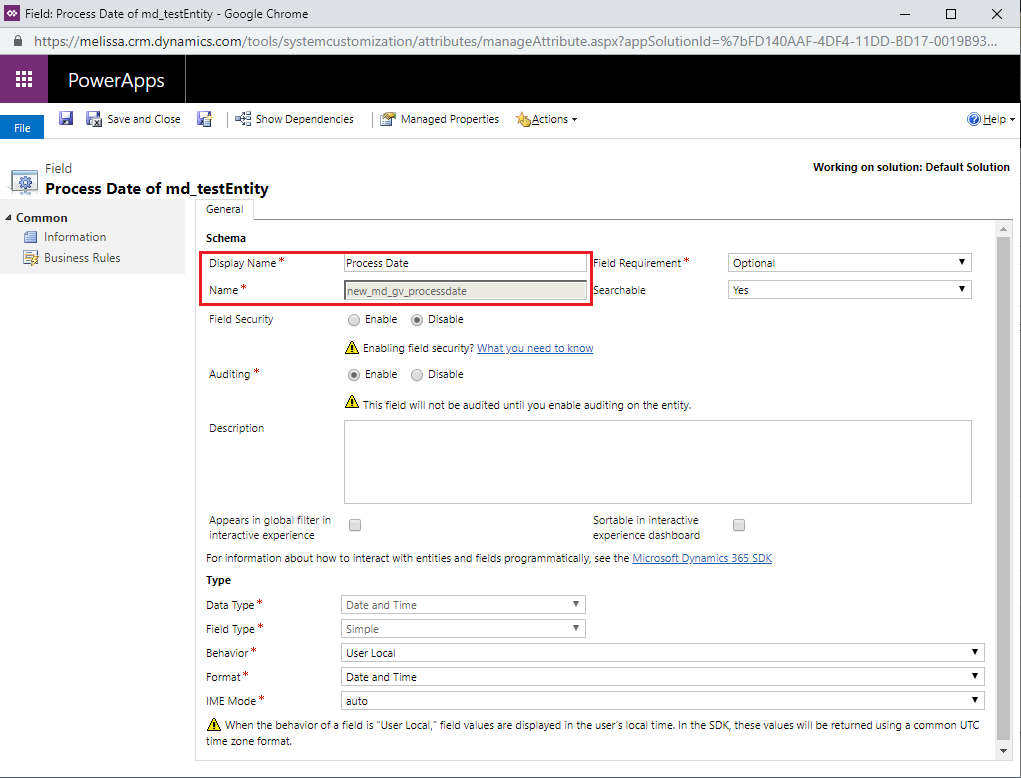
Change Name and Display Name fields#
Click the Save and Close button.
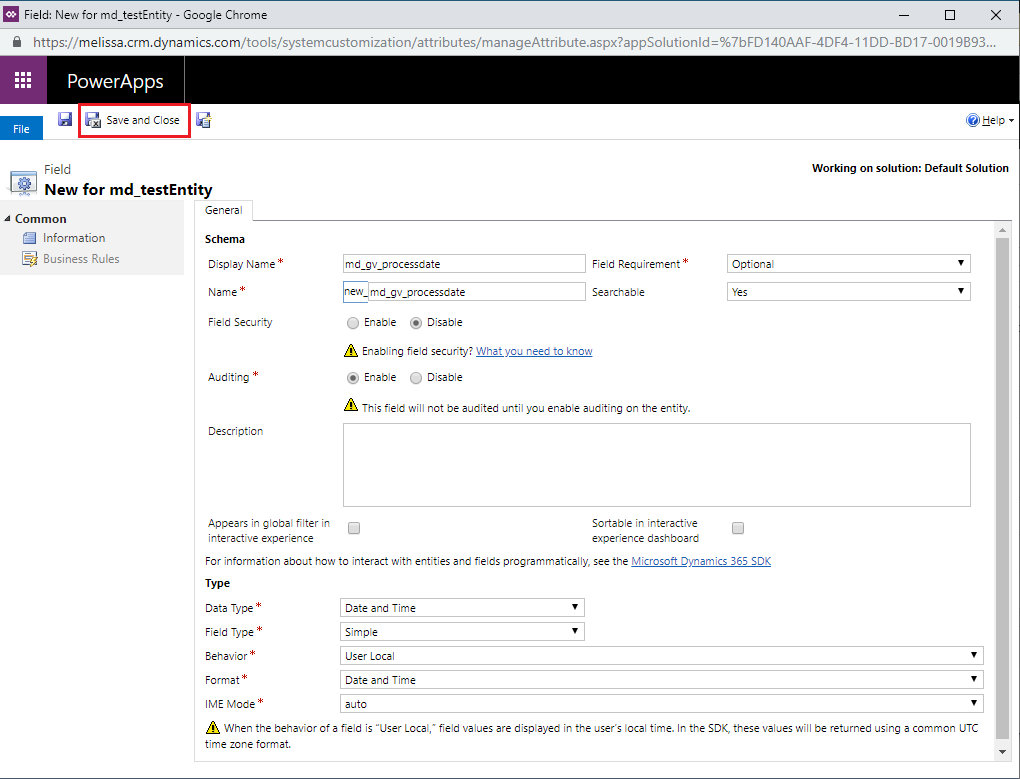
Click Save and Close#
Add Fields#
Next we are going to add the fields we just made to the form of the entity.
Open the Main form of the entity.
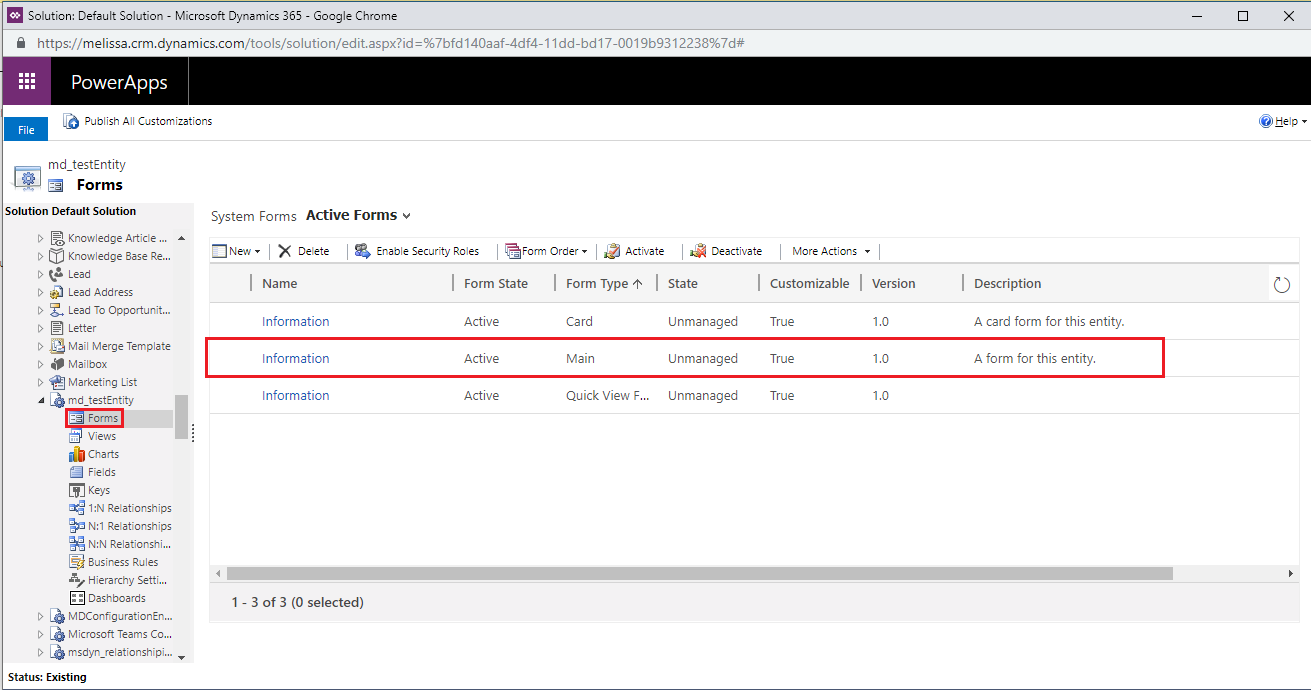
Open Main form#
On the left side of the window is a Field Explorer. This contains all of the fields that we just created. Drag them onto the form where ever you would like them to be placed.
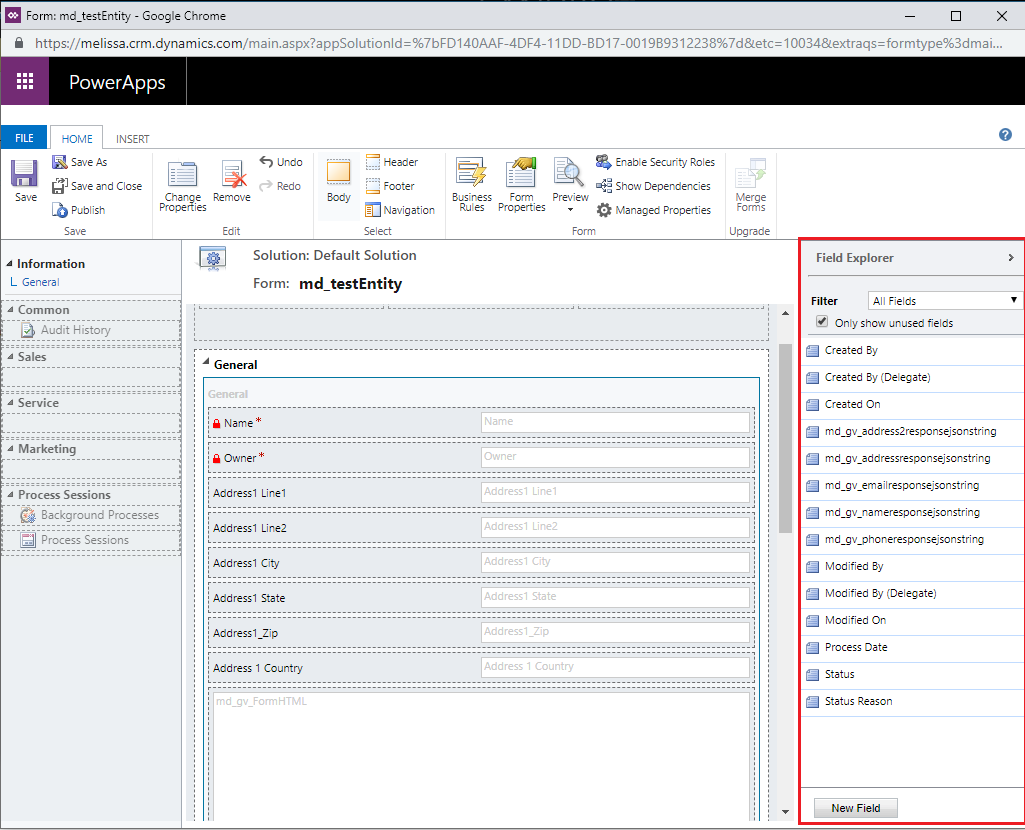
Drag created fields#
For the
reponsejsonstringfields it is a good idea to change their Visibility to hidden. To do this, double click the field on the form and uncheck the boxes for Display label on the form, and Visible by default. Once those are unchecked, click the OK button.
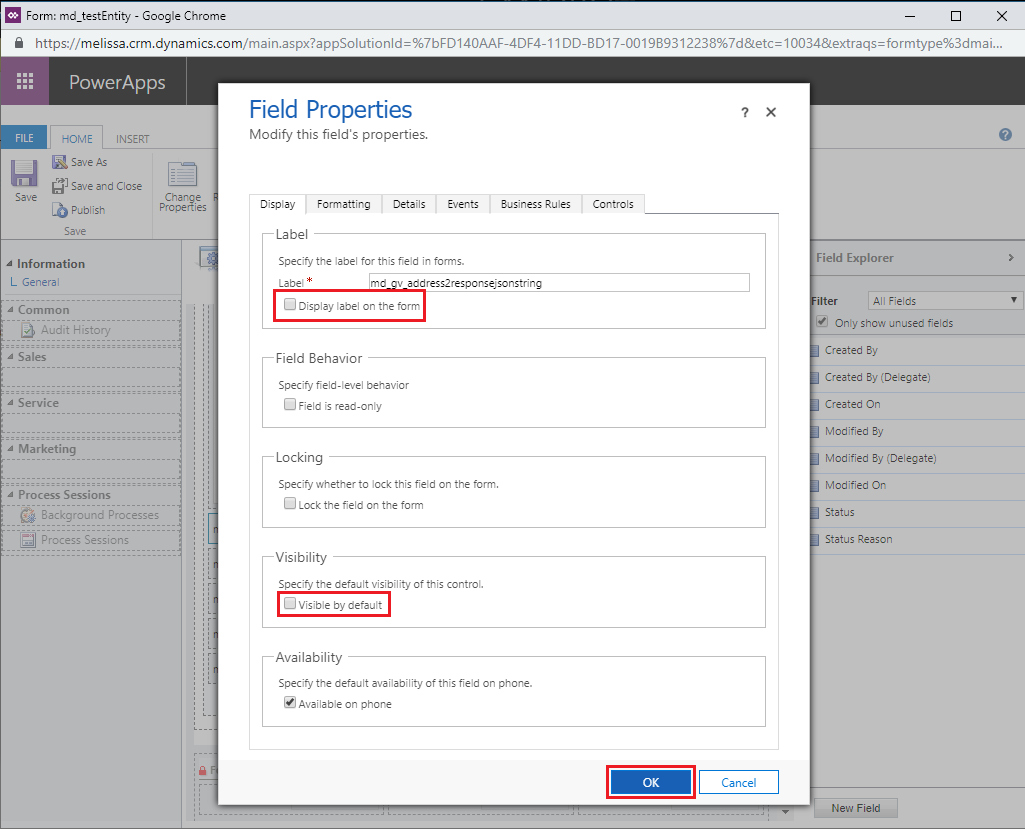
Change the visibility#
Repeat Step 28 for ALL responsejsonstring fields.
Click the Save and then the Publish buttons to save the changes made to the form.
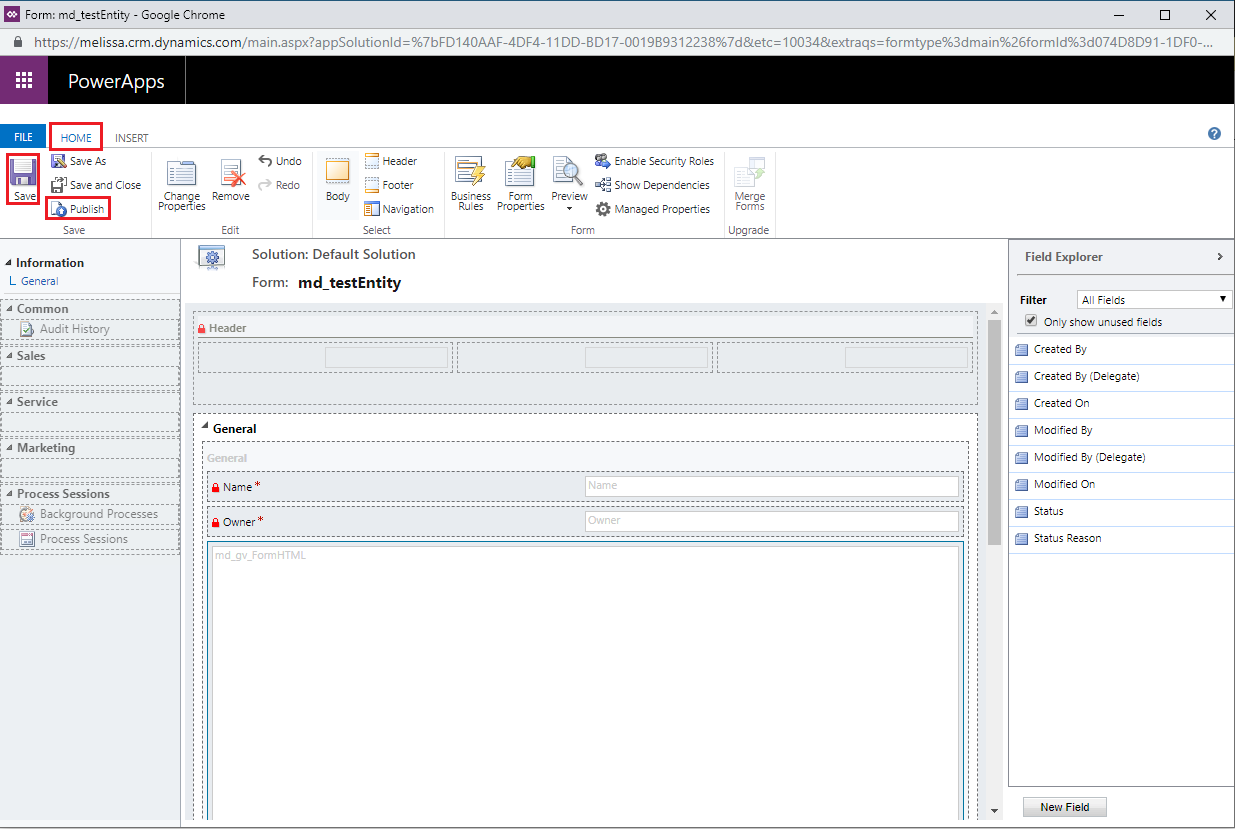
Click Save then Publish#
Global Verify Fields#
Melissa Data Email Details#
Email Details#
Field Name |
Description |
|---|---|
Email Address |
The email address. |
Mail Box Name |
The mail box name. (All characters that precede the “@” character.) |
Domain Name |
The domain name. (All characters following the “@” character.) |
Top Level Domain |
The top level domain. (For example, “com”.) |
Top Level Domain Name |
The top level domain description. |
Record ID |
Returns the unique identifier for the current record. |
Results |
Returns result codes specific to the record. |
Melissa Data Phone Details#
Mobile Phone Details#
Field Name |
Description |
|---|---|
Phone Number |
The phone number. |
Phone International Prefix |
The international exit code needed to call a number outside of the dialing country. If the input country and country of origin differ, this will return the digit(s) required to be dialed before the country code. |
Phone Country Dialing Code |
A digit, or combination of digits dialed after the international prefix. |
National Prefix |
A digit, or combination of digits that must be dialed before an area (city) code when calling a number within the same country but outside the numbering area. |
National Destination Code |
A digit, or combination of digits that identifies a numbering area within a country (or group of countries) and/or network/services. |
Phone Subscriber Number |
The subscriber number associated with the inputted phone number. The subscriber number contains significant leading digits that further define the local exchange area and/or service. |
Locality |
City. The locality associated with the inputted phone number. |
Administrative Area |
State. The administrative area associated with the inputted phone number. |
DST |
Daylight Savings Time. Returns a ‘Y’ (for yes) or ‘N’ (for no) to distinguish whether the region of the inputted phone number observes daylight savings time. |
UTC |
The universal time code for the time zone associated with the inputted phone number. The format will be: +/- hh:mm. |
Language |
This is the predominant language of the phone’s detected geographical location. Because of phone number portability, geographical information may not reflect the true location of the owner of the phone number for wireless and VOIP numbers. |
Latitude |
The geographic coordinate of the locale, city, municipality, or other geographically identifiable service area of the exchange measured in degrees north or south of the equator. |
Longitude |
The geographic coordinate of the locale, city, municipality, or other geographically identifiable service area of the exchange measured in degrees east or west of the Greenwich Meridian. |
Version |
This is a string value that is the current revision number. |
Results |
Returns result codes specific to the record. |
Melissa Data Address Details#
Formatted Address#
Field Name |
Description |
|---|---|
Formatted Address |
The address in the correct format for mailing from the country specified. This includes the Organization as the first line, one or more lines in the origin country’s format, and the destination country (if required). |
Address Lines#
Field Name |
Description |
|---|---|
Address Line 1-8 |
Will return the standardized or corrected contents of the input address. These lines will include the entire address including the locality, administrative area, and postal code. |
Thoroughfare Fields#
Field Name |
Description |
|---|---|
Thoroughfare |
Name of the street or block data element. |
Leading Type |
Leading thoroughfare type indicator within the Thoroughfare field. |
Pre-Direction |
Prefix directional contained within the Thoroughfare field. |
Name |
Name indicator within the Thoroughfare field. |
Post-Direction |
Postfix directional contained within the Thoroughfare field. |
Trailing Type |
Trailing thoroughfare type indicator within the Thoroughfare field. |
Parsed Area Fields#
Field Name |
Description |
|---|---|
Double-Dependent Locality |
An area or village (UK) within a Dependent Locality required to uniquely identify an address. |
Dependent Locality |
A smaller population center data element. Depends on the Locality element. US Term: Urbanization. In terms of US Addresses, this element applies only to Puerto Rican addresses. It is used to break ties when a ZIP Code is linked to multiple instances of the same address. |
Locality |
The most common population center data element. US Term: City. Canadian Term: Municipality. |
Sub-Administrative Area |
The smallest geographic data element. US Term: County. |
Administrative Area |
The most common geographic data element. US Term: State. Canadian Term: Province. |
Sub-National Area |
The administrative region within a country on an arbitrary level below that of the sovereign state. |
Postal Code |
The complete postal code for a particular delivery point. US Term: ZIP. Canadian Term: Postcode. |
Premises Fields#
Field Name |
Description |
|---|---|
Building |
Descriptive name identifying an individual location. |
Premises Number |
Alphanumeric indicator within premises field. |
Premises Type |
Leading premise type indicator within premises field. |
SubPremises |
Suite Alphanumeric code identifying an individual location. US Term: Suite |
SubPremises Number |
Sub premises number indicator within the premises field. US Term: Suite Number |
SubPremises Type |
Sub premises type indicator within the premises field. US Term: Suite Name |
Post Box |
Post box information for a particular delivery point. |
Geocodes#
Field Name |
Description |
|---|---|
Latitude |
Returns the geocoded latitude for the address entered in the Address Line field. |
Longitude |
Returns the geocoded longitude for the address entered in the Address Line field |
Dependent Thoroughfare Fields#
Field Name |
Description |
|---|---|
Dep. Thoroughfare |
Name of the street or block data element. |
Leading Type |
Leading thoroughfare type indicator within the Dependent Thoroughfare field. |
Pre-Direction |
Prefix directional contained within the Dependent Thoroughfare field. |
Name |
Name indicator within the Dependent Thoroughfare field. |
Post-Direction |
Postfix directional contained within the Dependent Thoroughfare field. |
Trailing Type |
Trailing thoroughfare type indicator within the Dependent Thoroughfare field. |
Country#
Field Name |
Description |
|---|---|
Country Name |
The official country name. |
Country ISO 2 |
ISO 3166 2-character country code. |
Country ISO 3 |
ISO 3166 3-character country code. |
Country ISO Number |
ISO 3166 3-digit numeric country code. |
Results#
Field Name |
Description |
|---|---|
Results |
Returns result codes specific to the record. |
Melissa Data Address 2 Details#
Field descriptions are the same as Melissa Data Address 1 Details above, just for the Address 2 field.
Personator#
Personator for Dynamics CRM is an all-in-one contact verification and appending solution. It allows you to pass in names, addresses, phone numbers, and email addresses; simultaneously parsing them, making conservative corrections, and even appending data derived from the input. It can also leverage all of these inputs to verify whole contact records. Personator can be configured to perform one or more of the primary actions the solution provides: Verify and Append.
Verifies name corresponds to address, email, and phone data.
Appends missing name and company name, phone number, and/or email address.
Provide current addresses for people and companies that have moved with 20+ years of history.
Installing Personator#
Begin by navigating to Settings in the top ribbon. To do this, click Sales along the top, then click Settings in the menu that drops down.

Click Settings in the drop down#
Click Solutions in the Customization category.
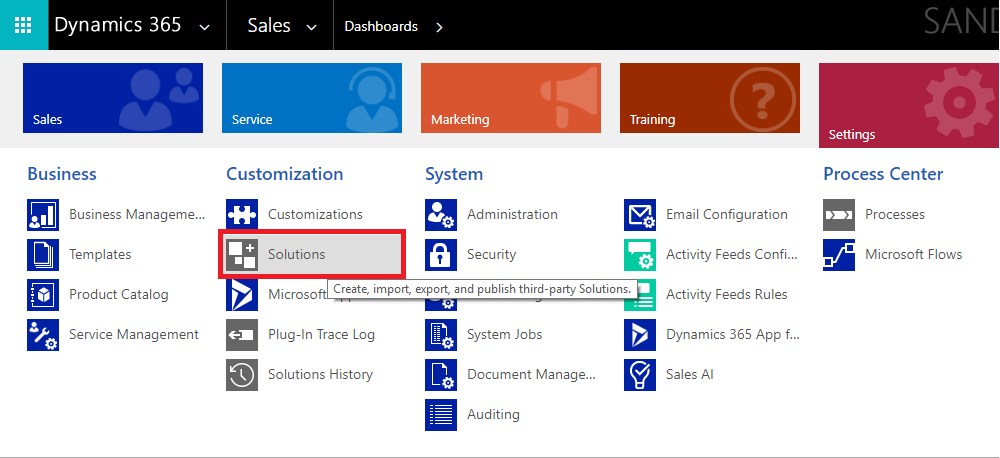
Click Solutions#
Click the Import button.
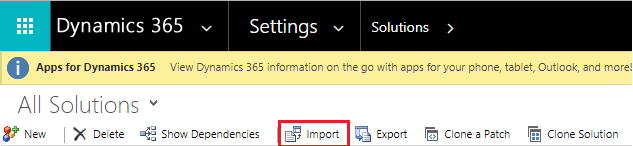
Click Import#
The Select Solution Package window will pop-up. Click the Choose File button.
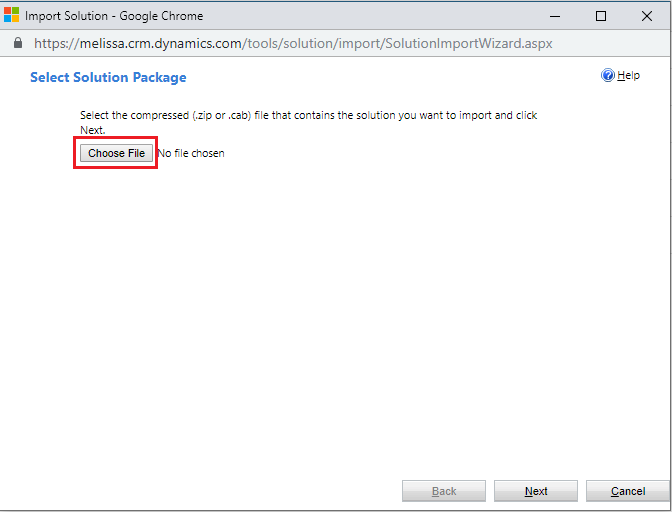
Click Choose File#
A file explorer window will pop-up. Locate the plugin .zip file that contains the Personator solution. Click Open.
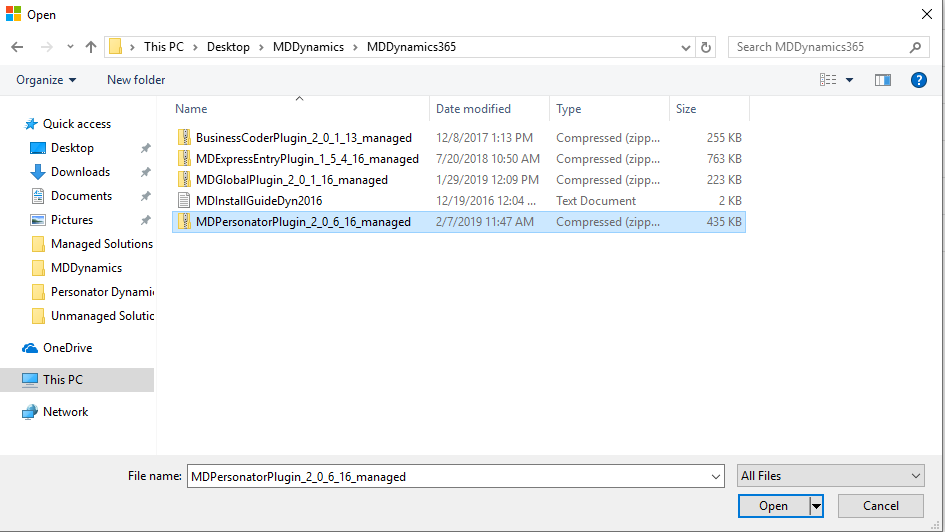
Click Open#
You should be back at the Select Solution Package window with your file listed. Now click Next.
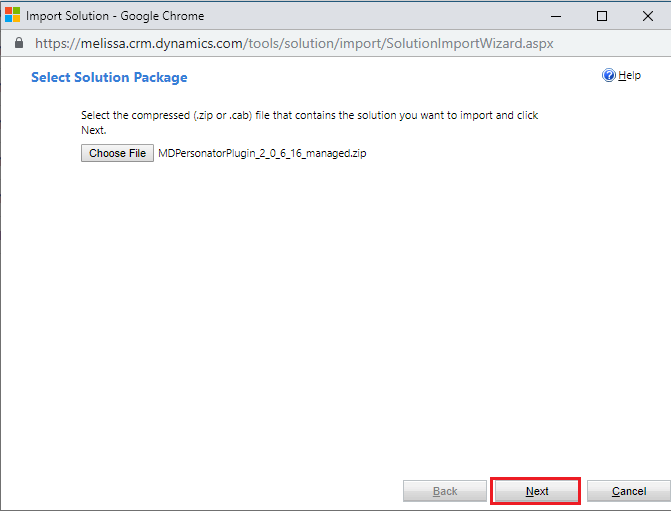
Click Next#
On the Import Options window click Import.
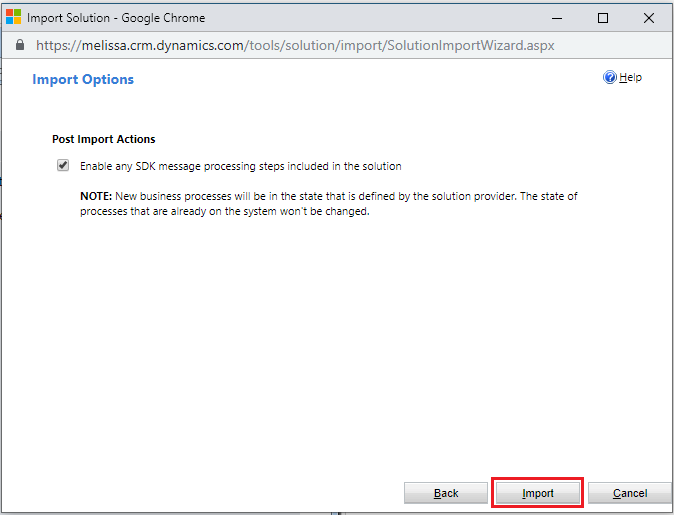
Click Import#
Wait for the solution to finish importing.
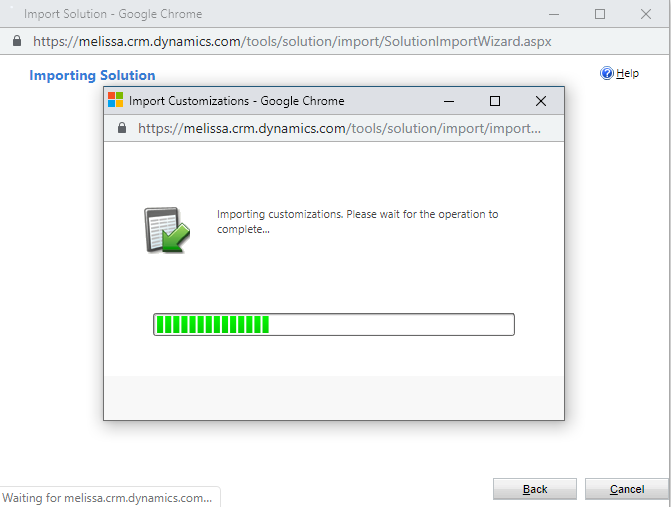
Wait for importing to finish#
The installation is now complete. Click Close to finish.
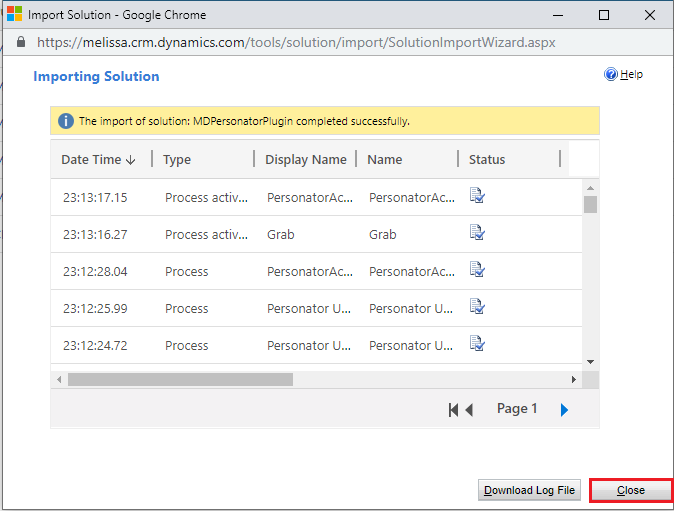
Installation complete#
Configuring Personator#
Begin by navigating to Settings in the top ribbon. To do this, click Sales along the top, then click Settings in the menu that drops down.

Click Settings#
Click Solutions in the Customization category.
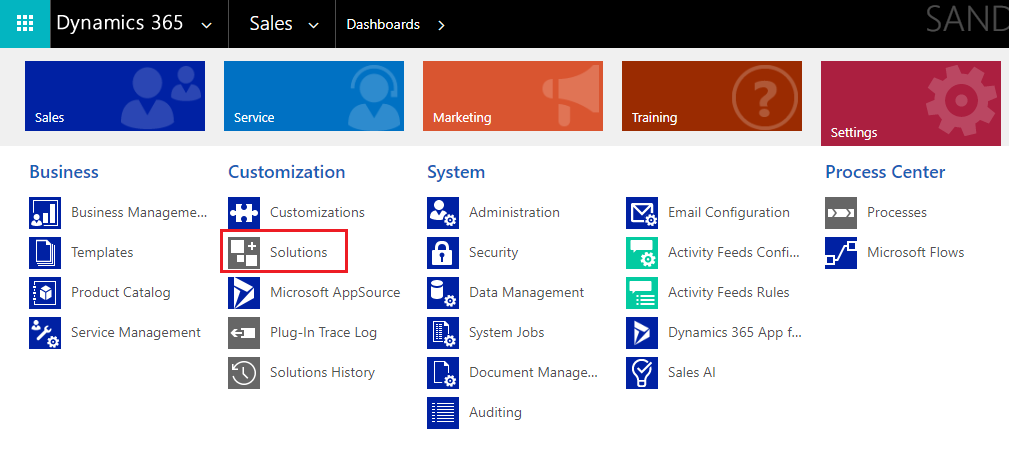
Click Solutions#
Click the MDPersonatorPlugin under Display Name.

Click the MDPersonatorPlugin#
Click Configuration in the solution pane located on the left side of the window.
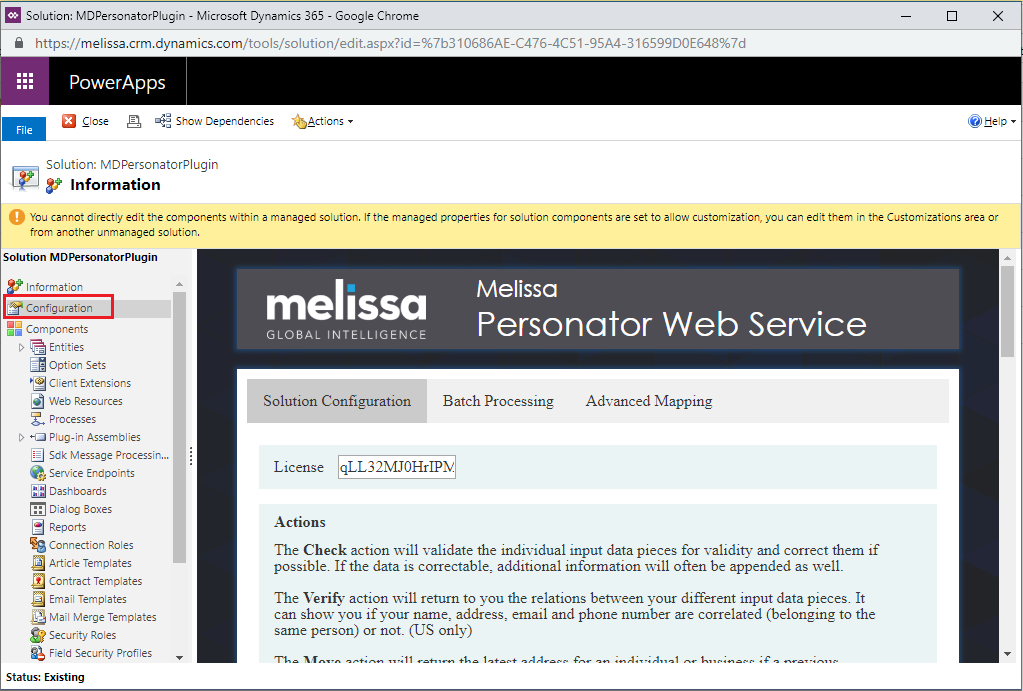
Click Configuration#
Then enter your License Key into the License field
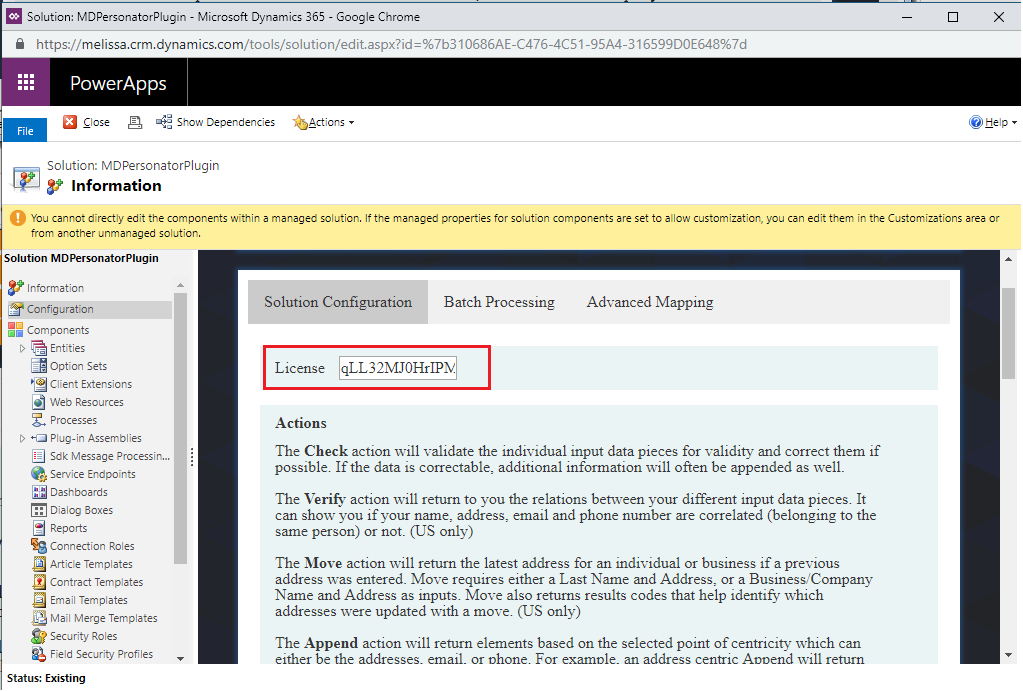
Enter your License Key#
Select which actions that you want to perform.
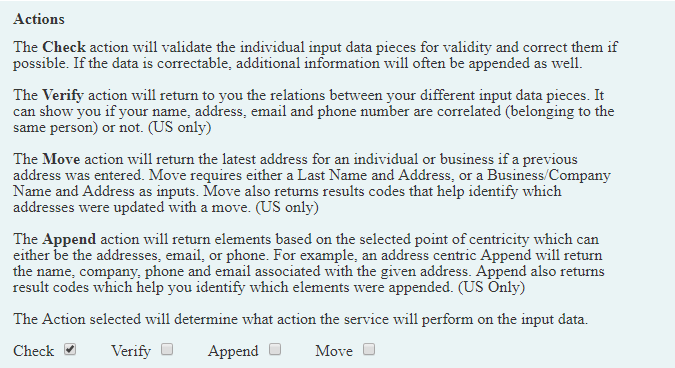
Select your desired actions#
Select your desired options for the Check action.

Select Check options#
Select your desired options for the Verify and Append actions.
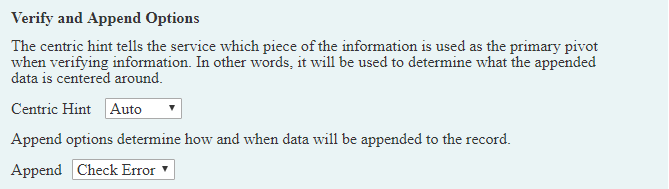
Select Verify and Append options#
Select your desired output options.
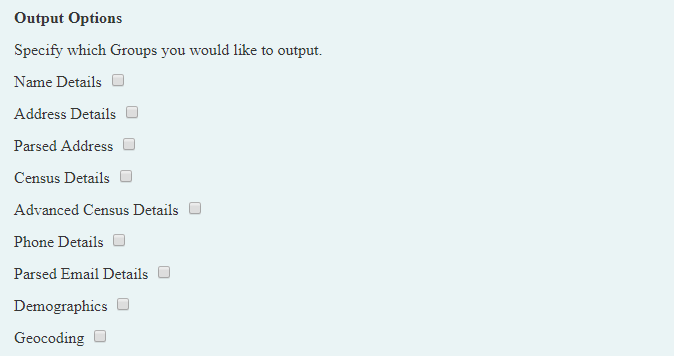
Select output options#
Select your desired Dynamics CRM options.
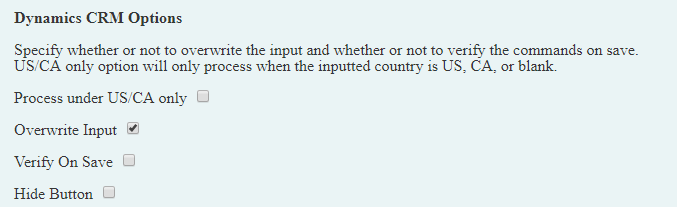
Select Dynamics CRM options#
Click Save All Settings to save these configurations. This completes the configuration.
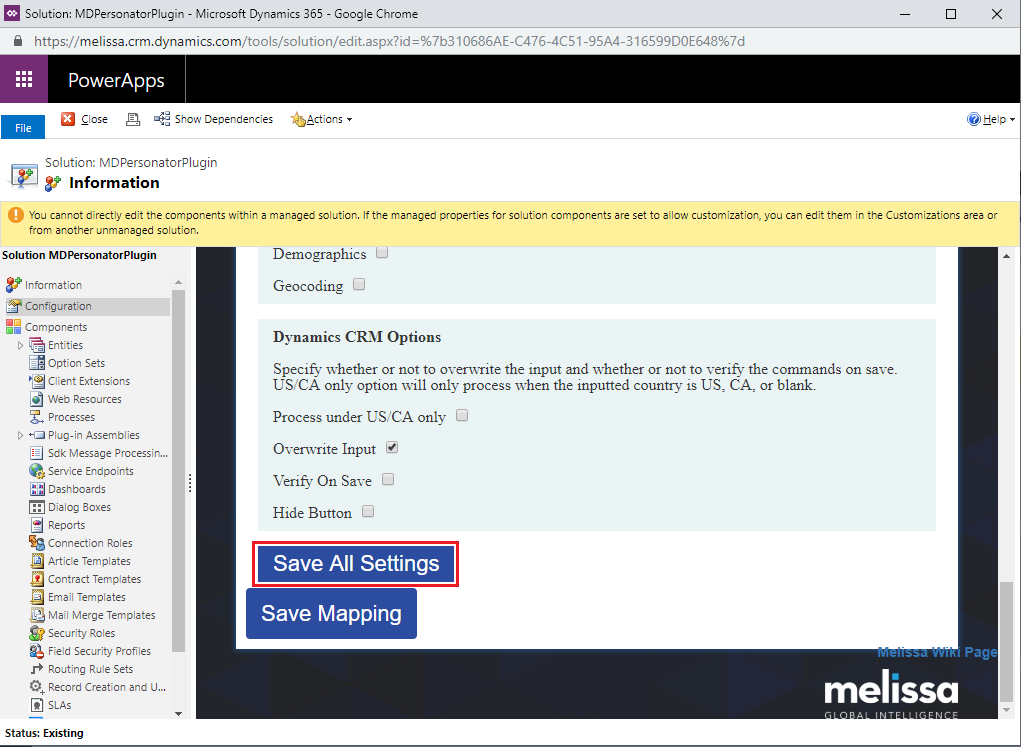
Click Set#
Personator Custom Mapping#
Begin by navigating to the Configuration screen.
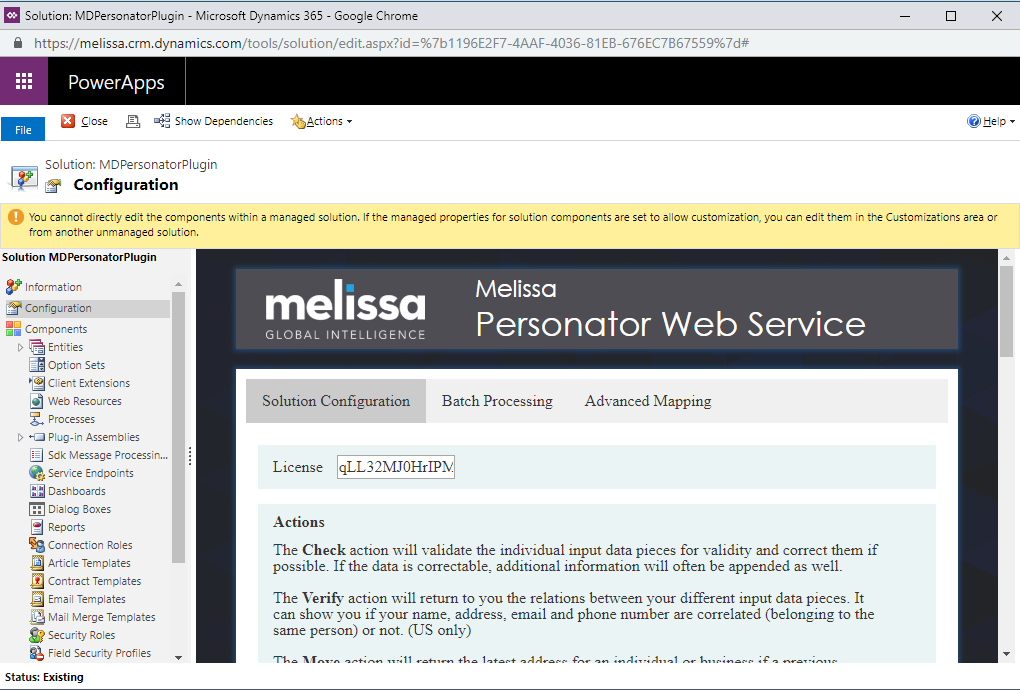
Navigate to Configuration#
Click the Advanced Mapping tab.
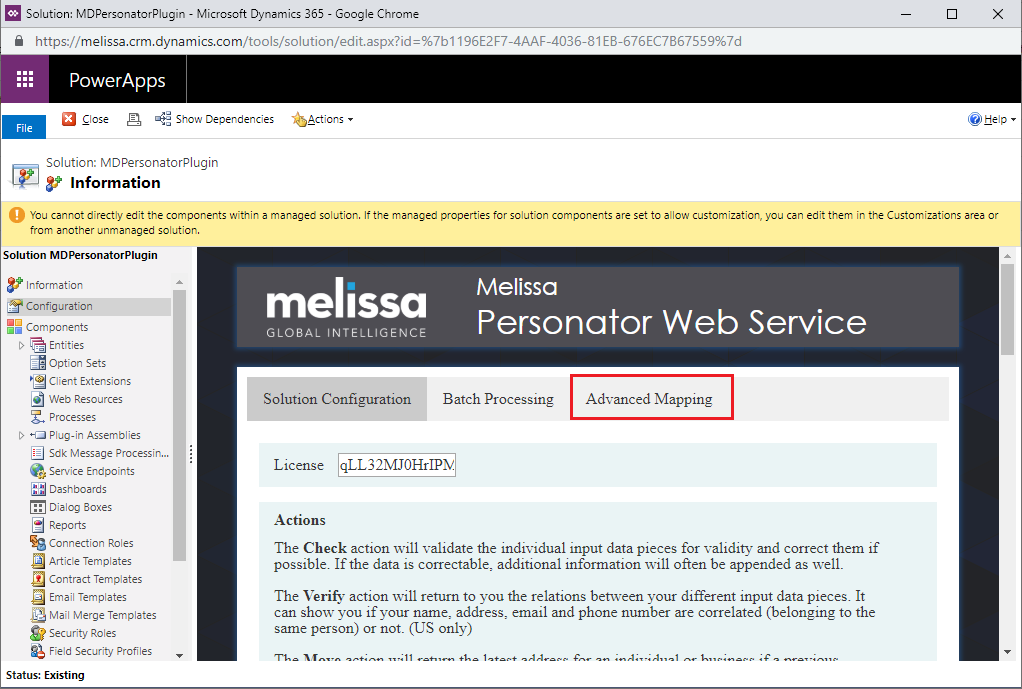
Click Advanced Mapping tab#
Click the Load Entities button. This queries the Dynamics organization for a full list of the entities that exist within your system and populates the list of attributes that are associated with the entity.
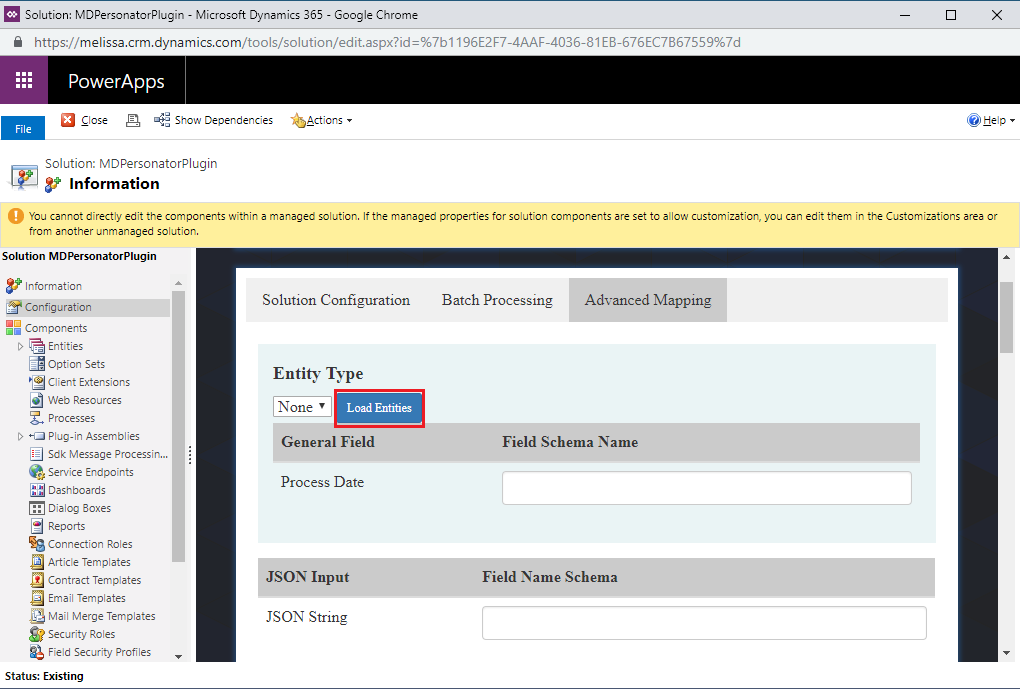
Click Load Entities#
Select the desired entity from the drop down list. If a mapping has already been established for the selected entity, the fields should automatically be populated with the previous values.
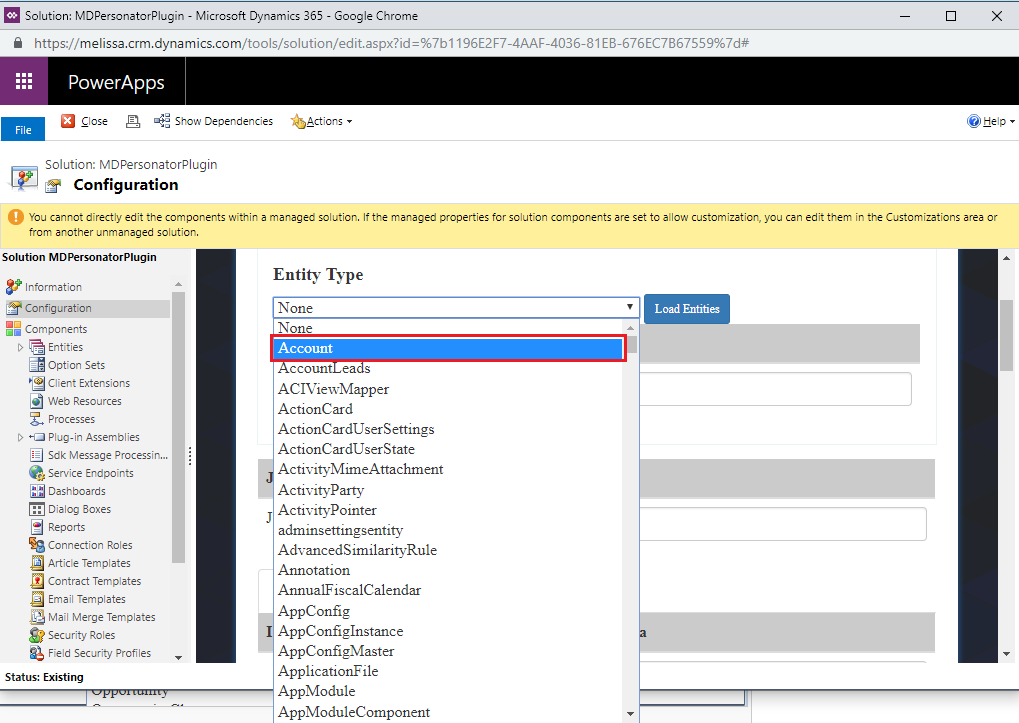
Select desired entity#
Type the name of the desired custom or out of the box field. In order to assist the field entry process, the field names should be auto-completed with only the correct field names for the selected entity.
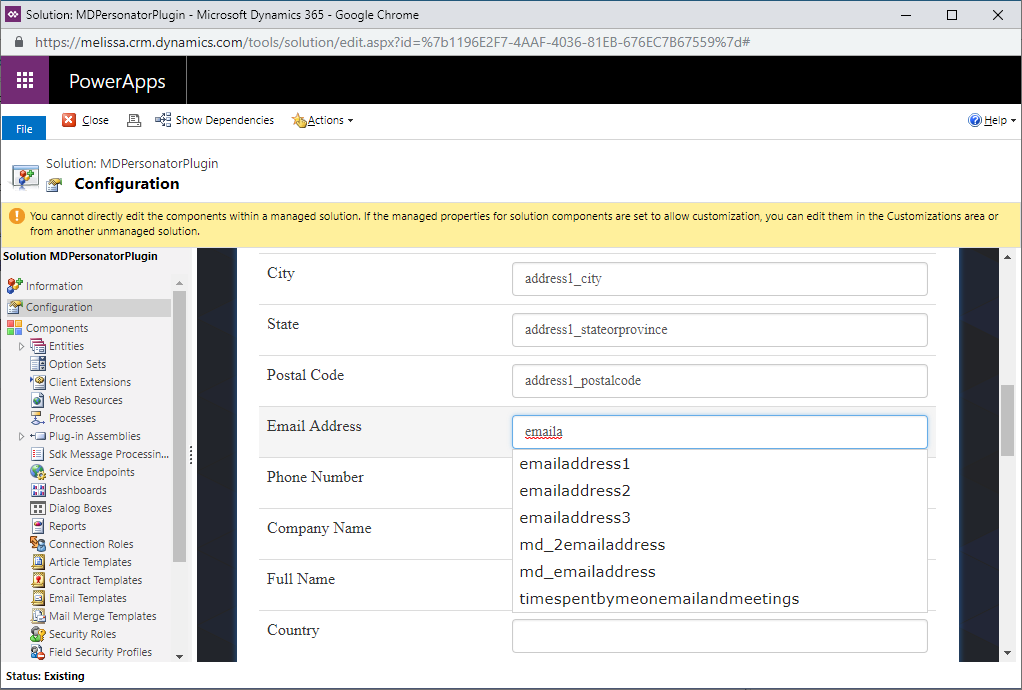
Type the field name#
The names should be the exact names that are assigned in Dynamics. These names can be viewed in the Fields section for that particular entity in the default solution.
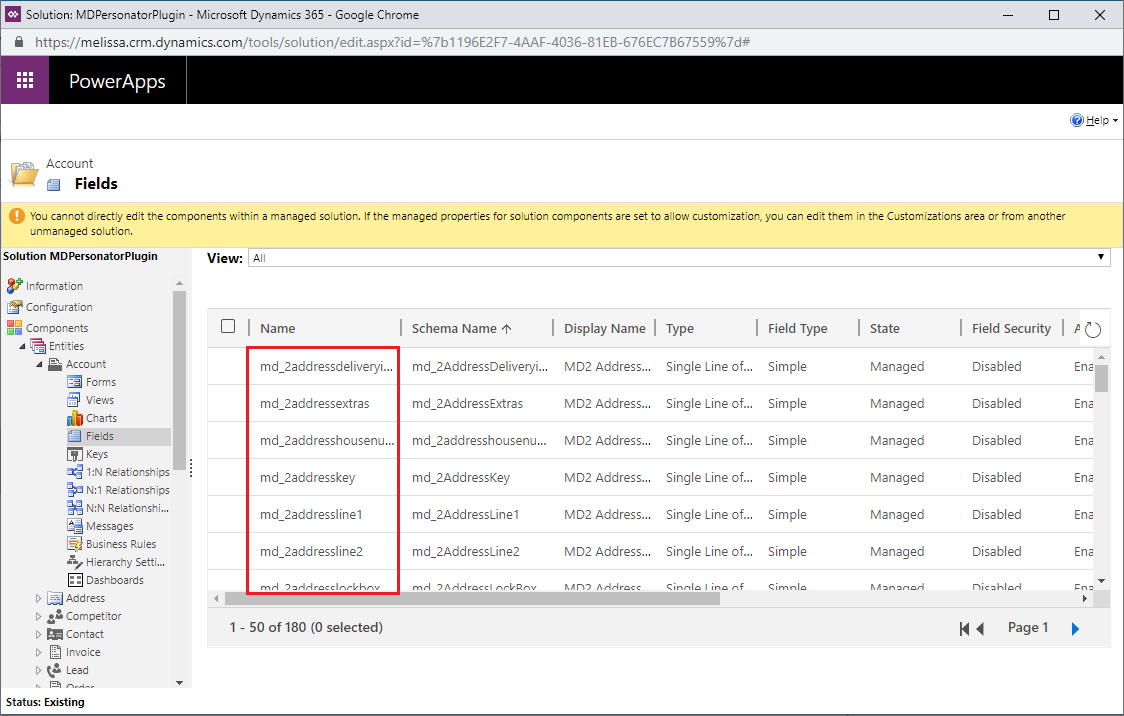
View entity field names#
Once the fields have been filled in click the Save Mapping button.
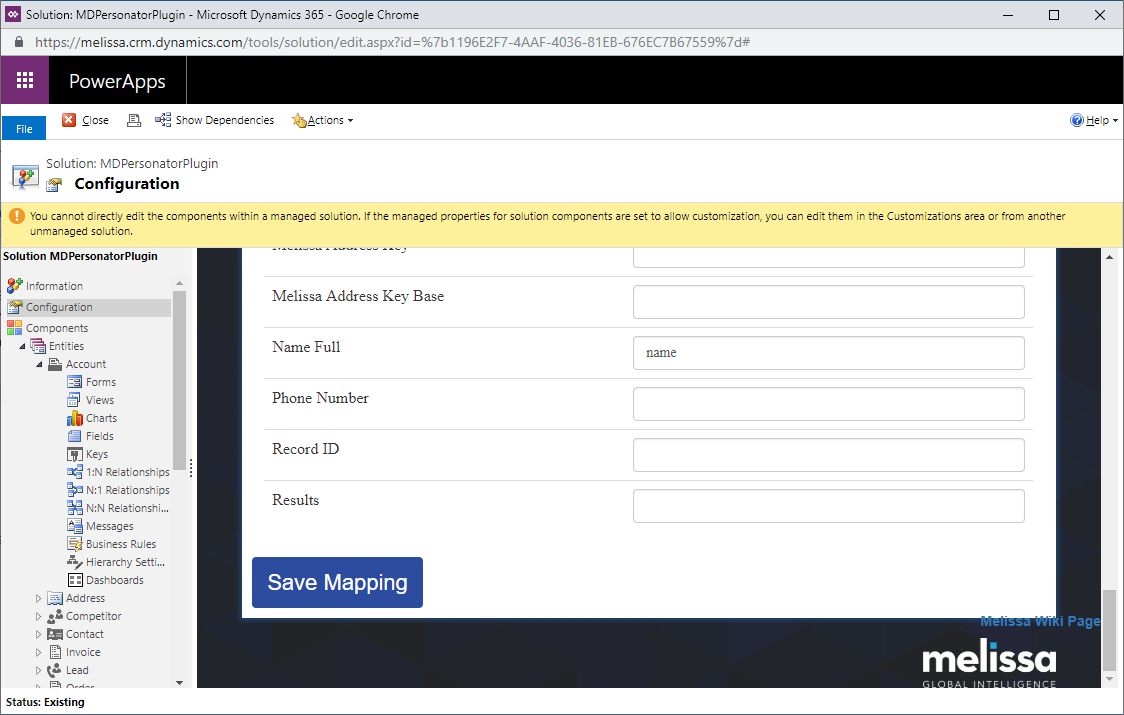
Click Save Mapping#
Custom Entity#
These steps will walk you through how to add Personator to custom entities.
Click the down arrow next to Sales, click Settings, then click Customizations under the Customization category.
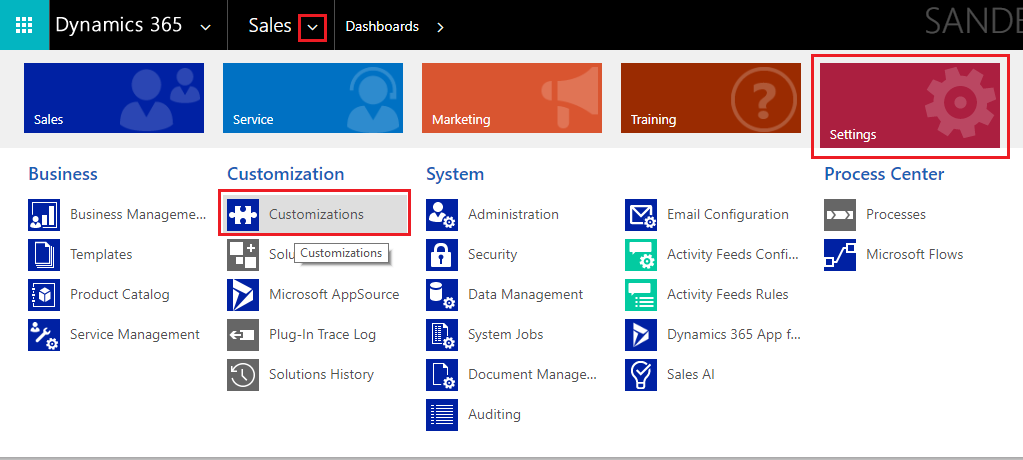
Click Customizations#
Click Customize the System.
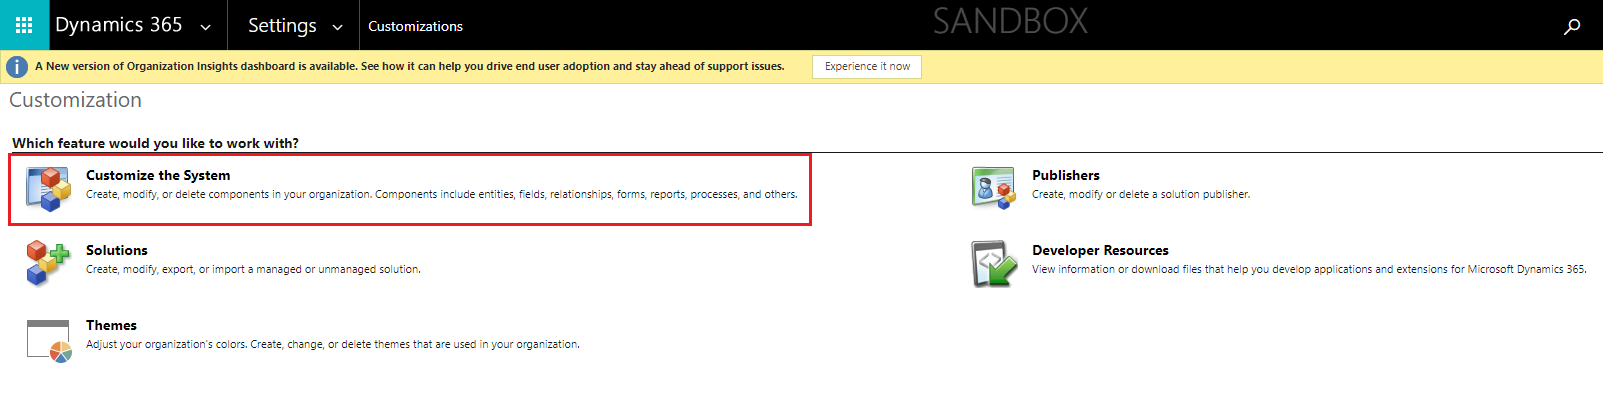
Click Customize the System#
On the left side of the new window that popped up, expand the Entities section to find the entity you want to add Personator to.
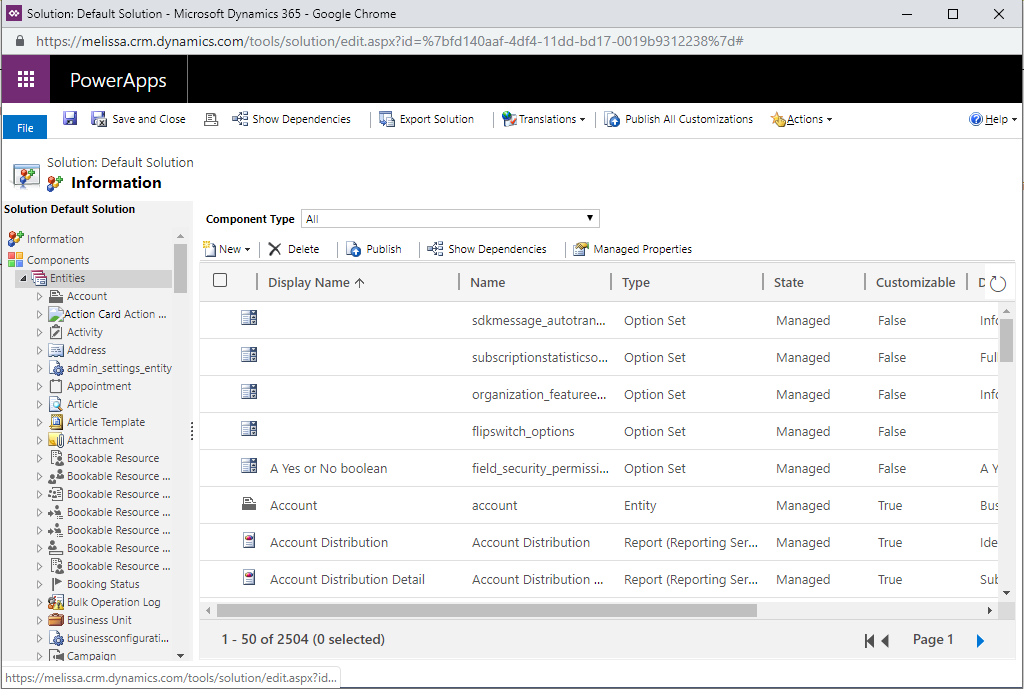
Expand Entities section#
In this case the test entity I am going to add it to is called md_testEntity.
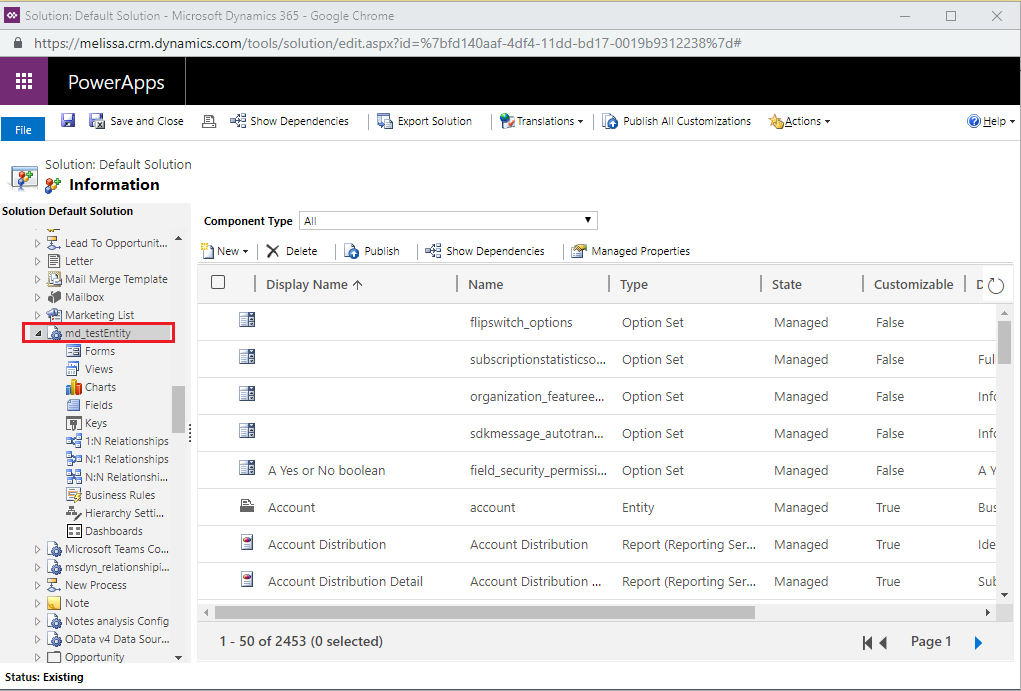
Add an entity#
Once you expand the entity, click the Forms tab then click on the Main form type.
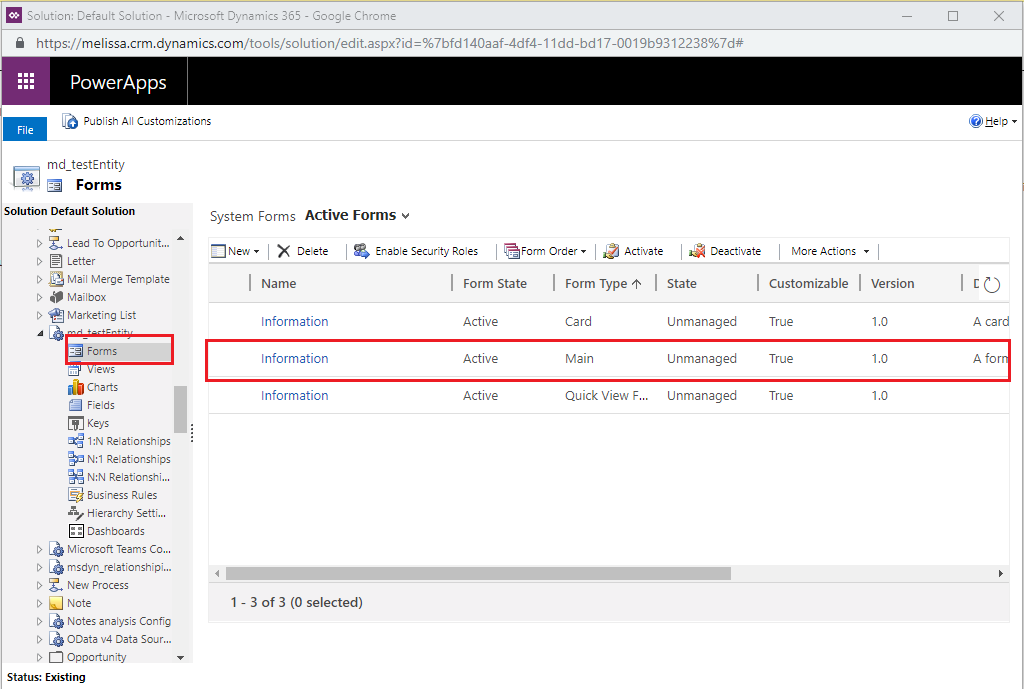
Click Main form#
Click the Insert tab, and then click the Web Resource button. This button is small and easy to miss, so reference the screenshot below.
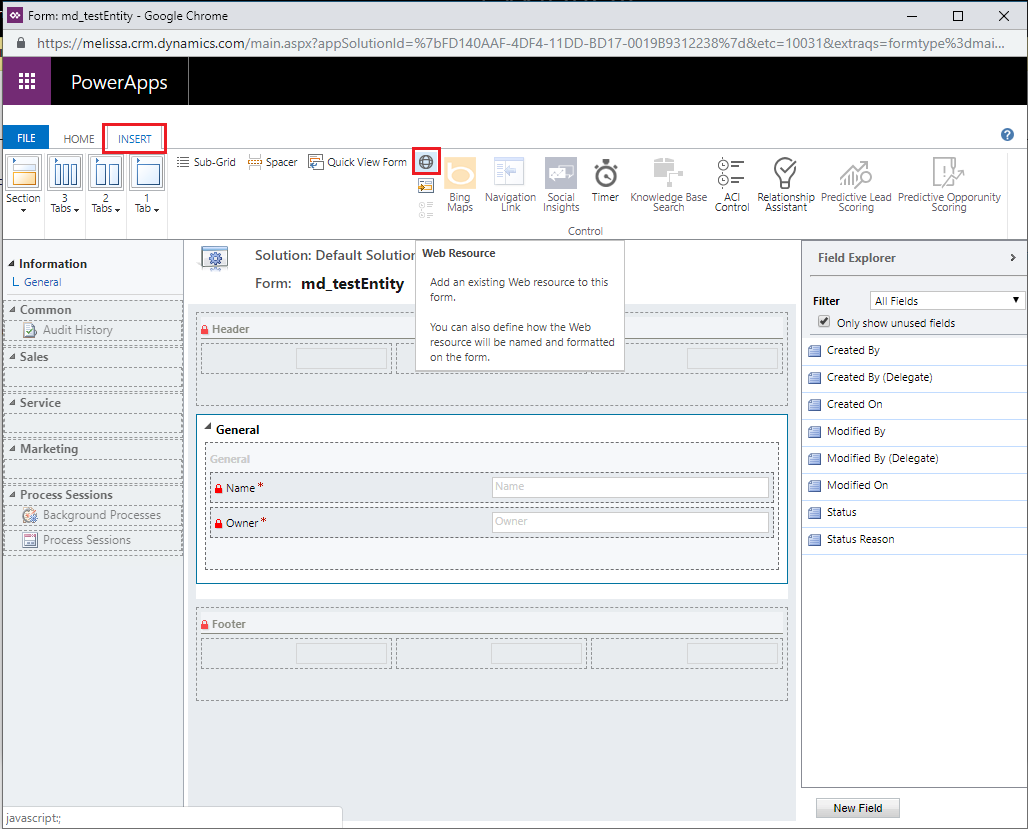
Small Web Resource button#
You can expand the popup window to see it easier.
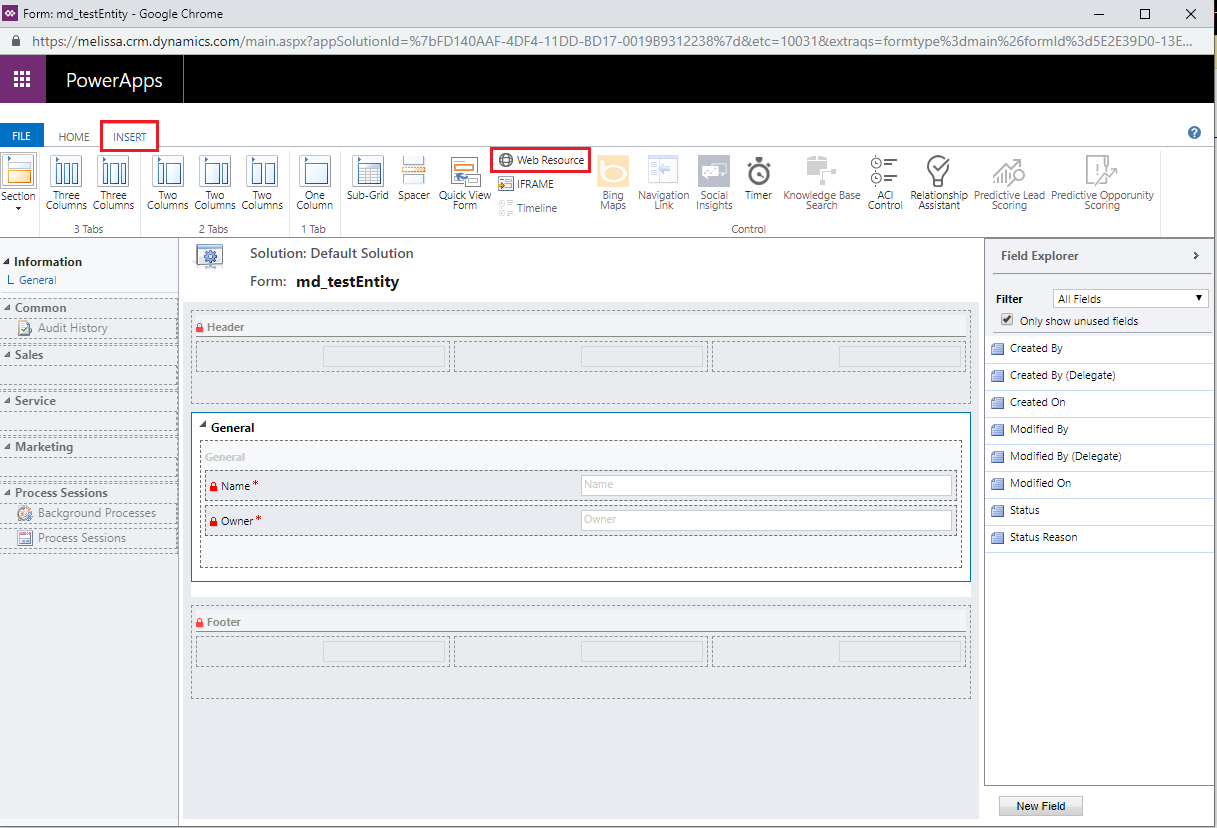
Click Web Resource button#
Type
md_p_PersonatorFormHTMLinto the Web Resource field. Then click the search button to populate a drop down menu. Select the corresponding item in that menu.
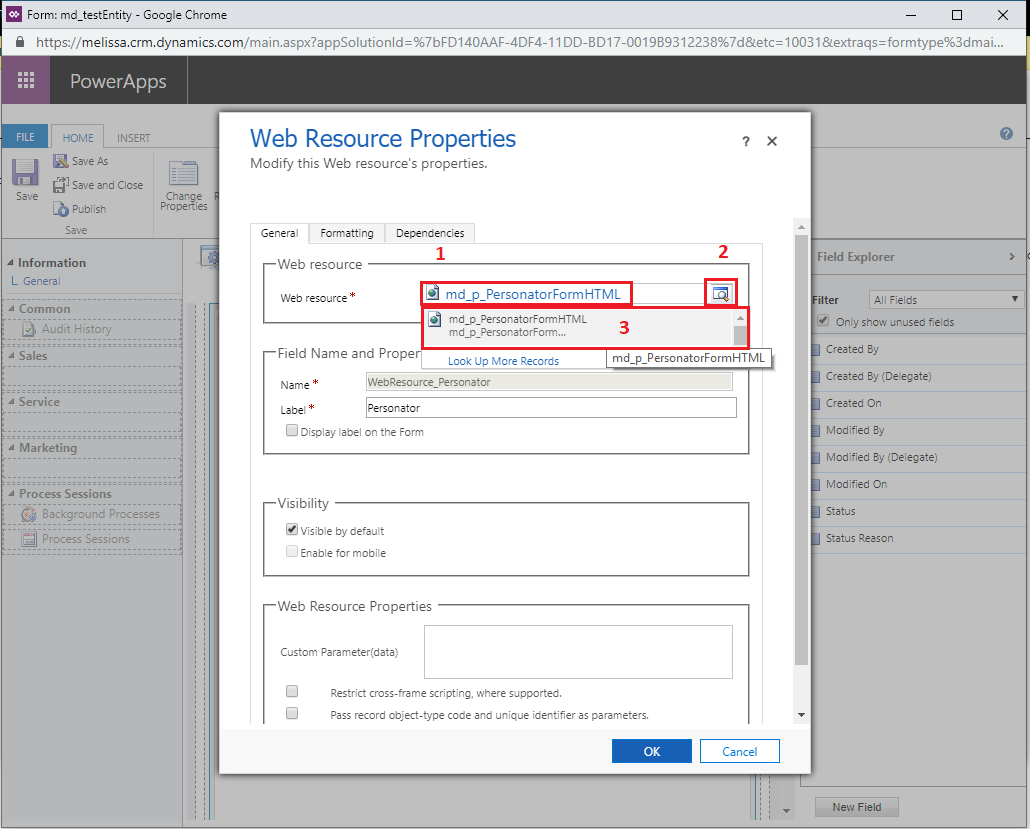
Select the corresponding field.#
Name the Web Resource
Personator. The Label field should auto-fill itself with the name you typed in.
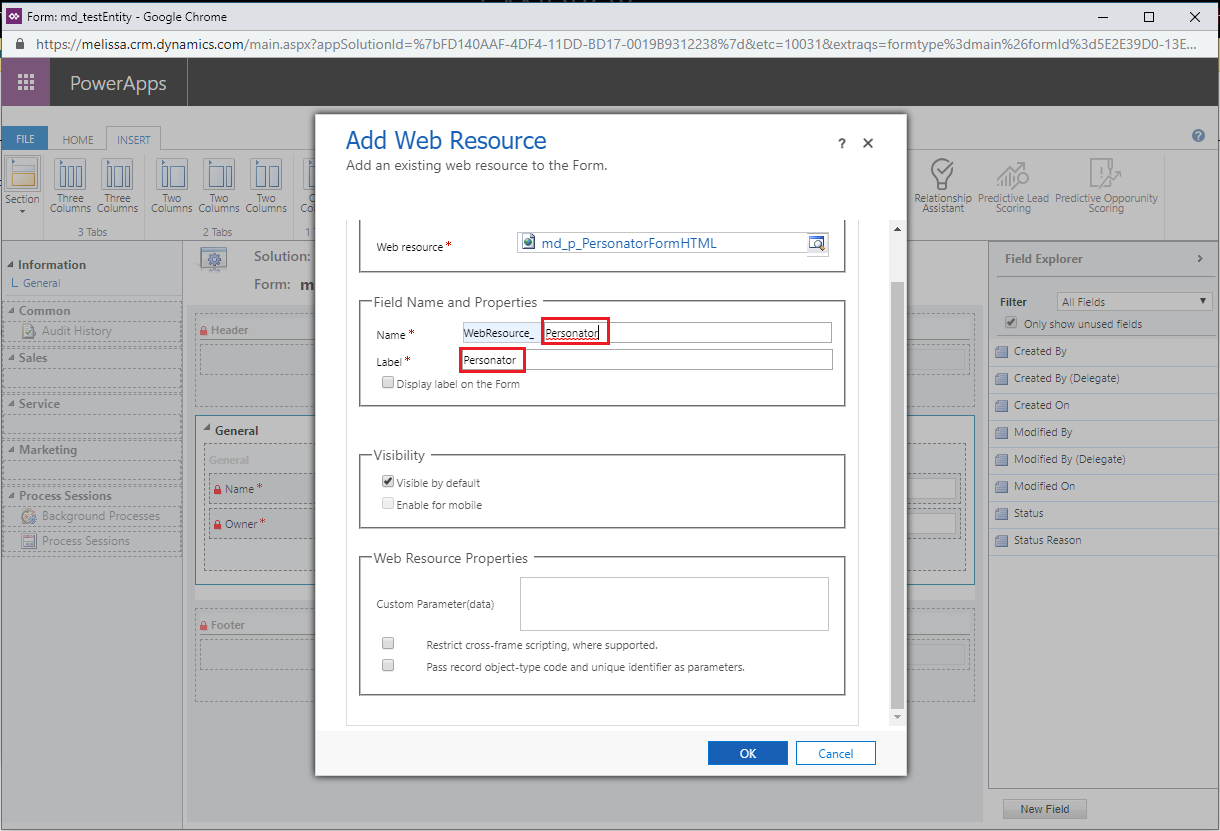
Name the Web Resource#
Click the Formatting tab and change the Row Layout number to
25. This increases the number of rows to make the Personator details easier to read.
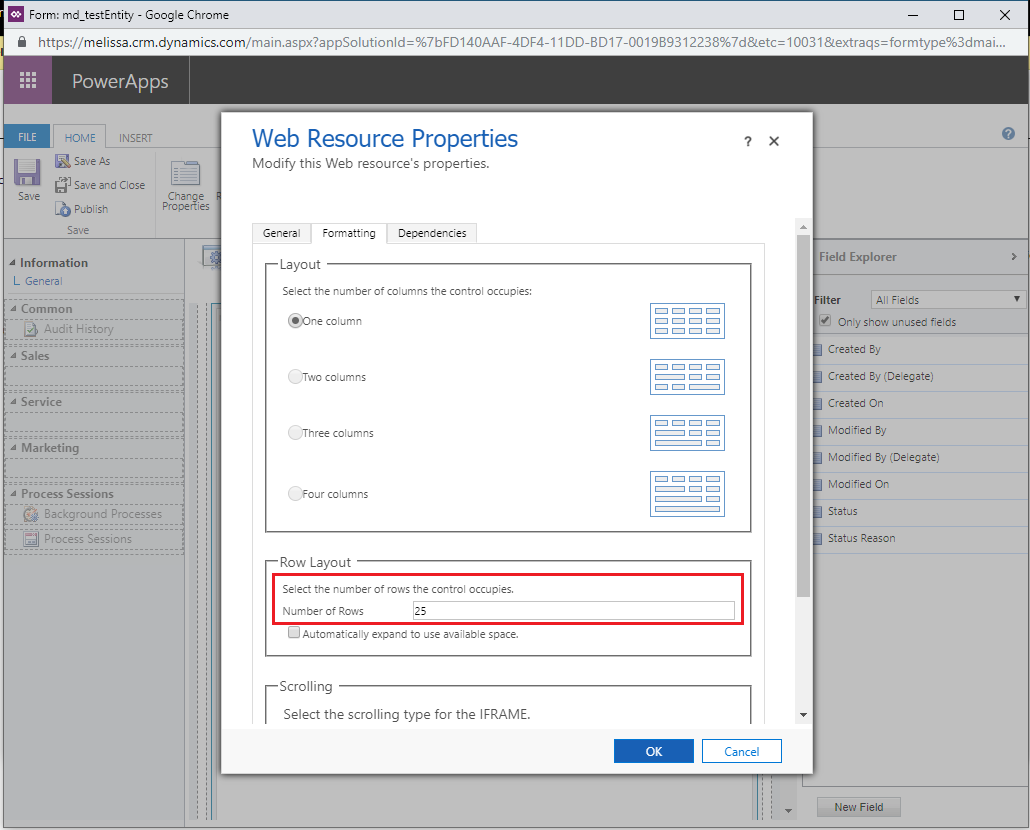
Change the Row Layout number#
Click OK at the bottom of the window.
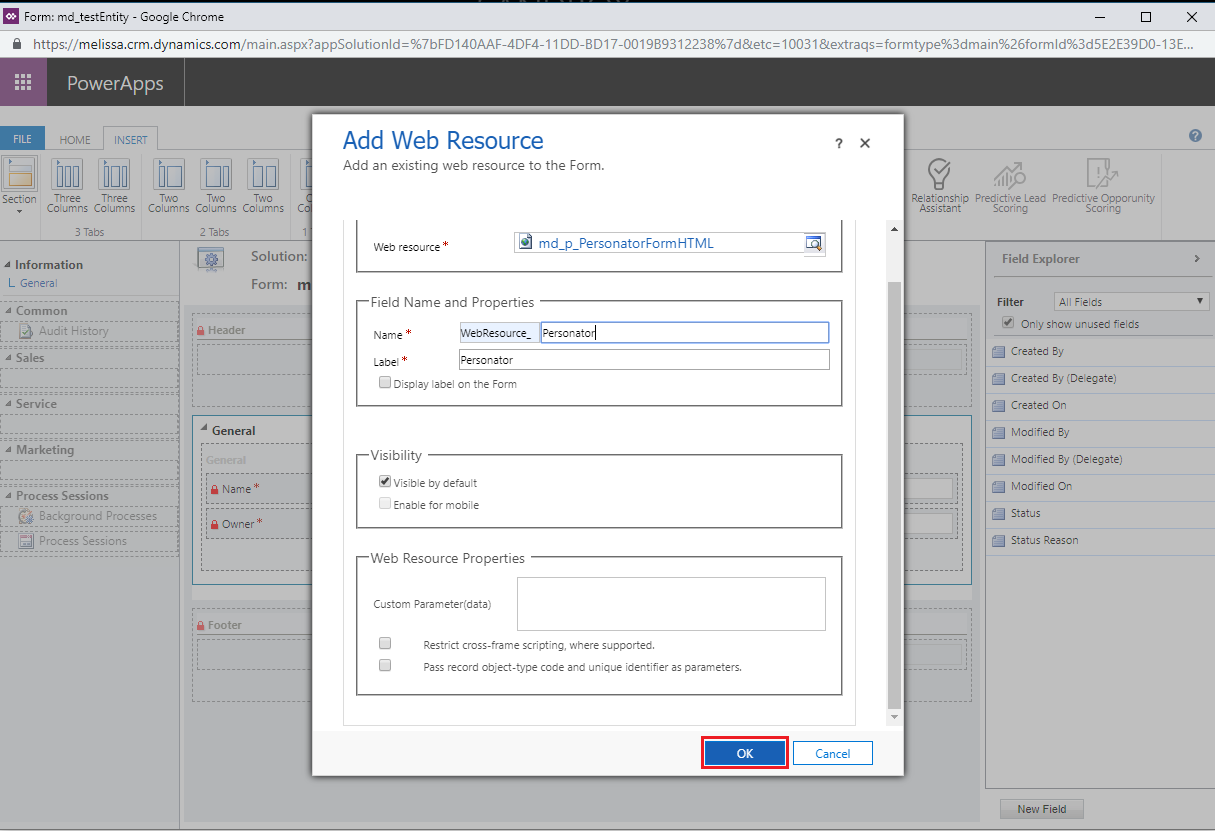
Click OK#
From the Home tab click Save. Then click the Publish button to save the modifications made.
After the form is added to the page, there are a handful of fields that need to be added for certain options to work correctly.
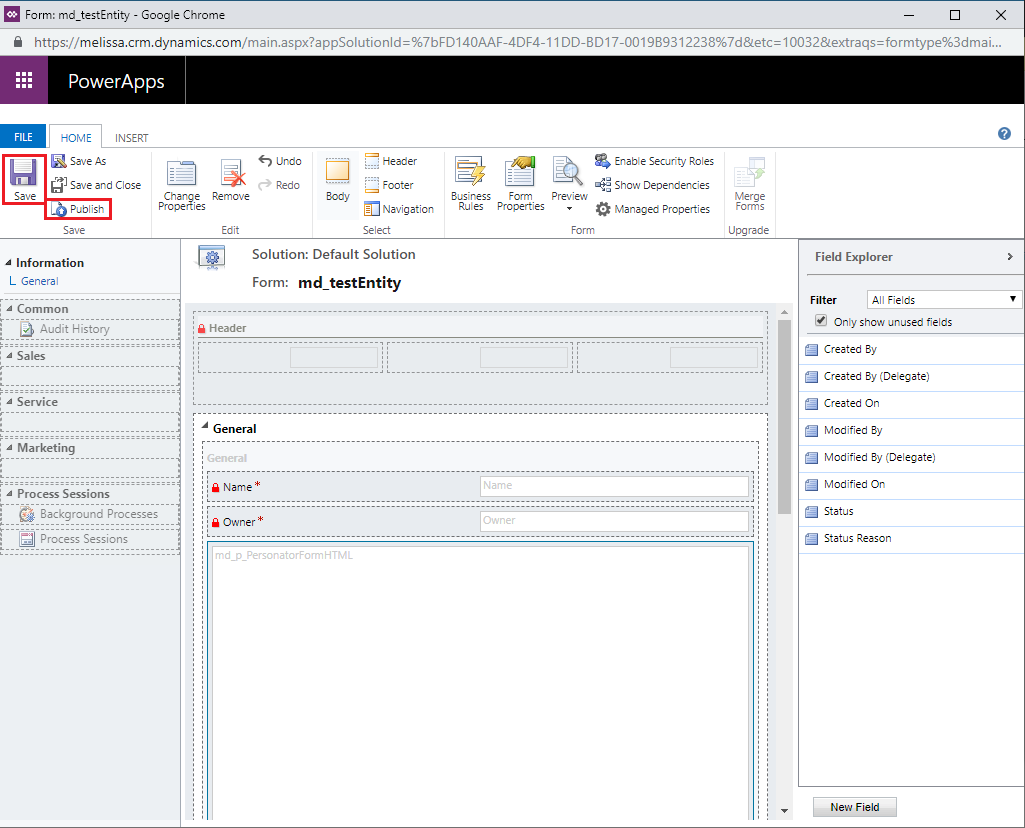
Click Save#
Additional Fields#
To add additional fields, open up the Fields tab for the entity you added
md_p_PersonatorFormHTMLto and click the New button.
There are two different types of fields you should make: Multiple Lines of Text, and Date and Time.
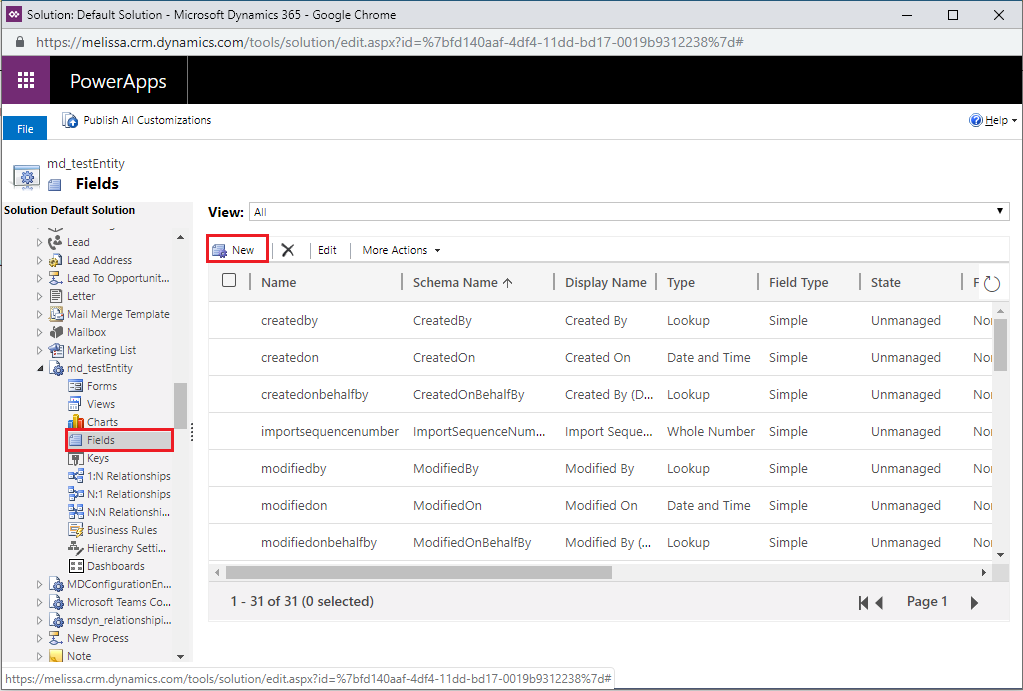
Click New in Fields tab#
Multiple Lines of Text Field#
Under the Type section, change the Data Type field from Single line of Text to Multiple Lines of Text.
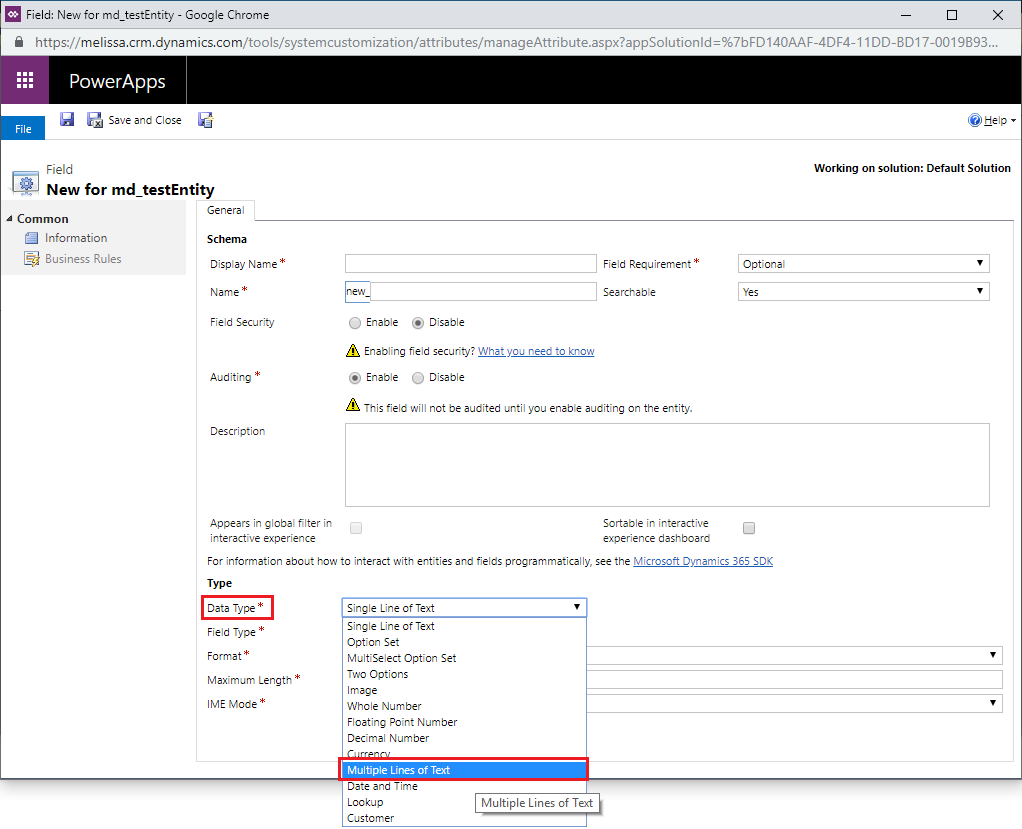
Change the Data Type#
Change the Maximum Length value to
250,000.
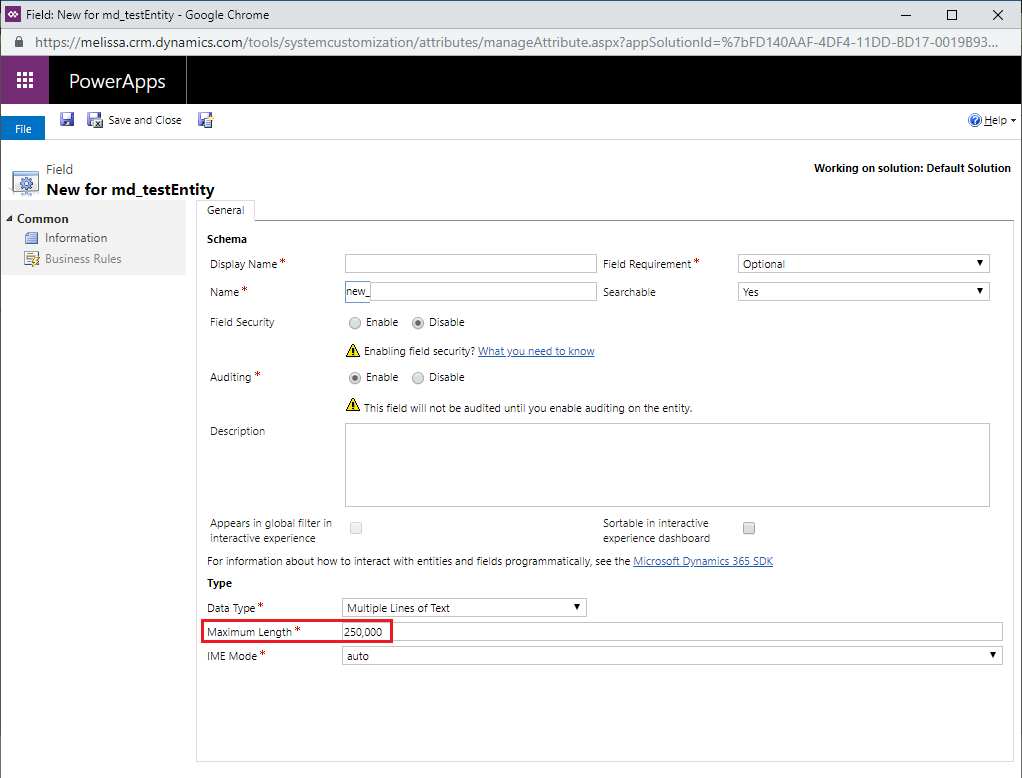
Change the Maximum Length#
Then enter
md_p_JSONStringInfointo the Name and Display Name fields.
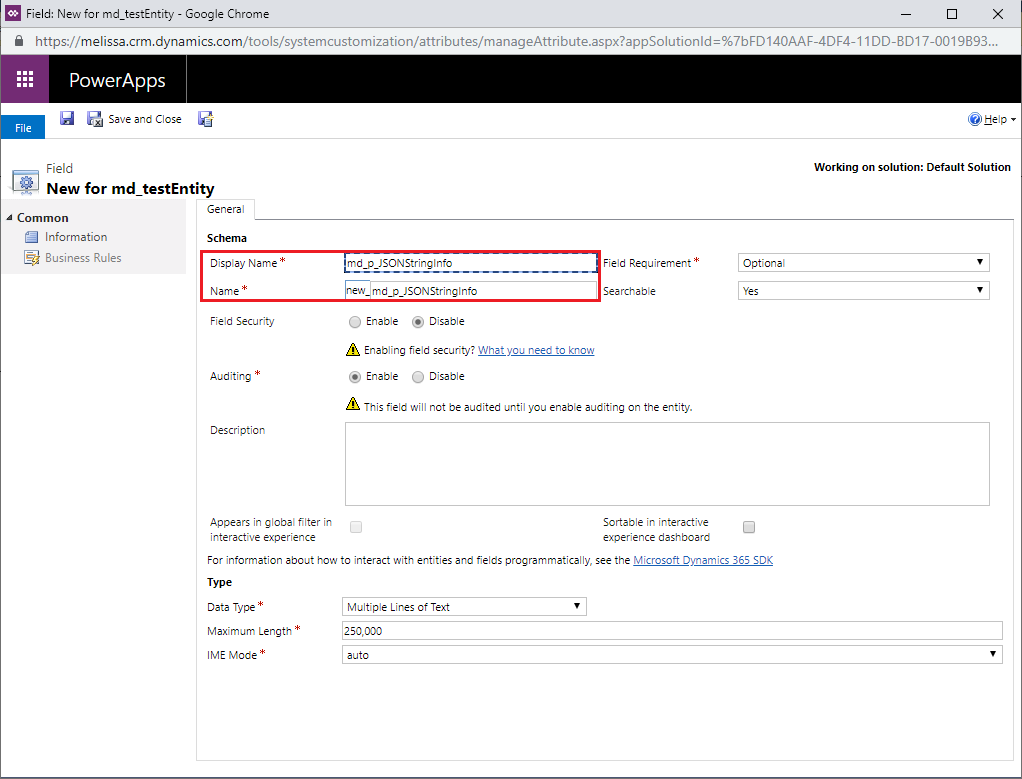
Enter Name and Display Name fields#
Click the Save and Close button.
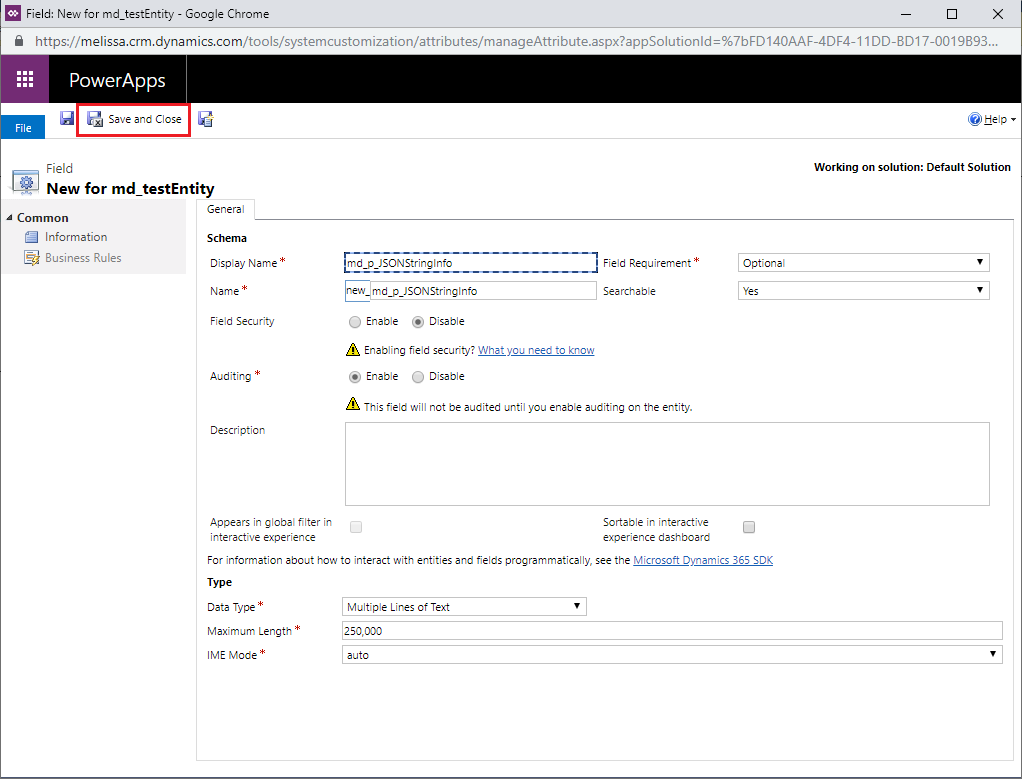
Click Save and Close#
Date and Time Field#
The next step follows from Step 17.
Change the Data Type field from Single Line of Text to Date and Time.
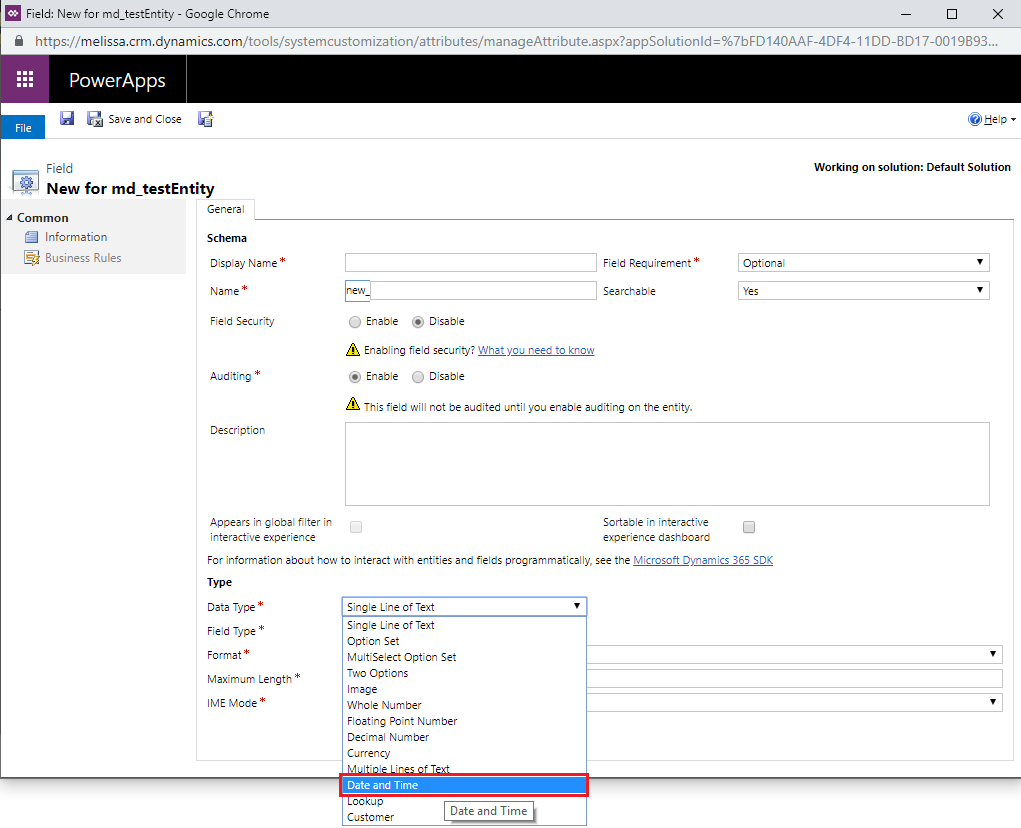
Change Data Type#
Change the Format field to Date and Time.
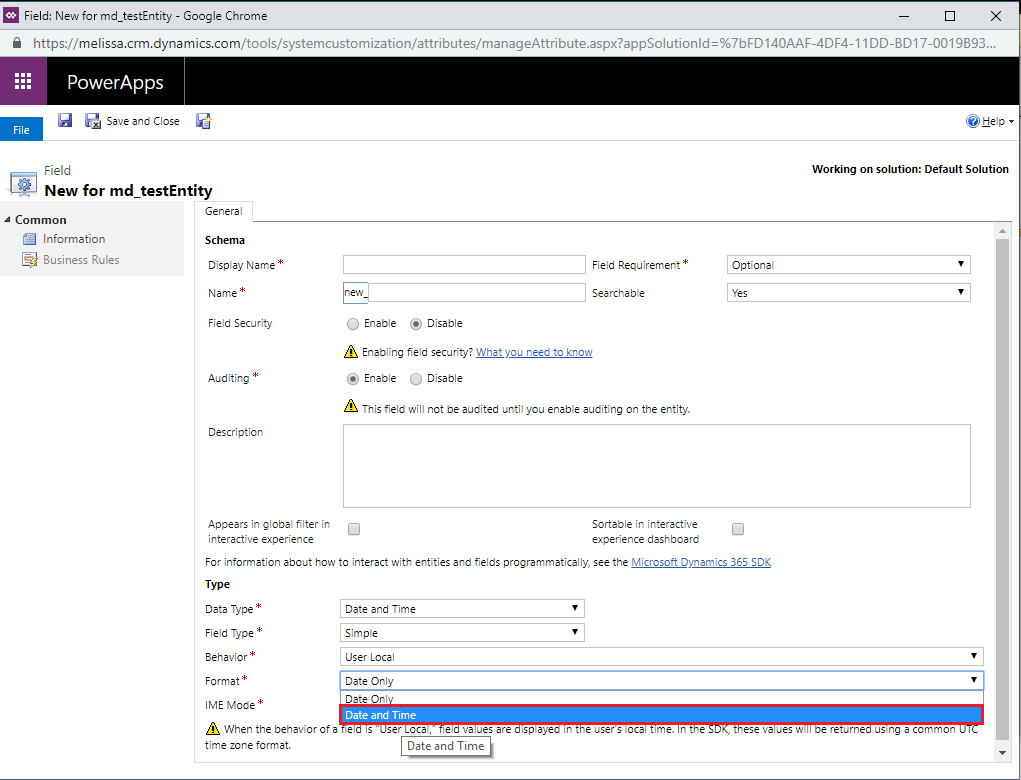
Change Format#
Add in
md_p_processdateto the Name field, andPersonator Process Dateto the Display Name field.
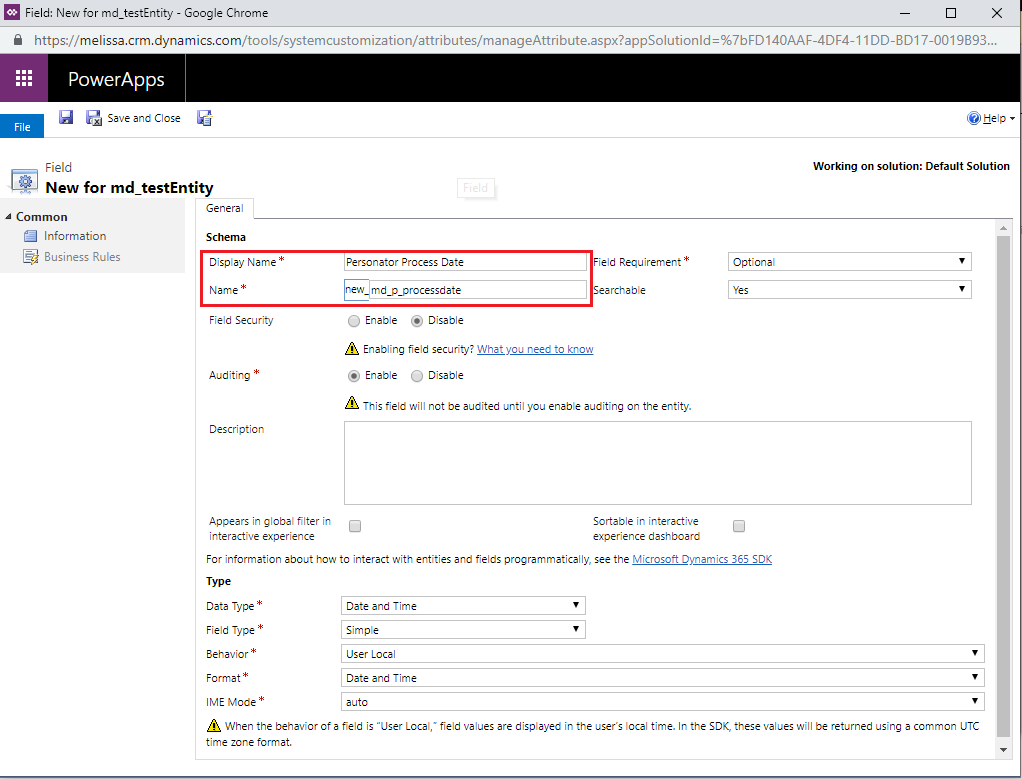
Change Name and Display Name fields#
Click the Save and Close button.
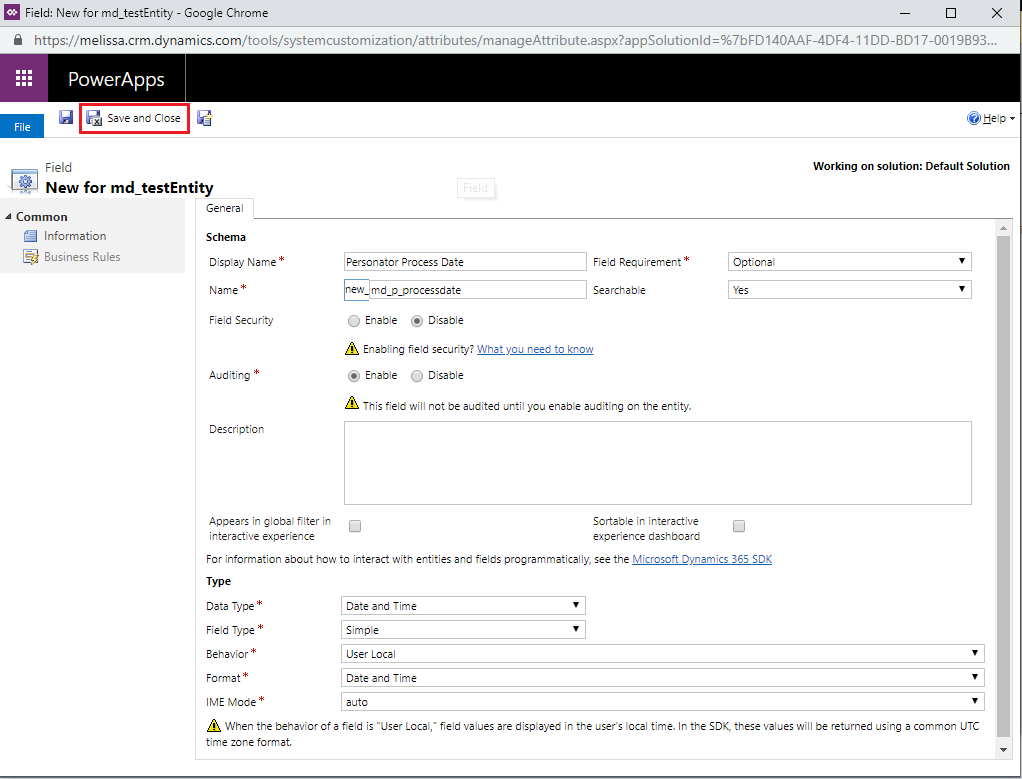
Click Save and Close#
Add Fields#
Next we are going to add the fields we just made to the form of the entity.
Open the Main form of the entity.
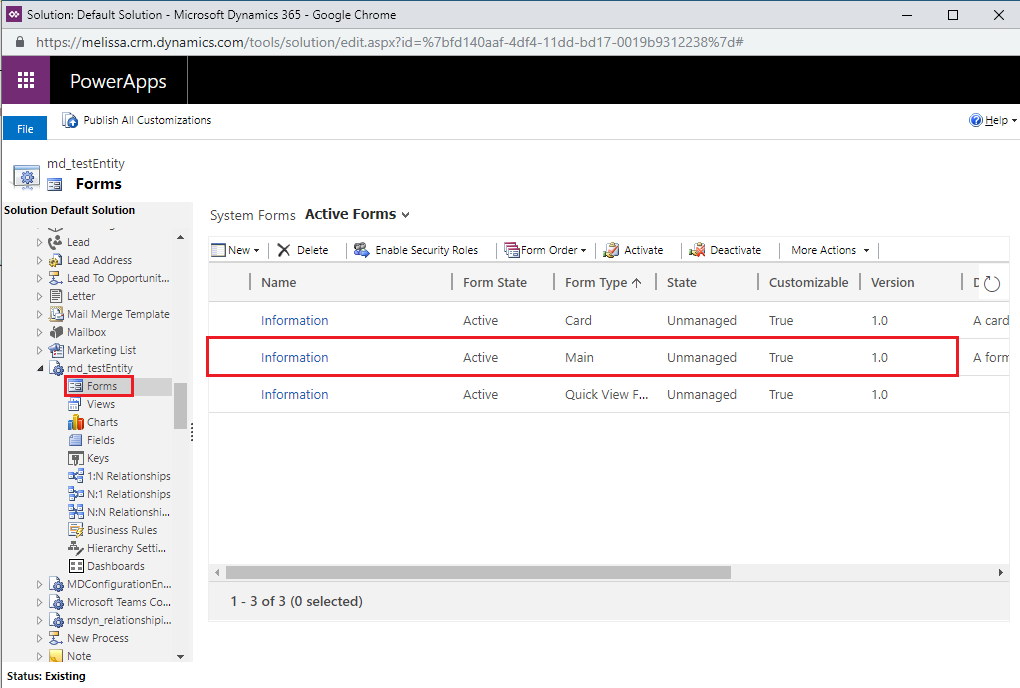
Open Main form#
On the left side of the window is a Field Explorer. This contains all of the fields that we just created. Drag them onto the form where ever you would like them to be placed.
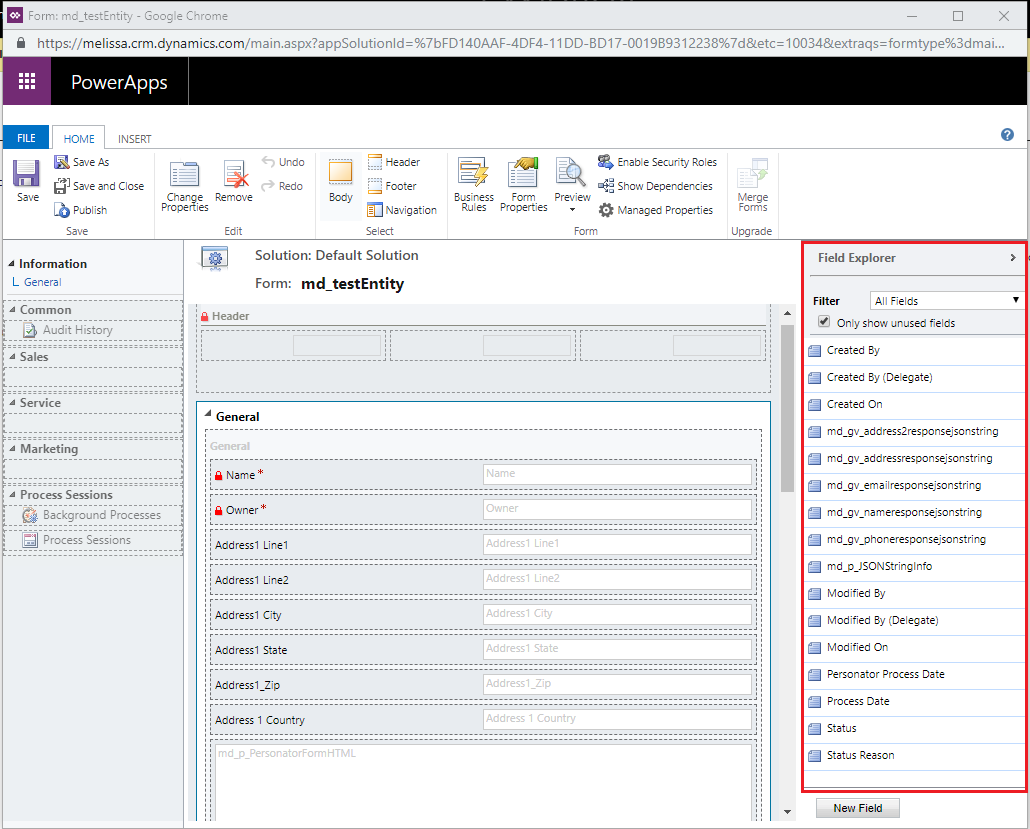
Drag created fields#
For the md_p_JSONStringInfo field it is a good idea to change the Visibility to
hidden. To do this, double click the field on the form and uncheck the boxes for Display label on the form, and Visible by default. Once those are unchecked, click the OK button.
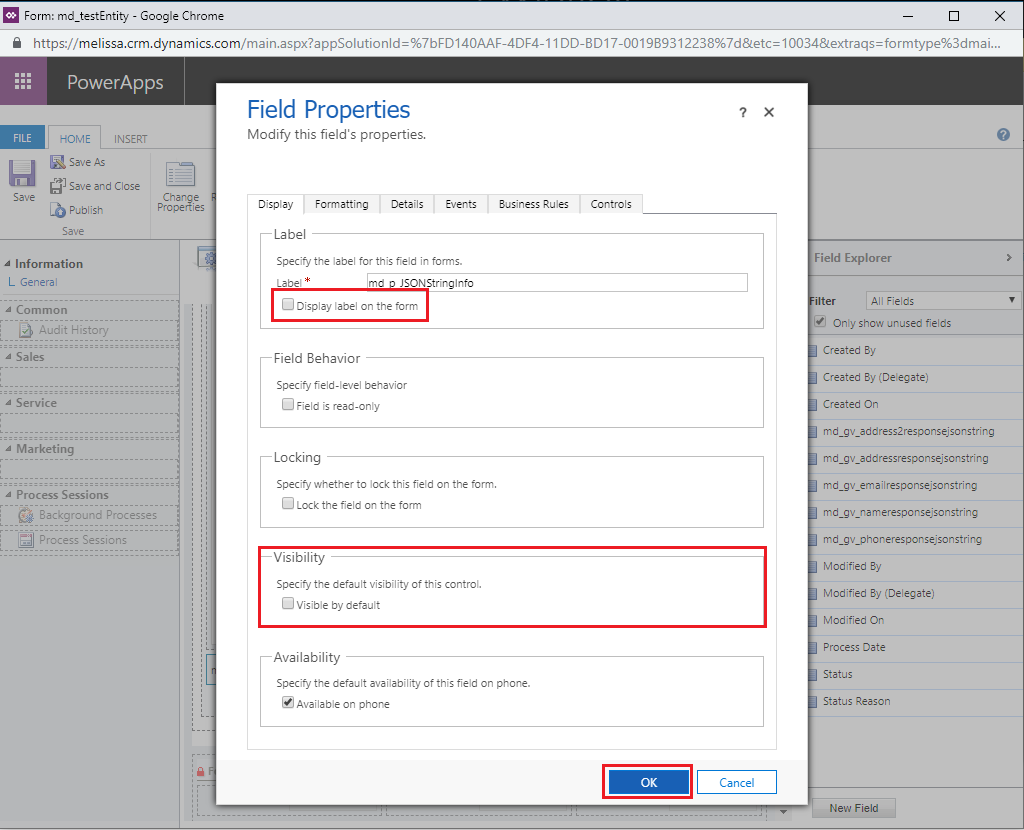
Change the visibility#
Click the Save and then the Publish buttons to save the changes made to the form.
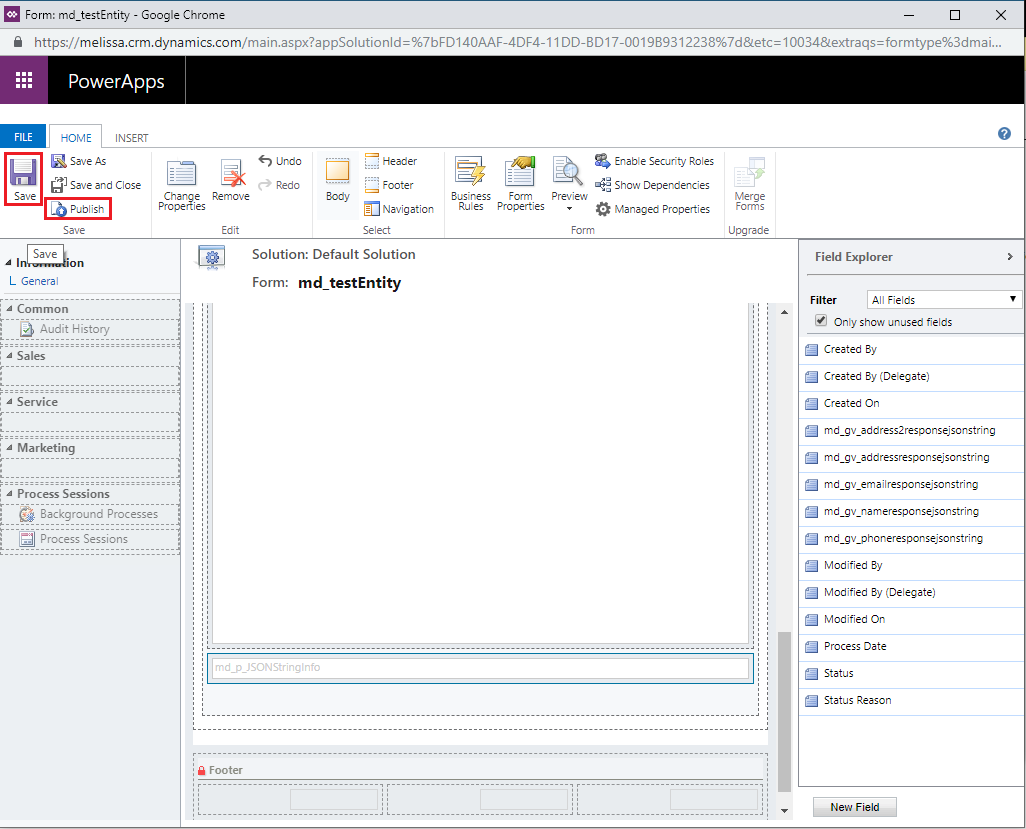
Click Save then Publish#
Personator Fields#
Personator Details#
Basic Details#
Field Name |
Description |
|---|---|
Full Name |
Returns the full name for the record. |
Company Name |
Returns the company name. |
Address Line 1 |
Returns the address entered in the Address Line field. If two addresses were entered and only one is valid, the valid address is returned instead. This includes the suite and private mailbox. |
Address Line 2 |
If two addresses are passed into the Address Line field, the second address is returned here. If only one of two addresses is valid, the valid address will be returned in Address Line 1. |
Suite |
Returns the suite for the address in the Address Line field, if any. If requested, the suite will be populated in this field instead of the Address field. |
Address Extras |
Any extra information that does not fit in the Address Line fields. |
Private MailBox |
Returns the private mail box number for the address in the Address Line field, if any. Private mailboxes are private mail boxes in commercial mail receiving agencies, like a UPS Store. If requested, the Private mailbox will be populated in this field instead of the Address field. |
City |
Returns the city entered in the City field. |
State |
Returns the state for the record. |
Postal Code |
Returns the 9-digit postal code for U.S. addresses and 6-digit postal code for Canadian addresses. |
Plus4 |
Returns the 4-digit plus4 for the input address. If this column is requested, the PostalCode field will only contain the 5-digit ZIP for U.S. addresses. |
Address Key |
Returns a unique identifier for an address. This key can be used with other current and future Melissa Data services. |
Phone Number |
Returns the standardized phone number for the record. |
Email Address |
Returns the email address entered in the Email field. |
Census Details#
Field Name |
Description |
|---|---|
County Name |
Returns the county name. |
County FIPS |
Returns the FIPS code for the county in the County field. FIPS code is a 5-digit code. The first two digits are a state code and the last three indicate the county within the state. |
Census Tract |
Returns a 4-to 6-digit string containing the census tract number associated with the requested record. Census tracts are small subdivisions of a county. |
Census Block |
Returns a 4-digit string containing the census block number associated with the requested record. Census blocks are the smallest geographic area for which the Bureau of the Census collects and tabulates decennial census data. |
Place Code |
When ZIP codes overlap, the City field will always return the city that covers most of the ZIP area. If the address is located outside of that city but within the ZIP Code, Place Code or Place Name will refer to that area. |
Place Name |
When ZIP codes overlap, the City field will always return the city that covers most of the ZIP area. If the address is located outside of that city but within the ZIP Code, Place Code or Place Name will refer to that area. |
CBSA Code |
Census Bureau’s Core Based Statistical Area (CBSA). Returns the 5-digit code for the CBSA associated with the requested record. |
CBSA Title |
Returns the title for the CBSA. |
CBSA Level |
Returns whether the CBSA is metropolitan or micropolitan. |
CBSA Division Code |
Returns the code for a division associated with the requested record, if any. |
CBSA Division Level |
Returns whether the CBSA division, if any, is metropolitan or micropolitan. |
CBSA Division Title |
Returns the title for the CBSA division, if any. |
Congressional District |
Returns the 2-digit congressional district that the requested record belongs to. |
Results#
Field Name |
Description |
|---|---|
Results |
Returns result codes specific to the record. |
Melissa Address Key |
Returns a propietary unique key assigned to the address record. |
Record Extras |
Returns any extra details on the current record. |
Record ID |
Returns the unique identifier for the current record. |
Name Details#
Field Name |
Description |
|---|---|
Gender |
Returns a gender for the name in the FullName field. |
Gender 2 |
Only used if 2 names are in the Full Name field. Returns a gender for the second name in the Full Name field. |
Salutation |
Returns a salutation for the name in the Full Name field. |
Name Prefix |
Returns a prefix for the name in the Full Name field. |
First Name |
Returns the first name in the Full Name field. |
Middle Name |
Returns a middle name for the name in the Full Name field. |
Last Name |
Returns the last name in the Full Name field. |
Name Suffix |
Returns a suffix for the name in the Full Name field. |
Prefix Name 2 |
Only used if 2 names are in the Full Name field. Returns a prefix for the second name in the Full Name field. |
First Name 2 |
Only used if 2 names are in the Full Name field. Returns the second name in the Full Name field. |
Middle Name 2 |
Only used if 2 names are in the Full Name field. Returns a middle name for the second name in the Full Name field. |
Last Name 2 |
Only used if 2 names are in the Full Name field. Returns a last name for the second name in the Full Name field. |
Name Suffix 2 |
Only used if 2 names are in the Full Name field. Returns a suffix for the second name in the Full Name field. |
Parsed Address#
Field Name |
Description |
|---|---|
Address House Number |
Returns the parsed house number for the address entered in the Address Line field. |
Address Pre Direction |
Returns the parsed pre-direction for the address entered in the Address Line field. |
Address Street Name |
Returns the parsed street name for the address entered in the Address Line field. |
Address Street Suffix |
Returns the parsed street suffix for the address entered in the Address Line field. |
Address Post Direction |
Returns the parsed post-direction for the address entered in the Address Line field. |
Address Suite Name |
Returns the parsed suite name for the address entered in the Address Line field. |
Address Suite Number |
Returns the parsed suite number for the address entered in the Address Line field. |
Address Private Mailbox Name |
Returns the parsed private mailbox name for the address entered in the Address Line field. |
Address Private Mailbox Range |
Returns the parsed private mailbox range for the address entered in the Address Line field. |
Parsed Email Details#
Field Name |
Description |
|---|---|
Domain Name |
Returns the parsed domain name for the email entered in the Email field. |
Mailbox Name |
Returns the parsed mailbox name for the email entered in the Email field. |
Top Level Domain |
Returns the parsed top-level domain name for the email entered in the Email field. |
Census Details 2#
Field Name |
Description |
|---|---|
Census Key |
Returns a 15 digit string containing the concatenated County FIPS, Census Tract and Census Block. |
County Subdivision Code |
Returns a 5 digit string representing the County Subdivision Code for the requested record. |
County Subdivision Name |
Returns the County Subdivision Name for the requested record. |
Elementary School District Code |
Returns a 5 digit string representing the Elementary School District Code for the requested record. |
Elementary School District Name |
Returns the Elementary School District Name for the requested record. |
Secondary School District Code |
Returns a 5 digit string representing the Secondary School District Code for the requested record. |
Secondary School District Name |
Returns the Secondary School District Name for the requested record. |
Unified School District Code |
Returns a 5 digit string representing the Unified School District Code for the requested record. |
Unified School District Name |
Returns the Secondary Unified District Name for the requested record. |
State District Lower |
Returns a 3 digit string representing the Lower State District Code for the requested record. |
State District Upper |
Returns a 3 digit string representing the Upper State District Code for the requested record. |
Address Details#
Field Name |
Description |
|---|---|
City Abbreviation |
Returns an abbreviation for the city entered in the City field, if any. |
State Name |
Returns the full name of the state entered in the State field. |
Address Type Code |
Returns a code for the address type in the Address Line field. Please see the appendix for the list of possible codes. |
Country Code |
Returns the country code for the country in the Country field. |
Delivery Indicator |
Returns an indicator of whether an address is a business address or residential address. |
Urbanization Name |
Returns the urbanization name for the address entered in the Address Line field. Usually only used if the address is in Puerto Rico. |
Carrier Route |
Returns a 4-character code defining the carrier route for this record. |
Delivery Point Code |
Returns a string value containing the 2-digit delivery point code. |
Delivery Point Check Digit |
Returns a string value containing the 1-digit delivery point check digit. |
UTC |
Returns the time zone of the requested record. All Melissa Data products express time zones in UTC (Coordinated Universal Time). |
Pased Address (Canada Only)#
Field Name |
Description |
|---|---|
Address Route Service (Canada Only) |
Returns the parsed route service number for the address entered in the Address Line field. |
Address Lock Box (Canada Only) |
Returns the parsed lock box number for the address entered in the Address Line field. |
Address Delivery Installation (Canada Only) |
Returns the parsed delivery installation for the address entered in the Address Line field. |
Geocode Details#
Field Name |
Description |
|---|---|
Latitude |
Returns the geocoded latitude for the address entered in the Address Line field. |
Longitude |
Returns the geocoded longitude for the address entered in the Address Line field |
Phone Details#
Field Name |
Description |
|---|---|
Area Code |
Returns the parsed area code for the phone number entered in the Phone field. |
New Area Code |
Returns the parsed new area code for the phone number entered in the Phone field. |
Phone Extension |
Returns the parsed extension for the phone number entered in the Phone field. |
Phone Prefix |
Returns the parsed prefix for the phone number entered in the Phone field. |
Phone Suffix |
Returns the parsed suffix for the phone number entered in the Phone field. |
Phone Country Code |
Returns the 2 character country code for the phone number entered in the Phone field. |
Phone Country Name |
Returns the full country name for the phone number entered in the Phone field. |
Demographics#
Field Name |
Description |
|---|---|
Date Of Birth |
Returns the date of birth in the format |
Household Income |
Returns the range of the household’s income. |
Length Of Residence |
Returns the range of the individual’s length of residency in their current address. |
Own Rent |
Returns the individual’s status as owner or renter of the property. |
Occupation |
Returns the category for the individual’s occupation. |
Presence Of Children |
Returns the presence of children in the household. |
Marital Status |
Returns the individual’s marital status. |
Date Of Death |
Returns the full date of death in the format |
Demographics Gender |
Returns gender based on demographics data. |
Demographics Results |
Returns the result codes for demographics. |