

Reference Only
Melissa legacy products are for reference only. They are NOT recommended for new development.
If you have any questions about any of these features, please feel free to contact Melissa Support at Tech@Melissa.com or 800-MELISSA ext. 4 (800-635-4772 ext. 4).
Reference Guide#
Introduction#
Clean Suite for CRM:Salesforce corrects and completes contact data, validates international addresses in 240 countries, while also enriching addresses with U.S. property and mortgage data.
Full (Name/Phone/Address/Email) U.S. Data Quality#
Clean Suite provides data quality functionality that cross-references the validity of your CRM data by verifying if a U.S. customer is legitimate by determining if the person’s name, address, phone and email belong or correlate with each other. Clean Suite also adds missing data to complete your contact records and provides you with the new addresses of people and companies that have moved.
For actions that Clean Suite supports and can be turned on or off:
Check – First step is to clean and standardize dirty contact data and determines if the address is deliverable, phone numbers are callable and whether an email address exists
Verify – Looks at the entire Salesforce record as a whole and determines whether the name, address, phone and email are associated with each other
Append – Populates missing data in your Salesforce objects. If your Salesforce object is missing a phone number for example, Clean Suite will append in a phone number based on other data within that Salesforce record such as the address, name or email
Move – Clean Suite can retrieve the latest address for an individual if that person has moved or had multiple moves within the last 12 years
Within Clean Suite, you can pick and choose which actions to turn on based on your needs. More settings and options are provided to tweak and control how Clean Suite will verify and append in data.
When you assemble a complete, holistic record knowing each contact point is deliverable and accurate against USPS and Telco information, you’ll be able to improve customer/prospect communications, easily identify purchasing trends and prevent fraud.
Global Verification#
Clean Suite provides standardization and validation for Salesforce objects across 240 countries and territories:
Standardize, parse, verify, transliterate and geocode addresses
Validate email addresses to the mailbox level and check if the email is indeed deliverable to
Determine if a phone number is valid based on your customer’s region
By using the Clean Suite Global Verification component, you can spot bad data in your Salesforce organization very easily and prevent wasted time on bad or fraudulent data.
Property & Mortgage Enrichment#
Enrich your Salesforce CRM records by seamlessly adding property and mortgage data on 140 million U.S. properties. The property lists are updated weekly and the data is divided into 12 main categories with over 165 information fields.
The main data elements include:
Property address
Owner (name, phone and address)
Current trust deed information
Prior sale information, plus many other fields
You can select the preferred level of data by selecting Basic and receive up to 30 property data elements, or choosing Detailed, and receive up to 160 property data elements (The level of detail may vary according to property location).
Melissa Data’s property and mortgage data is ideal for investors, lenders, real estate professionals, insurance agencies, risk managers, and service/product providers who employ the Salesforce CRM.
Global Address Autocompletion#
Clean Suite also brings address auto completion anywhere within Salesforce for over 240 countries and territories. As you type in an address, Clean Suite will complete your address with a verified existing address, including the city, state and postal code. With auto completion, save up to 50% fewer keystrokes and prevent typographical errors and mistakes.
Batch Processing#
Clean your Salesforce data in one sweep using Personator (U.S.) and Global Verification. Clean Suite lets you pick and choose which Salesforce objects to cleanse. After processing, you can view the results under the Clean Suite Report Summary tab to find weak points in your Salesforce data.
Getting Started#
Install Clean Suite#
Before getting started, download and install our Clean Suite for Salesforce app from AppExchange. For a guide on how to do this, see Package Installation.
Setup Clean Suite#
Once Clean Suite is installed, there is some basic setup required before you can use it. For a guide on how to do this, see Setup.
Install Clean Suite Components#
Based on your needs and requirements pick and choose which Clean Suite components to enable:
US/CAN (Personator) - Consult Installing Visualforce Pages for instructions on how to add the US/CAN component to your objects.
Global/International - Consult Installing Visualforce Pages for instructions how to add the Global component to your objects.
US property & enrichment - Consult Installing Visualforce Pages for instructions how to add the Property component to your objects.
Global address autocompletion (ExpressEntry) - Consult the Express Entry Component for instructions on how to enable address autocompletion.
Batch Processing#
For users with already a large number of records, Clean Suite provides batch processing. To read more, see Batch Processing.
Customizing Visualforce Pages#
Clean Suite comes with Visualforce pages already set up Contacts. To create your own Visualforce pages for other types of objects (Leads, Accounts or custom objects), see Custom Visualforce Pages.
Package Installation#
Once you choose to install Clean Suite for Salesforce, you will be directed to the Package Installation Details page. This page displays the package name, publisher, and description.
Click the Continue Button
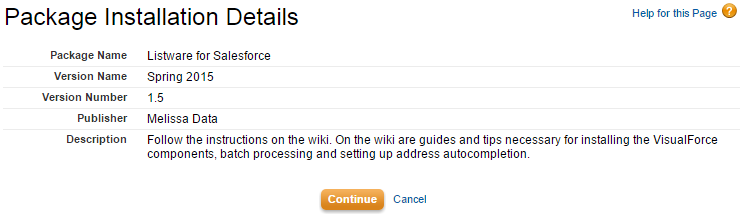
Begin Package Installation#
Approve Third-Party Access#
Clean Suite for Salesforce needs access to certain web sites. This page asks for your permission to allow Clean Suite access.
Be sure to check “Yes, grant access to these third-party web sites” and click Continue.
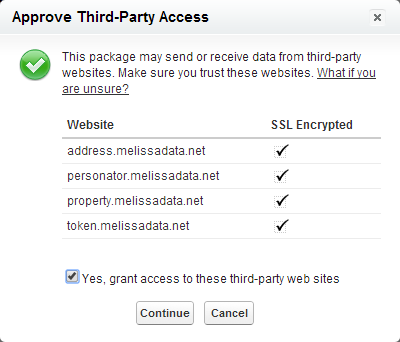
Approve Third-Party Access#
Approve Package API Access#
For Clean Suite to function, it needs access to selected objects in the API.
3.Click Next to approve access and continue.
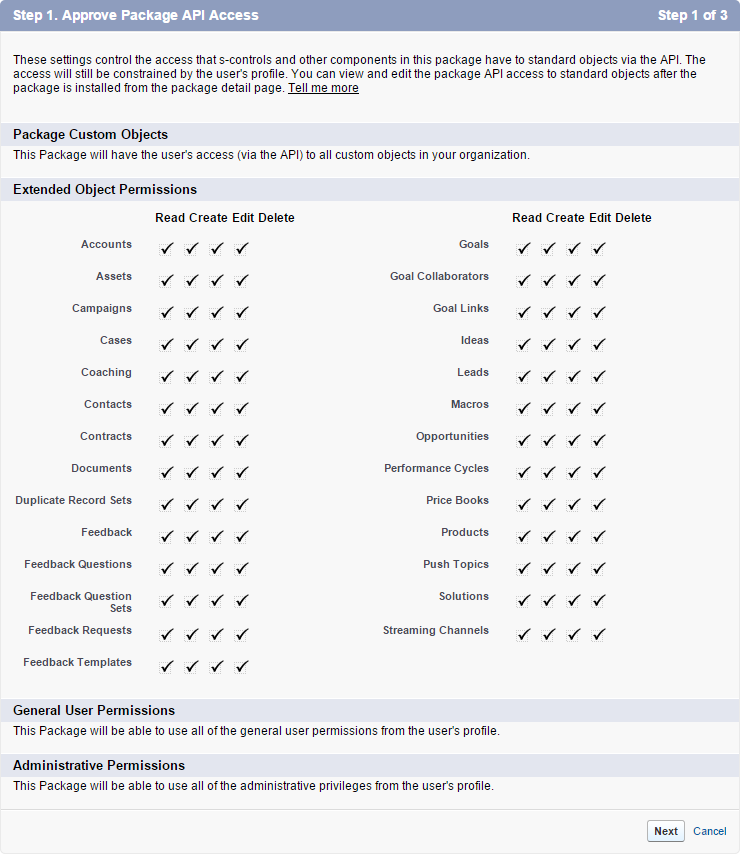
Approve Package API Access#
Choose Security Level#
You may choose the sercurity level for who will have access to Clean Suite for Salesforce here.
Select a Security level and click Next.
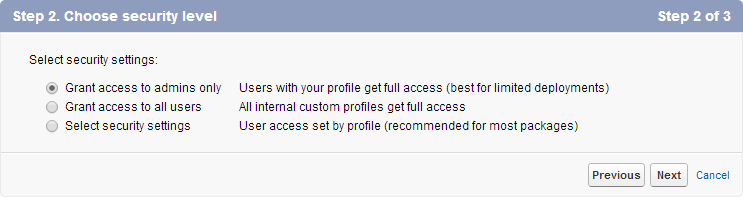
Choose Security Level#
Install the Package#
Select Install to install the Clean Suite for Salesforce package.

Install the Package#
Wait for Installation#
Depending on Salesforce, the installation process may take awhile. Salesforce will email you once installation is complete.

Wait for Installation#
Setup#
To begin using Clean Suite for Salesforce, you must first complete a few simple setup steps.
Select Clean Suite from the Sales drop-down menu.
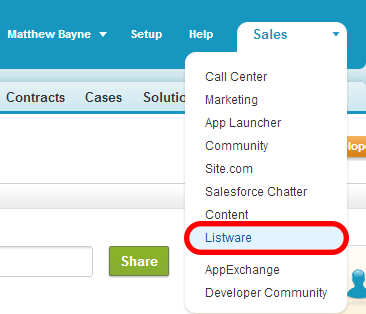
Select Clean Suite#
Enter a License Key#
For Clean Suite for Salesforce to work, you need a valid License Key from Melissa Data. You should have received one in your email from Melissa Data. If you did not receive a License Key from Melissa Data please contact us.
Enter your License Key. Make sure to click Save Settings once you are done.
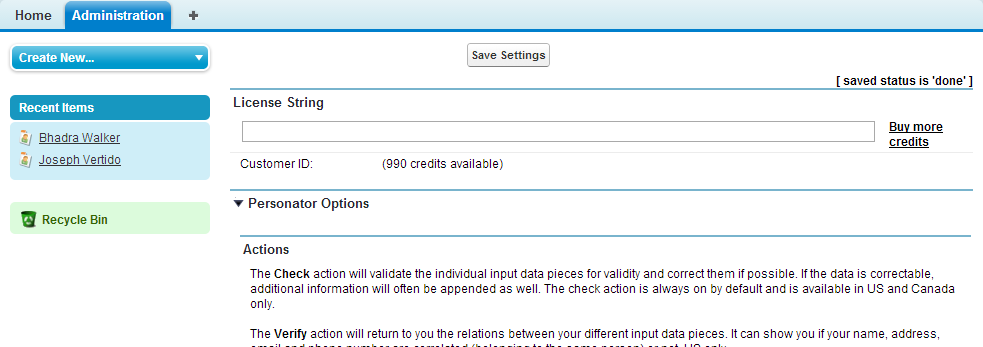
Enter a License Key#
Advanced Mappings#
Out of the box, Clean Suite for Salesforce allows support for the following Salesforce objects: Contact, Lead, and Account. If you need support for custom objects, please contact your sales rep about acquiring an Enterprise Key to unlock this functionality.
For each object, you’ll need to specify which fields contain the name, address, phone, and email. This can be configured under the Advanced Mappings tab. Advanced Mappings allows you to create input/output maps which indicates which fields per object contain the data you want to check/standardize and the fields to store the standardized results.
To set up the advanced mappings:
Click the Advanced Mappings tab.

Advanced Mappings#
Select the Object Type. If you have no enterprise key, you can only choose the Contact/Lead/Account Object Types.
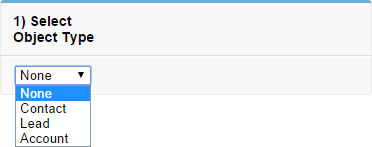
Object Types#
For advanced mapping to any salesforce object, including custom objects, you need an enterprise key. Contact Melissa Data support for more information.
Map your input and output mappings. The input mappings are the fields you want passed into Clean Suite. The output mappings are the fields you want Clean Suite to update after processing the input record. Once you’re satisfied with the mappings, click the Save Mapping button.
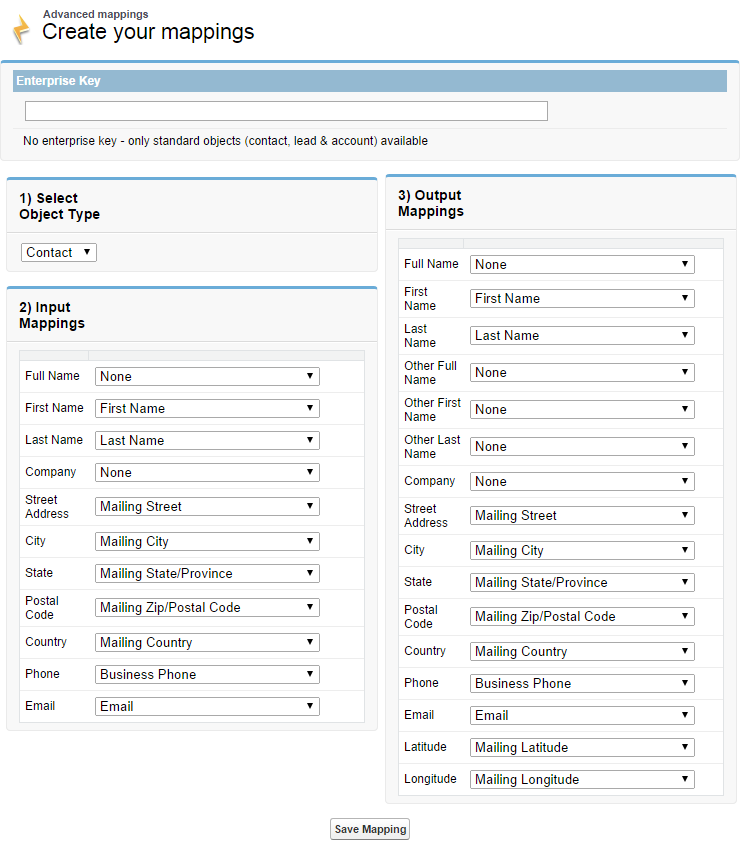
Mappings#
Notes#
All input fields selected must be strings. For example, the MailingAddress field in the Contact object can cause confusion because it is actually a special compound field.
These input/output map settings will be used in the Personator/Global Address Verification/Property components as well as the when doing batch processing. It’s very important that you review your settings to ensure everything is set correctly.
Full/First/Last Name vs Other Full/Other First/Other Last: Let’s say for example that one of your fields contains a name like this: John & Mary Babock. Through the Personator component, Clean Suite can parse out and break up the name into two separate names, with the first one containing John and the Other name containing Mary.
Latitude and Longitude: Geocoding of addresses can be done using the Clean Suite’s Personator and Global Address Verification components. In these cases, if you would like the longitude and latitude to be stored in the field of your choice, check first to see if the field you selected is capable of storing a DECIMAL or STRING.
Components#
Express Entry Component#
Clean Suite provides an ExpressEntry component that integrates address auto completion within Salesforce. To begin installing this component, access your Setup menu.
Here’s a guide to find this within Salesforce: https://help.salesforce.com/HTViewHelpDoc?id=basics_nav_setup.htm&language=en_US
Method #1 – Override New/Edit Actions#
In Setup, go to Customize → Contacts → Buttons, Links, and Actions:
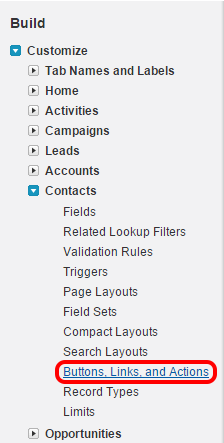
Customize → Contacts → Buttons, Links, and Actions#
Click the blue Edit link next to New in the Label column:

Edit link#
Next to Override With, select Visualforce Page and then select
MD_expressContactEditfrom the dropdown:
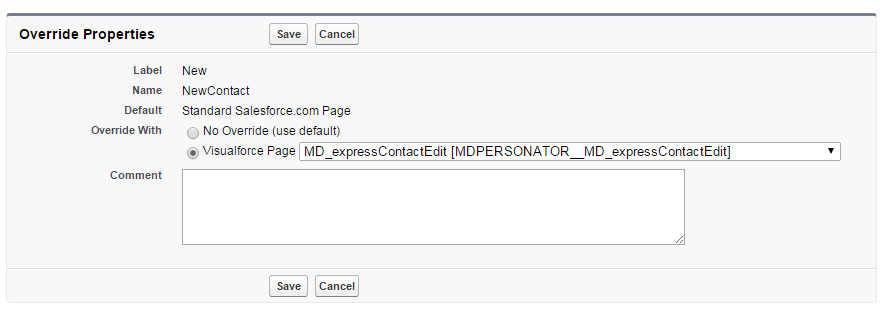
Select MD_expressContactEdit#
Click Save. You can also repeat steps 2 & 3 for the Edit action.
Create a new contact in Salesforce. When creating a new contact, ensure that you see
apex/MD_expressContactEditsomewhere in your URL to make sure that the Visualforce page selected in step 3 is being used.For example:

Create a new contact#
On the New contact page, we will now begin mapping the fields on this page. To map in the Mailing address fields, start off by getting the ID’s of each input element. Getting the ID’s will differ between browsers. As an example, in Chrome you can right click on the text field then click on Inspect element. This will bring up a panel in Chrome where you can find the id (id=”….) in the selected element:
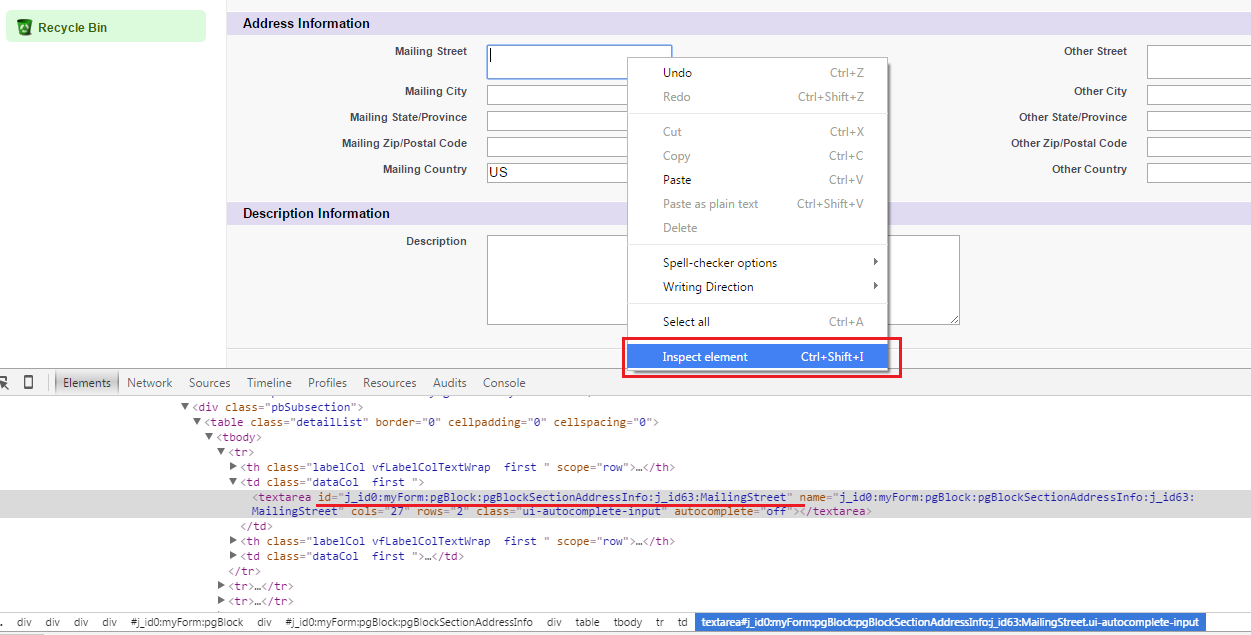
Inspect Element#
On a separate browser window or tab, go to the tab Clean Suite Express Entry Maps and then click on the New button to create a new Express Entry map:
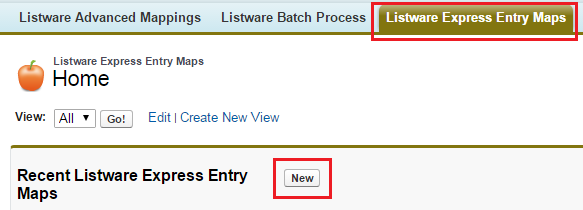
Clean Suite Express Entry Maps#
On the Express Entry Map Edit page, give the new mapping a name (something like Contact MailingStreet) and then for Object Prefix enter in apex. For the street, city, state, zip & country fields, copy and paste in the id’s that you’ve extracted from the other browser tab/window as detailed back in step 5. Save the mapping when finished:
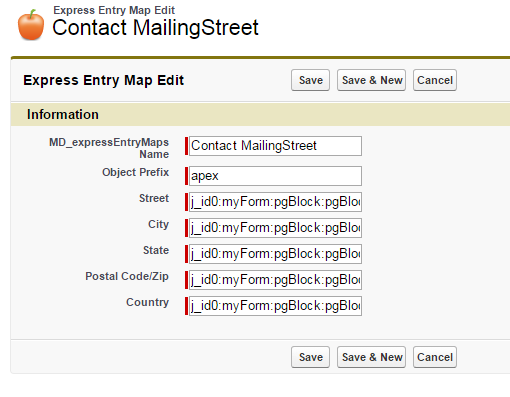
Contact MailingStreet#
After saving the mapping, if you now reload the new contact page or create a new contact, clicking on the Mailing Street field will now auto populate the Mailing Country field with the default country specified in Clean Suite Administration->Express Entry->Default country. Typing in the Mailing Street field will return suggestions based on the country entered in the Mailing Country field. Double clicking on the street field will clear out input fields. If this all works, then you have set up Express Entry successfully. For the Contact object, you can create a new Express Entry map for the Other address fields. Simply just follow the same steps that was done in this tutorial for the Mailing address fields.
Method #2 – Add component to page layout#
If overriding the New/Edit actions of your objects is not a viable option, the other method is to add an Express Entry component in to your Salesforce object’s page layout (what you see when you view the record). Using the Contact object as an example:
In Setup, go to Customize → Contacts → Page Layouts:
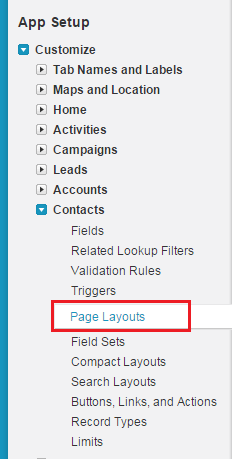
Customize → Contacts → Page Layouts#
Edit the page layout that you want to add the Express Entry component to:

Edit the page layout#
On the Edit Page Layout page, you’ll most likely want to create a new 1-Column Visualforce Page section in your page layout to contain the ExpressEntry component:
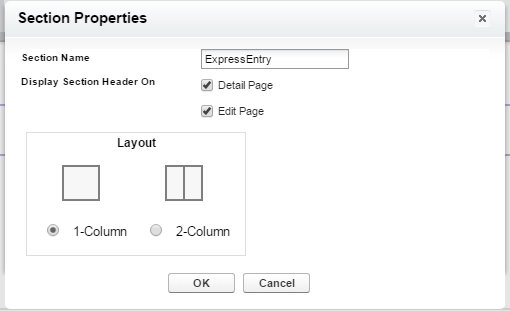
Create a new 1-Column Visualforce Page#
From the Visualforce Pages category, drag and drop
MD_expressEntryto the new section created in the previous step:
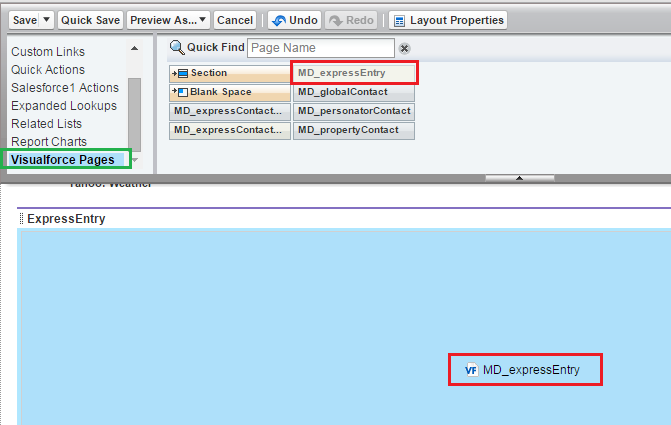
Drag and drop MD_expressEntry#
Save the page layout.
On a separate browser window or tab, go to the tab Clean Suite Express Entry Maps and then click on the New button to create a new Express Entry map:
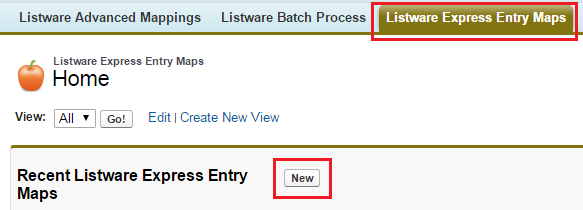
Clean Suite Express Entry Maps#
The Visualforce page that we added into the page layout back in step 4 contains two instances of the Express Entry Visualforce component (one for Mailing and another for Other). Therefore, create two mappings as such depicted below:
Contact Mailing
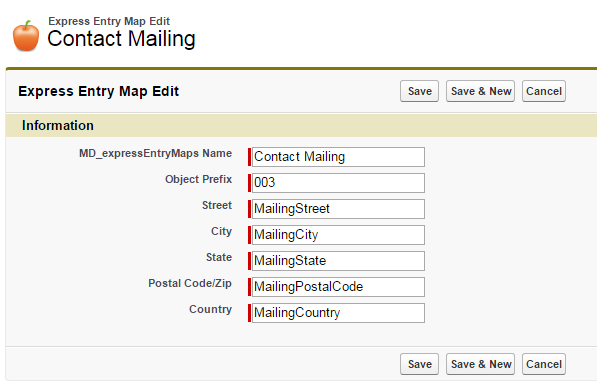
Contact Mailing#
Contact Other
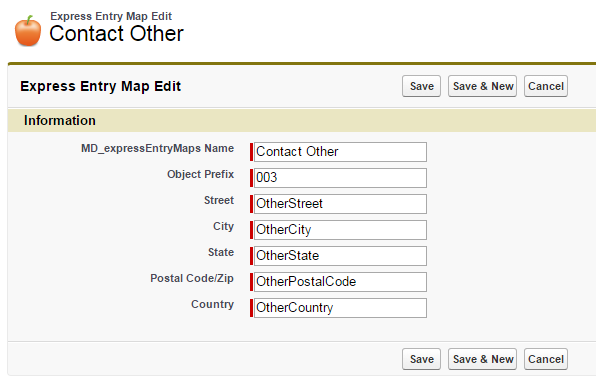
Contact Other#
After creating and saving both of these mappings, if you now view a Contact record the Express Entry components will now function:
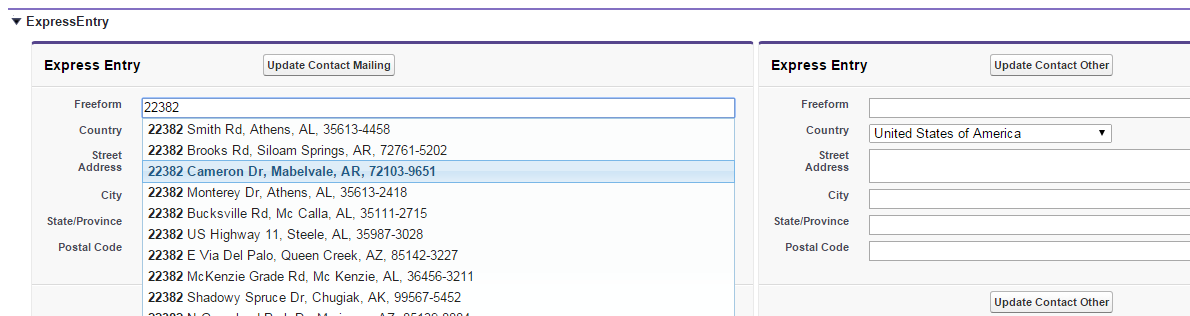
Express Entry Components#
Mobile#
ExpressEntry is also available as a Salesforce1 mobile component. Using the Contact object as an example:
Under Salesforce’s setup menu, go to Customize → Contacts → Page Layouts:
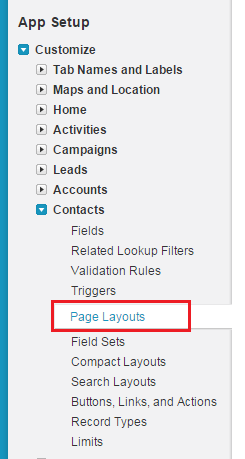
Page Layouts#
Edit the page layout that you want to add the Express Entry mobile component to:

Contact Page Layouts#
Go to the Buttons category and drag and drop ExpressEntry Mobile into the Custom Buttons section. Save the changes made to the layout:
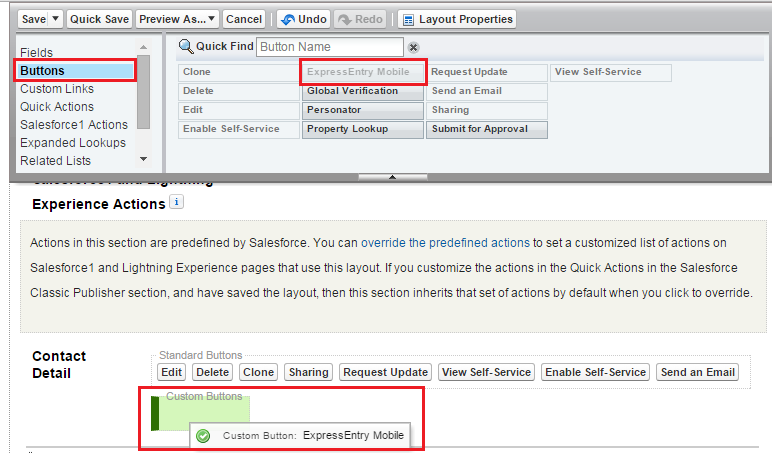
Buttons → ExpressEntry Mobile#
On a separate browser window or tab, go to the tab Clean Suite Express Entry Maps and then click on the New button to create a new Express Entry map:
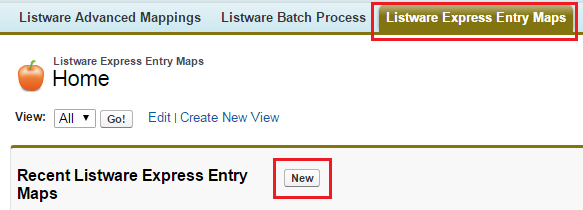
Clean Suite Express Entry Maps#
The Visualforce page that we added into the page layout back in step 4 contains two instances of the Express Entry Visualforce component (one for Mailing and another for Other). Therefore, create two mappings as such depicted below:
Contact Mailing
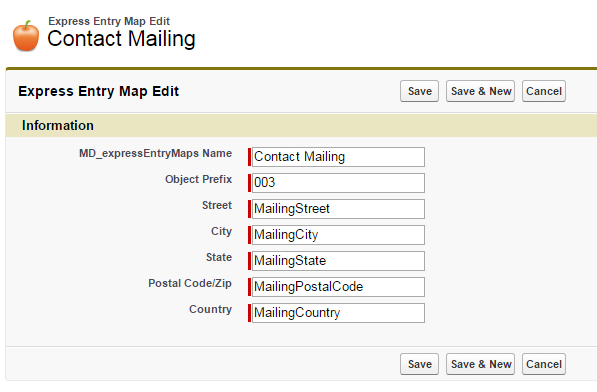
Contact Mailing#
Contact Other
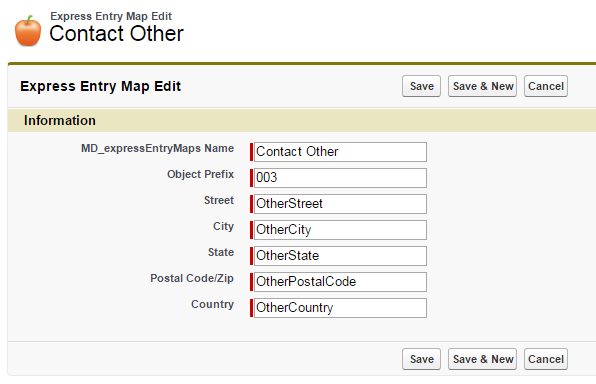
Contact Other#
Go into Salesforce1 and try viewing a Contact. You will now see ExpressEntry mobile as one of the buttons available for Contacts:
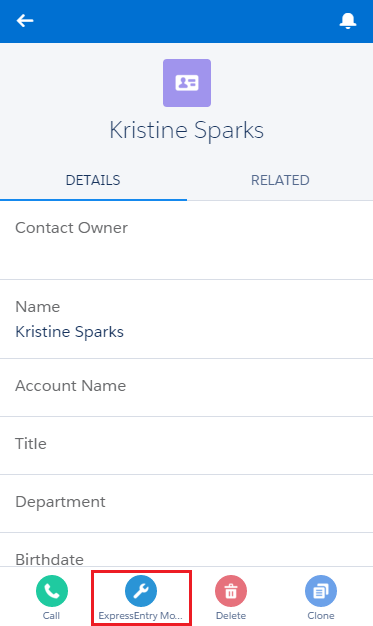
ExpressEntry Mobile Contacts#
Clicking on the button will bring up the ExpressEntry component which you can then begin to type an address into:
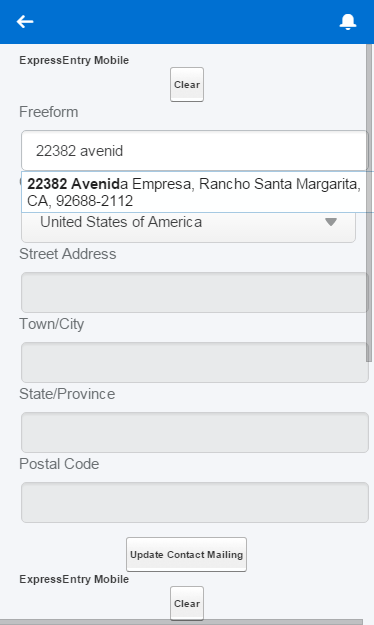
ExpressEntry Mobile#
Installing Visualforce Pages#
VisualForce pages (for use with Contact objects) for the Personator component are already included with Clean Suite. To add this component into your Contacts, use your Setup menu.
Here’s a guide to find this within Salesforce: https://help.salesforce.com/HTViewHelpDoc?id=basics_nav_setup.htm&language=en_US
Go to Customize → Buttons, Links, and Actions:
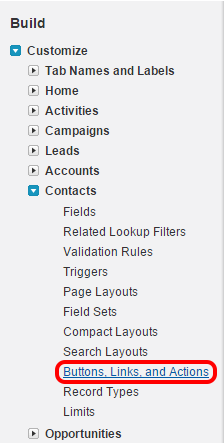
Click the Buttons, Links, and Actions Button#
The Visualforce page that we’ve provided is designed for use with the View action, so click Edit next to View:

Click Edit next to View#
Next to Override With, select the Visualforce page containing the component that you would like to use:
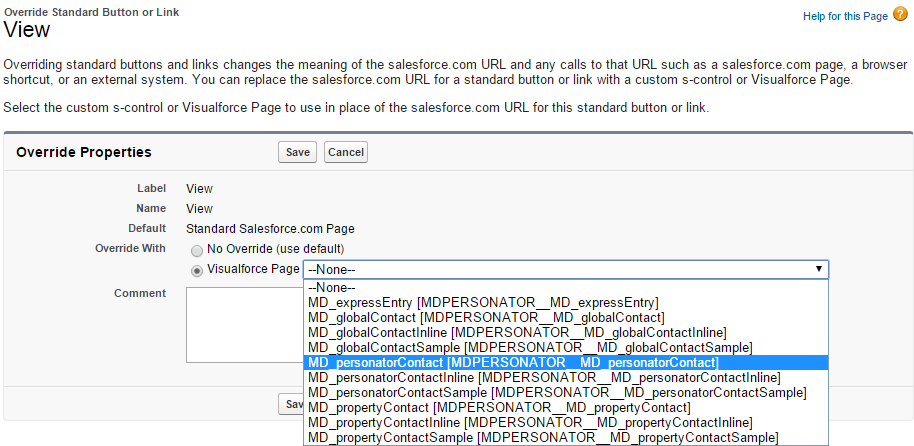
Select the Component you want#
Here you can select which Visualforce page to replace your view by picking which Clean Suite component that you would like to use:
MD_personatorContact- PersonatorMD_globalContact- Global Address VerificationMD_propertyContact- Property
You don’t have to use the Visualforce pages provided with Clean Suite. If you need to customize them or adapt functionality in some other way (for example, using the Personator component for your Contact objects or Property component for a custom object), you can simply use the included Visualforce pages as a template by opening them and viewing the Visualforce markup. You can then copy and paste the markup into your own custom Visualforce page and change the way they look or create your own Personator/Property/Global Address Verification components for your own custom objects.
Custom Visualforce Pages#
Clean Suite already provides Visualforce pages to use with Contact objects within Salesforce. If you would like to apply your own customizations or create new pages for other objects, please follow this guide as a model for customization. In this section, we will be creating a new Visualforce to use with Lead objects, using one of the included Visualforce pages for Personator as a template.
To start off, go to your Setup menu.
Here’s a guide to find this within Salesforce: https://help.salesforce.com/HTViewHelpDoc?id=basics_nav_setup.htm&language=en_US
Next, go to Develop → Pages:
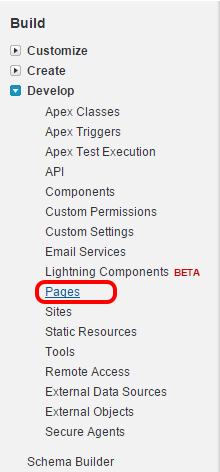
Select the Pages Button#
You should see a list of Visualforce pages that currently exist within your Salesforce organization. The ones installed by Clean Suite will exist within the MDPESRONATOR namespace. Go ahead and click on the name MD_personatorContact.

Select MD_personatorContact#
In the following page you should the markup for the MD_personatorContact Visualforce page. Highlight and select all the markup starting from <apex:page> down to the closing </apex:page> and copy it.
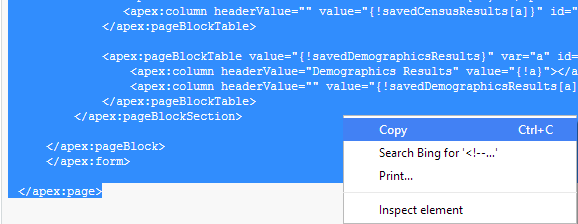
Copy the Markup#
Go back to Develop → Pages and now click on the New button.

Click the New Button#
In the new window, paste in the Visualforce markup that we copied from
MD_personatorContact. Replace the appearances of Contact in the markup with Lead. Give an appropriate Label and Name for the Visualforce page. Here’s an example of our new Personator Visualforce page for Leads:
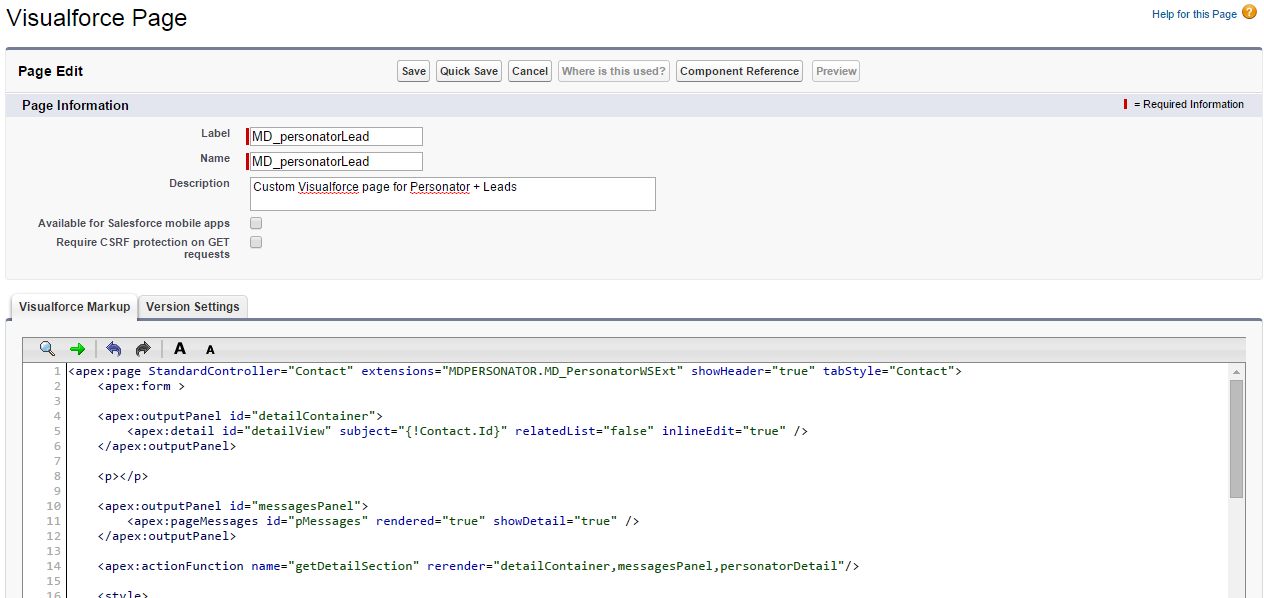
Paste the Markup#
Save the new page. You can now add this Visualforce page to your Leads.
Batch Processing#
Clean Suite provides US and global address batch processing. A couple of things to note before starting a batch job:
Decide which Salesforce object you want to batch process. Once you’ve decided, make sure that the appropriate mappings have been set under the Clean Suite Advanced Mappings tab.
If you worried about your data, please be sure to make a backup.
If you have triggers setup on the object that you want to process, they may interfere with the batch processing.
Starting a Batch Job#
The easiest way to start a batch job is to go to the tab Clean Suite Batch Process. You will then see a screen like this:
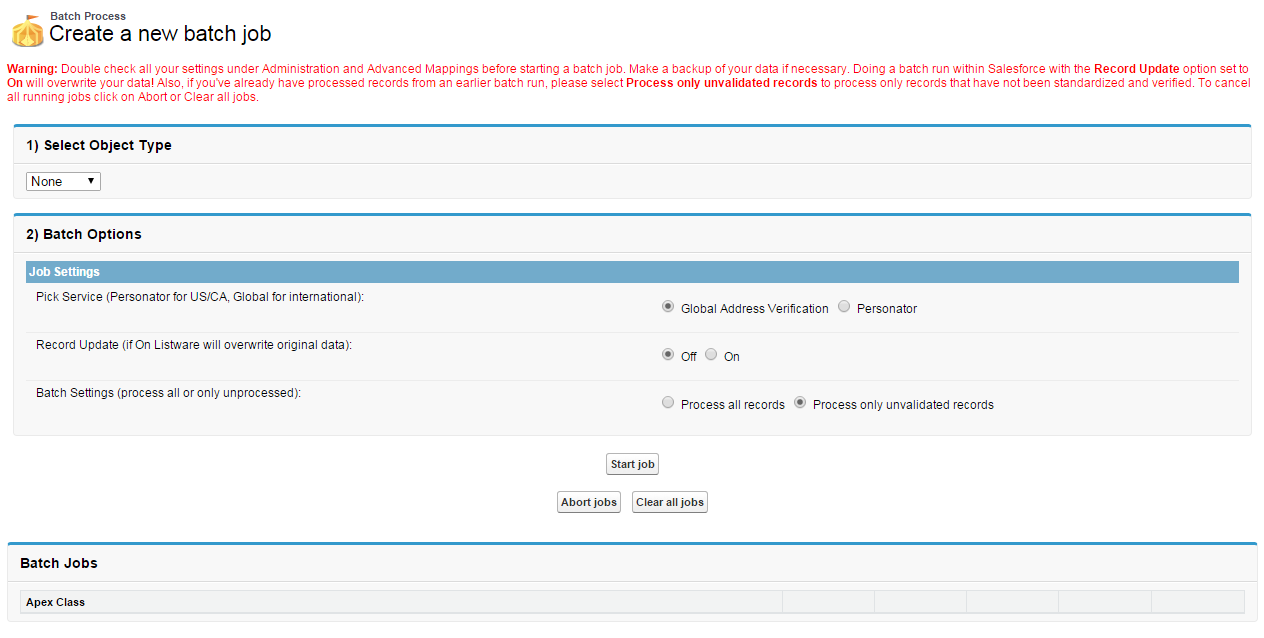
Starting a Batch Job#
Select an object type that you have already created a mapping for.
There are a few batch options that you can set: 1. Pick a service you would like to run the records through. If your records are located in the US or CAN, pick Personator. Otherwise, pick Global. 2. Record Update – If turned on, Clean Suite will then overwrite and standardize the original record provided it can validate the data. Otherwise, the results will be stored elsewhere and only viewable if you add in our Visualforce pages 3. Batch settings – Either process records that haven’t been processed/validated yet or process everything
Once you have selected your options click on the button Start job. If all the options are set correctly, a new job will appear below in the Batch Jobs box. You will then be able to monitor the progress of the jobs and cancel if necessary.
Viewing a Summary of the Batch Jobs#
After a batch job has finished, you can go to the Clean Suite Results/Summary tab. In there, you’ll be able to search records by the result codes from which you can then pinpoint records that validated and those that did not.
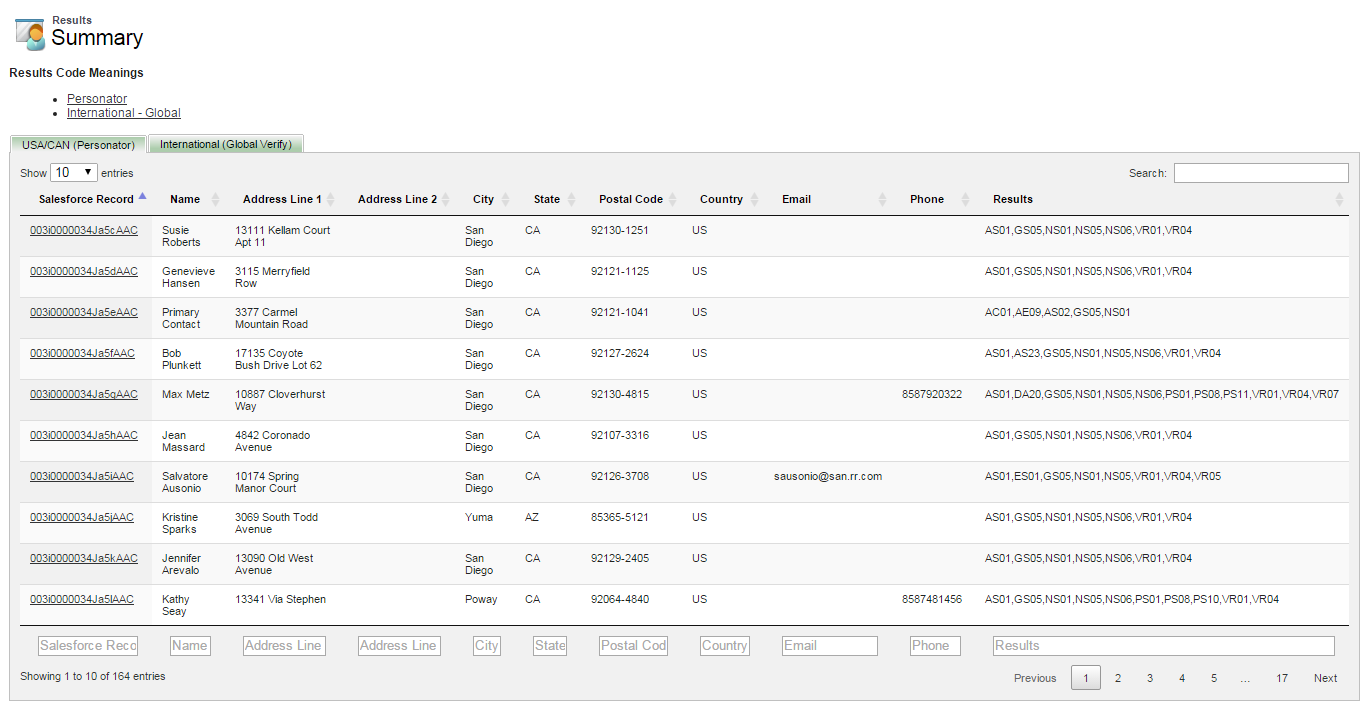
Viewing a Summary of the Batch Jobs#
Custom Batch Processing#
Note
This section is for advanced salesforce users/developers. Before proceeding, it is recommended that you have a fundamental grasp of SOQL and are comfortable with APEX code. Make sure all settings are correct before running a batch job, as batch jobs can result in unexpected record processing if not careful.
Starting a Batch Job#
An example of how to start up a batch job:
Id batchinstanceId = Database.executeBatch(new MDPERSONATOR.MD_PersonatorBatch('SELECT FirstName, LastName, MailingStreet, MailingCity, MailingCountry, MailingPostalCode, MailingState, Email, Phone, MailingLatitude, MailingLongitude FROM Contact', true, true), 100);
SOQL Query#
The part highlighted in cyan is the SOQL query and is how they specify what subset of records need to be processed. When SELECTing the fields, you must SELECT all the fields that mapped under the “Listware Advanced Mappings” tab for both the input and output. You can run the SOQL query:
SELECT MDPERSONATOR__inputMap__c, MDPERSONATOR__outputMap__c FROM MDPERSONATOR__MD_customMappings__c
and see the API names of the fields that were mapped in.
Boolean Parameters#
The part highlighted in purple are two Boolean parameters. The first one, if set true, will tell the batch process to update the Salesforce records with the clean/standardized data using the output mapping specified in Listware. The second one, if set true, will process all records returned by the SOQL query regardless of whether the record has been processed before using Listware.
Fixed Setting#
The last part, highlighted in yellow, should always be left to 100 and should not be adjusted.