

Reference Only
Melissa legacy products are for reference only. They are NOT recommended for new development.
If you have any questions about any of these features, please feel free to contact Melissa Support at Tech@Melissa.com or 800-MELISSA ext. 4 (800-635-4772 ext. 4).
Reference Guide#
Introduction#
Express Entry Desktop is an application that helps you fill out forms on the web or in screens in Windows applications. Express Entry Desktop’s GUI interface will send a verified and standardized address to the screen or form of your choice, with no programming required.
Express Entry Desktop can:
Save Data Entry Time
Protect against fraud
Reduce costs associated with re-shipping
The Express Entry Desktop application is driven by a simple input/output template system, which allows the flexibility of filling out diverse forms while delivering the power of Melissa Data’s Express Entry Web Service to your desktop and web applications.
System Requirements#
Minimum Requirements#
Windows 7
Java 8 (Will be installed when setting up the application)
128 MB hard-disk space (for Java and Express Entry Desktop)
Internet Access is required
Recommended Requirements#
Windows 7
Java 8 Update 25
168 MB hard-disk space (for Java and Express Entry Desktop)
Broadband Internet Access
Installation#
To install, run Setup.exe, and follow the on-screen prompts:
Download ftp://ftp.melissadata.com/Updates/EEDesktop2.2.24.zip
Extract the
setup.exefile in the.zip, the zip password will be given by your sales rep.Follow the setup prompts, entering your License Key and installing Java as necessary (you might have to uninstall Java from your machine for this step, and let the installer download the correct version for Express Entry Desktop).
Once Express Entry Desktop is installed, go into the icon properties and for
Targetadd<space>password=whitney(without the quotes), or you will only see ‘configuration’ under ‘settings’ and won’t be able to Manage Templates.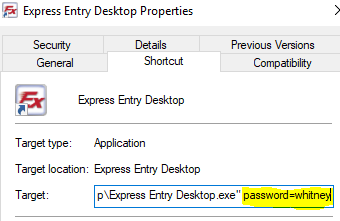
At this point you should be ready to set up templates. If you are deploying to multiple machines, you can simply copy
config.xmlfrom the Express Entry Desktop directory to the target machines, and your License Key, input template, and output templates will be preserved.
The License Key may be inserted during the Setup process, or upon first use of the software.
Starting Express Entry Desktop#
Start Express Entry Desktop by running the Express Entry Desktop icon on your desktop.
This will load the program and it will be immediately usable. To ensure full utilization of this software, you will need to modify the templates.
Licensing#
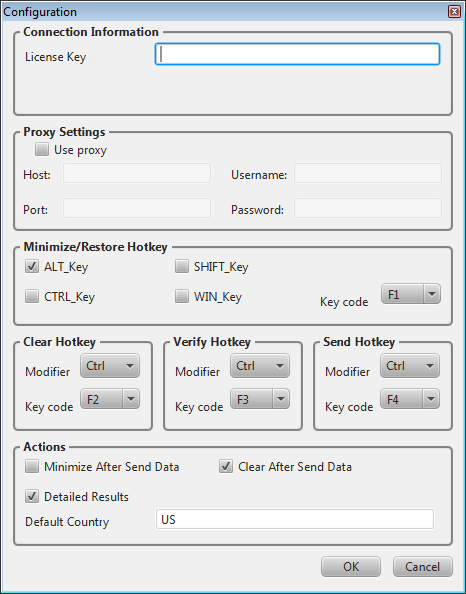
All licensing is handled by the License Key located under Connection Information, from the Configuration window. Without a License Key, Express Entry Desktop will not function.
To access the License Key, navigate to Settings > Configuration.
License Key and Demo Information#
Customers who have purchased the Melissa Data Components or any trials of the product will be issued a License Key by a Melissa Data sales representative.
Tutorial#
Hotkeys! Be sure to set/use hotkeys to maximize your time. For more information, see Configuration.
Configuration#
Navigate to Settings > Configuration.
Set up the Express Entry Desktop Configuration. See Configuration.
Assign Output Templates#
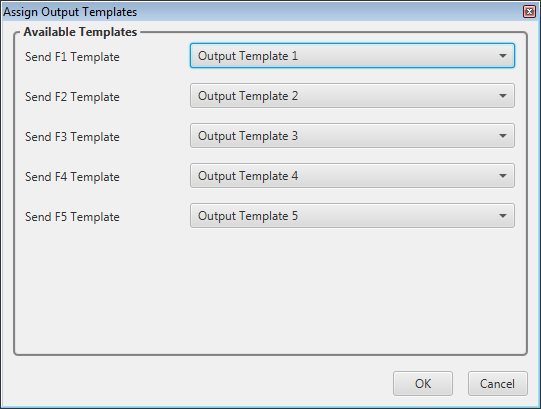
Assign output templates to F1-F5 Hotkeys. This will depend on the applications you are using in conjunction with Express Entry Desktop.
Manage Templates#
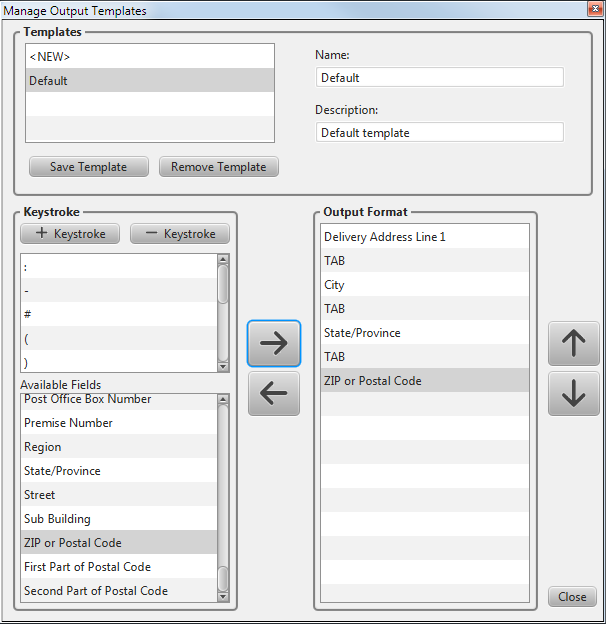
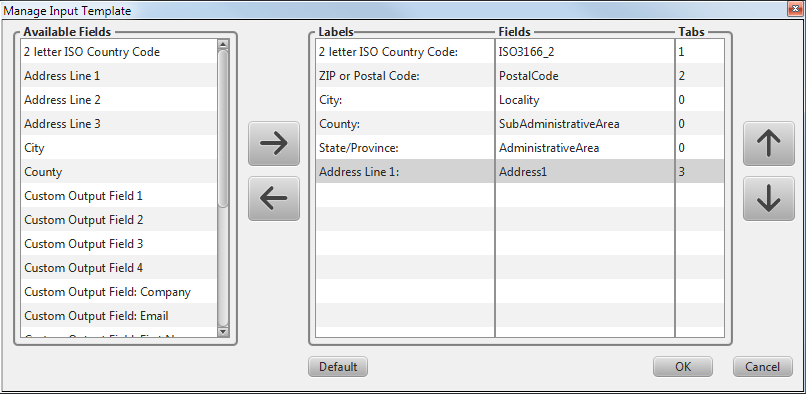
If you need to modify any input or output templates, use the Manage Input Template and Manage Output Templates windows to setup the template.
Enter Data#
Start by entering a zip code, then select the desired city/state from the drop down that appears. Then move to the Address and start entering the address. Select the desired address from the drop down that appears.
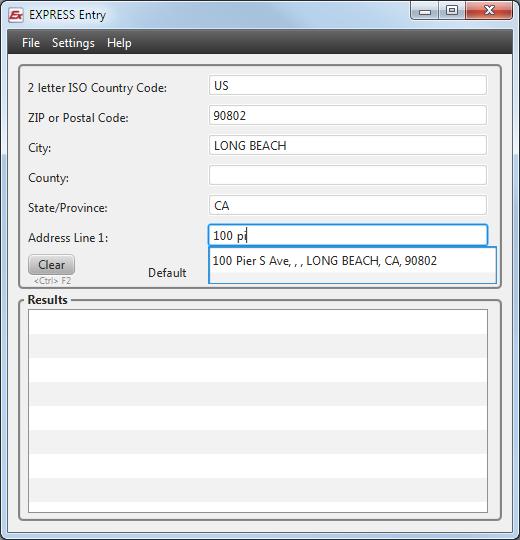
The DPV indicator lights when a U.S. address is chosen - all U.S. addresses in Express Entry are Delivery Point Verified.
Verify Data#
Once you have an address filled out, verify the data.
Either click the button or use the hotkey (Default is <Ctrl> F4).
This will verify the data and show you results.
Note: Certain fields in the output template require this verification step. The fields are: County (Subadministrative Area), Thoroughfare Pre Directional, Thoroughfare Leading Type, Thoroughfare Name, Thoroughfare Trailing Type, and Thoroughfare Post Directional, which are supported by certain countries in the service.
Use Data#
Utilize the data. Click the hotkey with which you want to send the data. There are up to 5 hotkeys, and each can be assigned a different output template. Be sure to set up output templates to make the most of this functionality.
Software#
The main screen is where you will do the majority of your express entering. This uses the input template, which is configurable.
Main#
- Country
The Country. US by default.
- Zip Code
The ZIP Code of the address. Start your lookup by entering in the zip code here first.
- CIty
The city associated with the zip code.
- State
The state associated with the zip code.
- Address1
The street address. This is usually the second step of express entry.
- Clear
Click here to clear the form.
- Verify
Click here to verify the entered address. Any results will be shown in the Results section.
- Send
Click here to ‘send’ (copy) the data to the last used window, aside from Express Entry Desktop.
- Results
This section shows the verification results of the address. Use this to determine the quality of the input address.
Configuration#
onfiguration is located under Settings > Configuration.
Connection Information#
The Express Entry License Key is required to use Express Entry.
If you have purchased Express Entry Desktop you should have been issued a License Key via email. If you did not receive this email or cannot find your License Key, contact your Melissa representative.
Express Entry Desktop License Key Required. The Melissa Data Customer License Key for Express Entry Desktop.
Proxy Settings#
- Use proxy
If your network uses a proxy server, enter the information below to enable Express Entry Desktop to function.
- Host
The proxy host information.
- Port
The proxy port information.
- Username
The user name for the proxy server.
- Password
The password for the proxy server.
Global Hotkeys#
Toggle the minimization/restoration of Express Entry Desktop. I.E. If the window is currently on screen, it will be minimized to the taskbar. Alternatively, if the window is currently minimized to the taskbar, it will be restored on screen.
<Alt> A by default.
- ALT_Key
Check this to require the use of this modifier. You may use more than one.
- CTRL_Key
Check this to require the use of this modifier. You may use more than one.
- SHIFT_Key
Check this to require the use of this modifier. You may use more than one.
- WIN_Key
Check this to require the use of this modifier, the Windows key. You may use more than one.
- Key code
Select the key code for this hotkey (Alpha-numeric).
Clear Hotkey#
The hotkey for the clear button. <Ctrl> F3 by default.
- Modifier
Select the modifier for this hotkey (
Ctrl,Alt, orNone).- Key code
Select the key code for this hotkey (Alpha-numeric or F3-12).
Verify Hotkey#
The hotkey for the verify button. <Ctrl> F4 by default.
- Modifier
Select the modifier for this hotkey (
Ctrl,Alt, orNone).- Key code
Select the key code for this hotkey (Alpha-numeric or F3-12).
- Send Delay
Specifies the amount of delay between fields when outputting an address (for systems that need it, such as some mainframes).
Actions#
- Minimize After Send Data
Check this to automatically minimize the Express Entry Desktop window after you click send.
- Clear After Send Data
Check this to clear the main screen after you click send.
- Detailed Results
Check this to see detailed results in the main screen’s Results Window.
- Send All Caps
Check this to send results in uppercase (for mailing labels, etc.).
- Default Country
Choose the default country for the main window.
Assign Output Templates#
Assign Output Templates is located under Settings on the main screen.
Note: In older versions of Express Entry Desktop, this menu option is replaced by Select / View Output Template.
Here you can assign output templates to the five available hotkeys as desired.
Manage Output Templates#
Manage Output Templates is located under Settings > Manage Output Templates.
Templates#
Select a template name to edit it, or select <NEW> to start a new template.
- Name
Displays the editable name of the selected template.
- Description
Displays the editable description of the selected template.
- Save Template
Any changes to the selected template will be saved when you click this button.
- Remove Template
This button deletes the selected template.
Keystroke#
Use the left and right arrow buttons to the right of this section to add the selected keystroke or field to the Output Format list.
- Keystroke
This button opens a pop-up to select a keystroke to add to the list.
- Keystroke
This button removes the selected keystroke from the list.
- Keystroke list
This list is controlled by the two buttons above it, + Keystroke and - Keystroke.
Available Fields#
This list holds all available fields for possible output. Some fields require the ‘verify’ button to be clicked before they will output address information.
Output Format#
This list displays the format of keystrokes and fields to be output.
Use the up and down buttons to the right of this section to arrange the order of the selected elements in the Output Format list.
Manage Input Template#
Manage Input Template is located under Settings > Manage Input Template.
Available Fields#
This list displays all available input fields.
Use the left and right arrow buttons to the right of this section to add the selected field to the field order list.
Field Order#
This list displays the format field labels, the format fields, and their tabbing order.
Use the up and down buttons to the right of this section to arrange the order of the selected elements in this section.
- Labels
A descriptive label you can assign to the selected input field. Double-click to edit.
- Fields
The type of input field.
- Tabs
The tab order of the selected input field. Double-click to edit.
- Default
Clicking this button will reset the input template to the default template.